ADVERTISEMENT
The speed of this recipe is its greatest asset. From melting to scooping, the whole process takes less than 15 minutes before the chill time begins. Efficiency is key, as the mixture thickens quickly once the heat is removed.
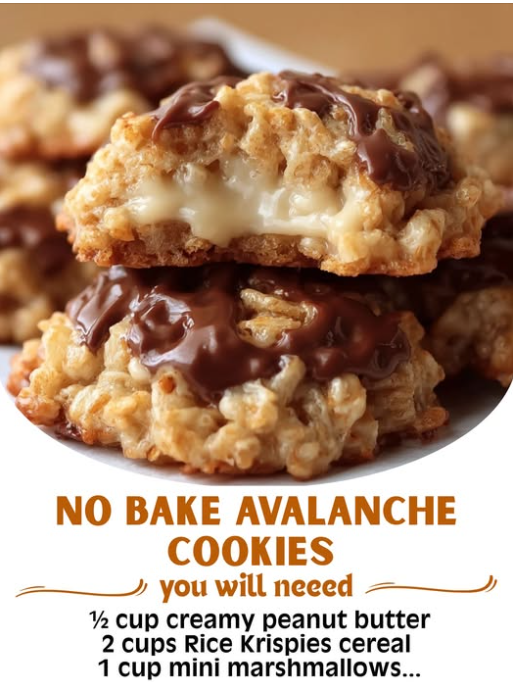
- The Melting Foundation: Place the **1 cup of white chocolate chips** and the **½ cup of creamy peanut butter** into a microwave-safe bowl. Heat on medium power for 60 seconds. Remove and stir thoroughly. The white chocolate may not appear fully melted yet. Return to the microwave for two more bursts of 30 seconds, stirring vigorously after each interval. Continue until the mixture is perfectly smooth, glossy, and completely lump-free. *Do not overheat*, as white chocolate scorches easily and will seize into a grainy, unusable paste.
- The Blending Moment: Once the peanut butter and white chocolate binder is a uniform, velvety liquid, immediately pour the mixture over the **2 cups of Rice Krispies cereal** in a large mixing bowl.
- The Folding Technique: Using a rubber spatula, quickly and gently fold the cereal into the melted mixture. The goal is to coat every piece of cereal without crushing it. Work from the bottom of the bowl upward, folding the ingredients over one another. Stop mixing the moment all the cereal is coated. Over-mixing can break up the delicate cereal pieces and dull their crunch.
- The Scoop and Drop: Working quickly before the mixture sets, use a medium cookie scoop (about 1.5 tablespoons) or two spoons to drop rounded mounds onto your prepared, parchment-lined baking sheet. Leave a small amount of space between each cookie. The size is entirely up to your preference, but consistency ensures even setting time.
- The Chill Time: Place the baking sheet into the refrigerator. Allow the cookies to chill and set completely for a minimum of **15 to 20 minutes**. The rapid cooling helps the white chocolate binder re-solidify quickly, locking the texture into place. Do not attempt to move or handle the cookies before they are firm to the touch.
- Ready for Consumption: Once firm, the cookies will peel effortlessly away from the parchment paper. They are now ready to be served, stored, or beautifully packaged.
The secret to perfect avalanche cookies lies in the minimal-contact blending and the immediate cooling. This preserves the cereal’s light, intact structure, which is the heart of the recipe’s crunch factor.
Serving and Storage: Maintaining the Perfect Snap
The resilience of the No Bake Avalanche Cookie makes it an outstanding choice for any occasion, from casual snacking to elegant party platters. Their stability means they require less fuss than traditional baked goods.
Serving Recommendations:
- Room Temperature: While they are made in the refrigerator, these cookies are best enjoyed at cool room temperature, about 10-15 minutes after being taken out of the fridge. This allows the peanut butter binder to soften slightly, maximizing the creamy chewiness against the cereal’s crispness.
- Hot Chocolate Accompaniment: Serve them alongside a mug of hot chocolate or coffee. The sweetness and crunch perfectly complement the rich bitterness of the hot beverages.
- Presentation: Arrange them on a tiered platter or in colorful mini cupcake liners for an elevated presentation. A drizzle of melted milk chocolate (see Variations) takes the visual appeal to the next level.
Optimal Storage:
The enemy of the Avalanche Cookie is heat, which can cause the white chocolate binder to melt and the cookies to collapse into a sticky pile. They are happiest and most stable when stored in a cool environment.
Store the cookies in an **airtight container** in the **refrigerator**. Layer them between sheets of parchment paper if stacking. Stored correctly, they will maintain their perfect texture and freshness for up to **one week**.
For longer preservation, they freeze beautifully. Place the set cookies in a freezer-safe zip-top bag, removing as much air as possible, and freeze for up to **three months**. Thaw them in the refrigerator, or simply enjoy them frozen—many find the intense chill enhances the cookie’s hard snap!
Tips: Mastering the No-Bake Method
Expert Tips for No-Fail Cookies:
- The Microwave is Key: Use medium power (50-70%) on your microwave when melting the chips. High power will heat the white chocolate too quickly, causing it to seize or burn before it can melt completely. Patience here prevents frustration.
- Keep it Cool: The cereal should be at room temperature, not cold, but do not heat the cereal. The difference in temperature between the hot binder and the cool cereal is what helps the mixture begin to set quickly, aiding in the scooping process.
- Use Wax Paper or Parchment: Never drop the cookies directly onto a bare metal or plastic surface. Even a lightly greased surface will not guarantee easy removal. Parchment paper is the single greatest tool for successful no-bake confectionery.
- Scoop Consistency: Using a cookie scoop is the best way to ensure every cookie is uniform in size, which looks professional and allows you to accurately track how many batches you’re making.
Variations: Customizing Your Avalanche
Once you have mastered the foundational three-ingredient recipe, the Avalanche Cookie becomes a customizable platform for seasonal and flavor variations.
The Texture Boosters:
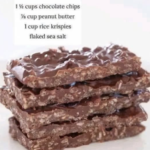
- The Crunch-Factor: Add **½ cup of miniature pretzel pieces** to the cereal before mixing. The extra salt and thick crunch offer a delicious new layer of complexity.
- Chewy Center: Mix in **½ cup of mini marshmallows** (added in with the cereal) for pockets of gooey chewiness that contrast beautifully with the snap of the cereal.
The Flavor Swaps:
- Peanut Butter Cup Avalanche: Swap the white chocolate chips for **milk chocolate chips** and reduce the peanut butter slightly (to ¼ cup). This creates a flavor profile reminiscent of a deconstructed peanut butter cup.
- The Seasonal Pumpkin Spice: Add **1 teaspoon of pumpkin pie spice** and **½ teaspoon of vanilla extract** to the melted binder before adding the cereal. Use fall-themed sprinkles for a festive look.
The Gourmet Finish:
Melt 2 ounces of dark or milk chocolate. Once the cookies are set, drizzle the melted chocolate over the tops using a fork or a piping bag. While the drizzle is still wet, sprinkle the cookies with a pinch of **flaky sea salt** for a gourmet, salted chocolate finish that instantly elevates the treat.
Conclusion: The Ultimate Time-Saving Delight
The No Bake Avalanche Cookie stands as a testament to the idea that the best treats are often the simplest. By perfecting the balance between a rich, stable binder (white chocolate and peanut butter) and a light, textural agent (Rice Krispies), we have created a dessert that is consistently sweet, crunchy, and irresistibly satisfying. This article has provided the blueprint for flawless execution, from the three essential ingredients to the rapid setting process.
Whether you’re battling a heatwave and refusing to turn on the oven, or you simply need a last-minute contribution to a bake sale, these cookies are your culinary superhero. They require no special skill, yet they deliver a flavor that feels indulgent and complex. Master the core technique, embrace the simple science of the quick-setting binder, and enjoy the praise that inevitably follows when you share these delightful, crunch-filled avalanches of joy.
Frequently Asked Questions: Troubleshooting and Clarifications
Q: Why did my cookies not set properly and remain too soft?
A: This is usually a sign of **too much peanut butter** or not enough white chocolate. The white chocolate is the primary setting agent. Ensure you are using exactly the specified ratios. Also, check your peanut butter; if it’s an all-natural, oily kind, the extra oil can interfere with the setting process. Using a standard, stabilized creamy peanut butter is essential.
Q: Can I use different cereals instead of Rice Krispies?
A: Yes, but the texture will change. Cereals like Corn Flakes, Cheerios, or even crushed Captain Crunch can work. However, the delicate, airy structure of the Rice Krispies is what gives the “Avalanche” cookie its signature light crunch. Other cereals will result in a denser, heavier cookie.
Q: My white chocolate seized and turned lumpy when I melted it. What went wrong?
A: White chocolate seizes for two main reasons: **overheating** (too much heat, causing the cocoa solids to burn) or the introduction of a **tiny amount of water** (even steam is enough). Always melt on medium power and keep the bowl and stirring utensil completely dry.
Q: Can I make these in advance for a party?
A: Absolutely! These are one of the best make-ahead party treats. Store them in an airtight container in the refrigerator for up to a week. They will be perfectly fresh and crunchy when serving time arrives.
ADVERTISEMENT