- The Membrane (Crucial Step): Flip the ribs bone-side up. Locate the thin, silvery membrane (the pleura). Use a butter knife to loosen it at one corner, then grab it with a paper towel and pull it off. Removing this allows the seasoning to penetrate the meat and prevents a “leathery” texture.
- The Bind and Rub: Pat the ribs completely dry. Coat both sides with a thin layer of olive oil. Mix your dry rub ingredients in a small bowl and sprinkle generously over the ribs, pressing the spices into the meat. Let them sit for at least 30 minutes at room temperature.
- The Slow Cook: Preheat your oven or smoker to 275°F (135°C). Wrap each rack tightly in heavy-duty aluminum foil. This creates a steam chamber that breaks down the collagen quickly. Place on a baking sheet and cook for 2 to 2.5 hours.
- The Bend Test: Carefully open the foil. Use tongs to lift the rack; if it bends easily and the meat has started to pull back about 1/4 inch from the ends of the bones, they are ready for the glaze.
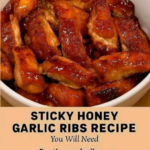
- The Glaze: Remove the ribs from the foil. Brush a thick layer of BBQ sauce over the top. Increase the heat to 400°F (200°C) or move them to a hot grill.
- The Caramelization: Cook uncovered for 10–15 minutes. The sugars in the sauce should bubble and become tacky, creating a “lacquered” finish. Watch closely to prevent burning.
- The Rest: Let the ribs rest for 10 minutes before slicing. This allows the juices to redistribute so the meat doesn’t dry out the moment you cut it.
Serving and Storage
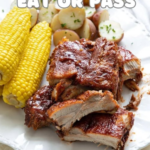
Serving: Ribs are best served family-style on a large wooden board. Pair with classic sides like vinegar-based coleslaw, cornbread, or a hearty potato salad to balance the sweetness of the BBQ sauce.
Storage: Leftover ribs can be kept in the refrigerator for up to 4 days. To reheat without drying them out, wrap them in foil with a splash of apple juice or water and heat at 300°F until warm.
Tips: The “Pull” vs. “Fall-Off-The-Bone”
In the world of professional BBQ, “fall-off-the-bone” is actually considered overcooked. You want the meat to come off the bone easily when you bite it, but it should still have a little “tug.” If the bones slide out like a hot knife through butter, you’ve gone slightly too far in the foil stage—but don’t worry, they will still taste delicious!
Variations: Customizing Your Smoke
- The Spicy Kick: Add ½ teaspoon of cayenne pepper or chipotle powder to the dry rub for a lingering heat.
- The Apple Infusion: Spritz the ribs with a mixture of 50/50 apple juice and apple cider vinegar every hour during the cooking process to add brightness and moisture.
- The Dry Rib: Skip the BBQ sauce glaze entirely. Instead, apply a second, lighter dusting of the dry rub 15 minutes before the ribs are finished for a “Memphis Style” dry rib.
Tips: Why the Rest Matters
When meat is hot, the muscle fibers are tight and the juices are fluid. If you cut into a rack of ribs immediately after taking them off the heat, those juices will run out onto your cutting board, leaving the meat fibers dry. By resting the ribs for 10 minutes, the fibers relax and re-absorb that moisture, ensuring every bite is succulent.
Conclusion: The Ultimate Backyard Reward
Mastering BBQ ribs is a rite of passage for any home cook. It requires patience, attention to detail, and a respect for the process. By removing the membrane, layering your flavors with a rub and a glaze, and respecting the “low and slow” temperature, you produce a meal that is simple, nourishing, and incredibly satisfying. There is no better feeling than leaning back after a rib dinner and knowing you’ve mastered the flame.
Would you like me to help you create a specific shopping list for this BBQ feast, or perhaps suggest a homemade BBQ sauce recipe from scratch?
Frequently Asked Questions
- Do I have to use foil?
- While you can cook them “naked,” the foil (often called the “Texas Crutch”) speeds up the cooking process and guarantees tenderness by steaming the meat in its own juices.
- Can I make these a day in advance?
- Yes! You can do the 2-hour foil bake the day before. On the day of serving, just do the final glazing and caramelization step to refresh them.
- What is the difference between Baby Back and Spare Ribs?
- Baby backs are cut from the top of the rib cage near the spine; they are smaller and leaner. Spare ribs are cut from the bottom near the belly; they are larger, fattier, and take longer to cook but offer a deeper pork flavor.