
Step 1: The Searing and Seasoning
- Heat a large skillet over medium-high heat. Add the **ground beef**, breaking it apart with a spatula until it is browned and crumbled.
- Drain the excess grease. Leaving the fat in the pan will lead to a soggy tortilla.
- Follow the packet instructions to add the **taco seasoning** and water. Let it simmer for 5 minutes. You want the liquid to evaporate until the beef is coated in a thick, flavorful sludge.
Step 2: Preparing the “Liquid Gold”
- Warm the **nacho cheese sauce** either in a small saucepan or in the microwave. If it feels too thick, add 1 teaspoon of milk to reach a smooth, pourable consistency.
Step 3: The Assembly Line
- Lay the **tortilla** flat. Professional Tip: Warm the tortilla in a dry pan for 10 seconds first to make it more pliable.
- Spread a generous layer of nacho cheese down the center.
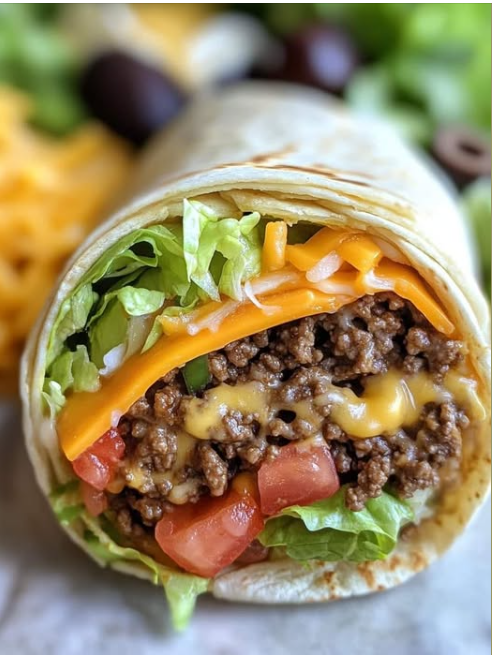
- Spoon the beef over the cheese. Layer the lettuce, tomatoes, olives, and finally the shredded cheddar on top.
Step 4: The Tight Roll
- Fold the two side edges in about 1 inch.
- Starting from the bottom, roll the tortilla upward, tucking the filling in tightly as you go. This creates a secure “pocket.”
Expert Tips for a Professional Wrap
Tip 1: The “Toasting” Trick
For an extra-special fiesta experience, place the finished wrap back into the skillet (seam-side down) for 60 seconds. This “seals” the wrap and creates a delicious, golden-brown crunch on the outside of the tortilla.
Tip 2: Temperature Contrast
To keep the lettuce from wilting immediately, allow the beef to rest for 2 minutes before assembling the wrap. This ensures the “warm” elements are pleasant to eat without destroying the “cold” elements of the salad portion.
Tip 3: Homemade Nacho Cheese
If you have an extra 5 minutes, you can make a quick nacho sauce by melting 1 cup of shredded cheddar with 1/4 cup of whole milk and a pinch of flour. It tastes fresher than the canned version and allows you to control the salt levels.
Variations: Making the Fiesta Your Own
| Variation | Modification | Best For |
|---|---|---|
| **The Spicy Fiesta** | Add diced jalapeños and use “Hot” taco seasoning. | Heat-seekers and adults. |
| **The Lean Fiesta** | Substitute ground beef for ground turkey or chicken. | A lower-calorie, high-protein alternative. |
| **The Veggie Fiesta** | Swap beef for black beans and sautéed bell peppers. | Vegetarians and meatless Mondays. |
| **The Loaded Fiesta** | Add corn, rice, and crushed tortilla chips inside. | A massive, filling meal-in-one. |
Serving and Storage
These wraps are best served fresh, but the components are perfect for meal prepping.
- **Serving:** Serve with **sour cream and salsa** on the side for dipping. A side of Mexican rice or refried beans rounds out the meal perfectly.
- **Storage:** Store the beef and cheese separately from the fresh vegetables. The beef will stay fresh in the fridge for up to **4 days**.
- **Reheating:** Reheat the beef in the microwave for 45 seconds, then assemble the wrap with fresh lettuce and tomatoes for a “just-made” taste.
Conclusion: A New Weekly Tradition
The Cheesy Beef Fiesta Wrap is proof that you don’t need a lot of time to create a meal that feels like a celebration. By balancing the warmth of the seasoned beef and nacho cheese with the cool, fresh snap of garden vegetables, you’ve created a dish that hits every flavor note. Whether it’s a quick lunch or a fast-paced dinner, this wrap is a guaranteed winner.
Happy Fiesta!
Frequently Asked Questions
Q: My wrap keeps falling apart. What am I doing wrong?
A: Most likely, the tortilla is either too cold (making it brittle) or you are overfilling it. Try warming the tortilla first and leaving at least 2 inches of space on the edges.
Q: Can I make these in an Air Fryer?
A: Yes! After rolling the wrap, place it in the air fryer at $375^{\circ}\text{F}$ for 3 minutes. It will come out incredibly crispy, like a giant chimichanga!
Q: How do I make this kid-friendly?
A: For kids, you can omit the olives and use a “Mild” taco seasoning. You can also cut the wrap into “pinwheels” (1-inch slices) to make them easier for small hands to manage.
Related posts:
 Nacho Cheese Beef Wraps: The Definitive Crunch-Wrap Alternative
 The Ultimate Homemade Beef Meximelt
 Nacho Cheese Beef Wraps: The Secret to a Perfect Family Dinner
 Dorito Taco Salad: The Perfect Fusion of Crunch and Freshness
 The Ultimate Guide to French Dip Tortilla Roll Ups
 The Unbelievably Addictive Taco Spaghetti
