Step 1: Browning the Beef
- Heat a large skillet over medium-high heat. Add the **ground beef**, breaking it up with a spatula.
- Cook until the beef is browned and no longer pink. Drain the excess fat. Too much grease will prevent the roll-up from sealing.
- Stir in the **garlic powder, paprika, salt, and pepper**. Cook for 1 minute to “toast” the spices.
Step 2: Creating the Sauce Base
- Lower the heat and add the **tomato sauce**. Stir to coat the beef completely.
- Let it simmer for 2-3 minutes until the sauce has thickened slightly and clings to the meat. You don’t want it “soupy,” just moist.
Step 3: Filling and Rolling
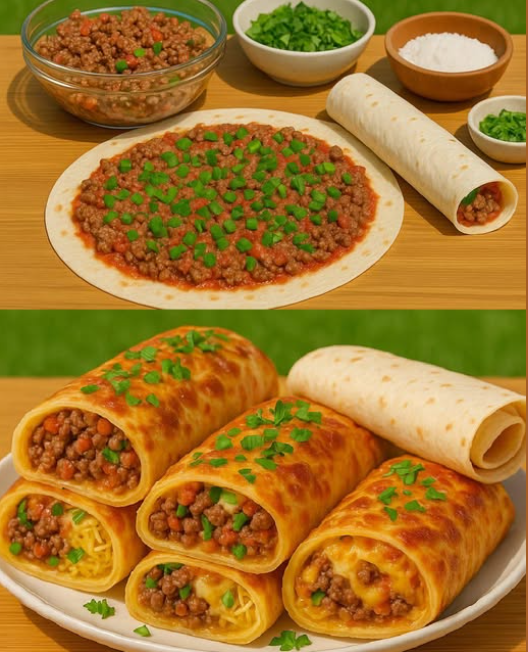
- Lay a **tortilla** flat. Place a quarter of the beef mixture in the center, spreading it toward the edges but leaving a 1-inch border.
- Sprinkle a generous amount of **mozzarella cheese** and **green onions** over the beef.
- Fold in the sides and roll tightly from the bottom up, creating a log shape.
Step 4: The Skillet Finish
- Wipe out your skillet and add the **olive oil** over medium heat.
- Place the roll-ups seam-side down in the pan. This is crucial—the heat will melt the cheese and “glue” the seam shut.
- Cook for 2 minutes per side until the tortilla is golden brown and crispy.
Expert Tips for Bakery-Level Roll-Ups
Tip 1: The “Tight Roll” Secret
If your roll-ups are unravelling, you might be using cold tortillas. Microwave them for 15 seconds before filling to make the flour more flexible. A warm tortilla stretches; a cold one snaps.
Tip 2: Vegetable “Stealth”
If you’re making these for kids, you can finely grate a zucchini or a carrot into the beef while it’s browning. Once it’s mixed with the tomato sauce and melted mozzarella, they’ll never know the veggies are there!
Tip 3: The Garnish Matters
Don’t skip the **fresh parsley**. Not only does it look beautiful, but the fresh herb helps cut through the richness of the cheese and beef, providing a balanced final bite.
Variations: Customizing Your Batch
| Variation | Key Modification | Flavor Result |
|---|---|---|
| **The Pizza Roll-Up** | Use pepperoni slices inside and dip in marinara. | A kid-favorite pizza twist. |
| **The Mushroom Melt** | Add sautéed mushrooms and a dash of Worcestershire. | Earthy, rich, and “steakhouse” style. |
| **The Spicy Beef** | Add red pepper flakes and use Pepper Jack cheese. | A zesty kick for spice lovers. |
| **The Breakfast Beef** | Add a scrambled egg inside the roll. | A hearty, protein-packed brunch. |
Serving and Storage
These are best eaten fresh, but they are surprisingly resilient for meal prepping.
- **Serving:** Slice the roll-ups into 1-inch “pinwheels” for a fun appetizer or lunchbox treat.
- **Storage:** Keep leftover beef mixture in an airtight container for up to **4 days**.
- **Freezing:** You can freeze the *un-toasted* roll-ups. Wrap them tightly in foil. To eat, bake at $375^{\circ}\text{F}$ directly from the freezer until the cheese is melted and the tortilla is crisp.
Conclusion: A Meal Worth Repeating
Cheesy Ground Beef Tortilla Roll-Ups are a testament to the fact that the best meals aren’t always the most complex. By taking high-quality beef, a few pantry spices, and the perfect melting cheese, you’ve created a dish that brings comfort and joy to your family dinner table. It’s no wonder they disappear fast—they are the ultimate handheld comfort food.
Happy Rolling!
Frequently Asked Questions
Q: Can I use ground turkey instead of beef?
A: Absolutely! Ground turkey or chicken works beautifully. Since they are leaner, you may want to add an extra tablespoon of tomato sauce to keep the filling moist.
Q: Why is my tortilla soggy?
A: This happens if the beef wasn’t drained well or the tomato sauce was too watery. Make sure to simmer the sauce until it’s thick before filling the tortillas.
Q: What’s the best side dish for this?
A: A simple **Caesar salad** or some **crispy roasted potatoes** complement the savory beef and mozzarella perfectly.