ADVERTISEMENT
Phase 1: Crust and Swirl Prep
- **Prep Oven and Pan:** Preheat oven to **$350^\circ\text{F}$ ($175^\circ\text{C}$)**. Tightly wrap the exterior bottom and sides of a $9$-inch springform pan in heavy-duty aluminum foil. This is crucial for the water bath.
- **Make Crust:** In a medium bowl, combine the **graham cracker crumbs**, **melted butter**, **granulated sugar**, and **1 tsp cinnamon**. Press the mixture firmly into the bottom of the prepared springform pan. Bake for **8 minutes**. Remove and reduce oven temperature to **$325^\circ\text{F}$ ($160^\circ\text{C}$)**.
- **Make Swirl:** In a small bowl, whisk together the **$\frac{1}{4}$ cup melted butter**, **$\frac{1}{2}$ cup brown sugar**, and **1 tbsp cinnamon**. Set aside.
Phase 2: Filling and Baking (Water Bath Protocol)
- **Make Filling (COLD INGREDIENT RULE):** In a large bowl, beat the **3 packages of softened cream cheese** until completely smooth. Gradually beat in the **1 cup granulated sugar** until combined. Mix in the **$\frac{1}{2}$ cup sour cream** and **1 tbsp vanilla extract**. Finally, beat in the **3 room-temperature eggs** one at a time, mixing only until *just* incorporated. Do not over-mix.
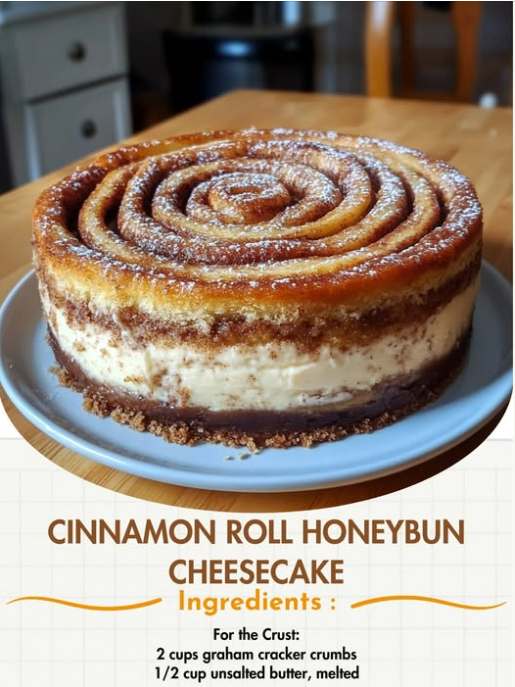
- **Assemble and Swirl:** Pour half of the cheesecake filling into the prepared crust. Dollop half of the cinnamon swirl mixture over the top. Gently pour the remaining cheesecake filling over the swirl layer. Dollop the remaining swirl mixture on top. Using a skewer or knife, gently swirl the mixture **only 3-4 times** (PERFECT SWIRL TECHNIQUE).
- **Bake (WATER BATH PROTOCOL):** Place the foil-wrapped springform pan into a large roasting pan. Carefully pour boiling water into the roasting pan until the water reaches about 1-inch up the sides of the springform pan. Bake at **$325^\circ\text{F}$ ($160^\circ\text{C}$)** for **60–75 minutes**, or until the edges are set and the center is only slightly wobbly.
Phase 3: Cooling and Glazing
- **Cool Gradually:** Turn off the oven, prop the oven door open slightly, and let the cheesecake cool inside the water bath for **1 hour**. Remove the cheesecake from the water bath, remove the foil, and let it cool completely on a wire rack for 1-2 hours.
- **Chill:** Transfer the fully cooled cheesecake to the refrigerator and chill for a **minimum of 6 hours**, or preferably **overnight**.
- **Glaze and Serve:** Whisk together the **$\frac{1}{2}$ cup powdered sugar**, **2 tbsp milk**, and **1 tbsp honey** until smooth. Pour or drizzle the glaze over the chilled cheesecake just before serving.
Serving and Storage: The Waiting Game
Optimal handling for this dessert:
- **Serving:** Ensure the cheesecake is fully chilled (Instruction 8) before slicing. Dip a sharp knife in hot water and wipe it clean between each cut for perfect slices.
- **Storage:** Store leftovers, covered, in the refrigerator for up to **5 days**.
- **Freezing:** Freezing is possible *before* glazing. Cool, wrap tightly in plastic wrap, then foil, and freeze for up to 1 month. Thaw overnight in the refrigerator before glazing.
Tips: Essential Techniques for a Crack-Free Result
Room Temperature (CRITICAL): All dairy ingredients—**cream cheese, eggs, and sour cream** (Step 4)—must be at room temperature. This is the single most important step for a smooth, lump-free batter that won’t crack due to excessive mixing.
The Flour Alternative: If you are worried about cracking, you may add **1 tablespoon of all-purpose flour** to the dry ingredients (sugar) in Step 4. Flour acts as a binder and helps prevent protein coagulation, increasing stability.
Using a Stand Mixer: If using a stand mixer (Step 4), use the **paddle attachment** on medium-low speed. Avoid using the whisk attachment, as it incorporates too much air, leading to a cracked top.
Foil Wrap: Ensure the aluminum foil wrap around the springform pan (Step 1) is heavy-duty and has **no tears**. Water seeping into the crust makes it soggy and is the main risk of the water bath method.
Doneness Test:** The center should look like a **large ring of wet jello** when done (Step 6). It will solidify completely during the slow cool-down (Step 7).
Variations: Customizing Layers and Spice
Easily adapt the flavor profile of the cheesecake:
- **Nutty Crust:** Substitute up to $\frac{1}{2}$ cup of the **graham cracker crumbs** with finely ground pecans or walnuts (Step 2).
- **Spicy Swirl:** Add **$\frac{1}{2}$ teaspoon of ground cardamom or nutmeg** to the cinnamon swirl mixture (Step 3) for a warmer, more complex spice profile.
- **Cream Cheese Glaze:** Substitute the **honey glaze** (Step 9) with a simple cream cheese frosting: 2 oz softened cream cheese, 1 cup powdered sugar, 2 tbsp milk.
- **Coffee Flavor:** Add **1 teaspoon of espresso powder** to the cheesecake filling (Step 4) to enhance the deep brown sugar and cinnamon notes.
**Pressing the Crust:** When pressing the crust (Step 2), ensure the crumbs are pressed firmly and evenly up the sides of the pan for about 1 inch. This prevents the filling from sticking to the pan edges.
**Checking the Seal:** Before pouring water into the roasting pan (Step 6), lift the foil-wrapped springform pan. If water is visible inside the foil, **dry the pan exterior immediately** and re-wrap it with a new, double layer of foil.
**Glaze Consistency:** If the glaze (Step 9) is too thick, add milk, **1 teaspoon at a time**. If it is too thin, add powdered sugar, 1 teaspoon at a time.
**Clean Slice:** For the most professional-looking slices, **remove the cheesecake from the springform collar** only after it has fully chilled (Step 8). Run a thin knife around the edge of the pan before releasing the collar.
Conclusion: A Dessert Worth the Wait
The **Cinnamon Roll Honeybun Cheesecake** is a rich, comforting dessert that successfully marries two classics. By strictly adhering to **The Cold Ingredient Rule** and mastering **The Gentle Water Bath Protocol**, you guarantee a creamy, crack-free cheesecake with a dense, luxurious texture. The final honey glaze and cinnamon swirl transform this creation into an unforgettable, iconic bake.
Frequently Asked Questions (FAQ)
Q: Why did my cheesecake crack?
A: Cracking is usually due to **over-mixing** the batter (incorporating too much air, Step 4) or **baking too fast/cooling too quickly** (violating the Water Bath Protocol, Steps 6 & 7).
Q: My crust got soggy. Why?
A: Water likely seeped in from the water bath (Step 6). Ensure the **foil wrap is tight and flawless** (Step 1) to prevent water from wicking up into the base.
Q: Can I skip the water bath?
A: **It is not recommended.** (Step 6). While possible, skipping the water bath significantly increases the risk of cracking and results in a drier, less evenly baked texture.
Q: Why did my swirl disappear?
A: You either **over-swirled** the batter (Perfect Swirl Technique, Step 5) or the swirl mixture was **too thin**. Aim for only a few gentle passes to keep the definition.
ADVERTISEMENT