ADVERTISEMENT
The list specifies all the components needed for the core filling, plus the optional additions for extra texture and heartiness.
I. The Core Components:
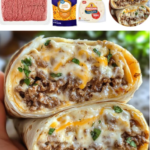
- **2 cups cooked chicken, shredded:** Rotisserie chicken or boiled/baked chicken breast works best.
- **1 cup bell peppers, chopped (any colors you like):** Red, yellow, and orange provide sweetness.
- **1/2 cup ranch dressing:** Use a thick, good-quality ranch.
- **1 cup cheese (cheddar or your favorite):** Shredded Monterey Jack or Mexican blend is also excellent.
- **4 large flour tortillas:** Burrito size (approx. 10 inches).
- **Salt and pepper to taste**
II. Optional Additions (For Heartiness):
- **1 can black beans, drained and rinsed:** Adds protein and fiber.
- **1/2 cup corn (optional):** Canned, frozen (thawed), or roasted corn.
- **1/4 cup chopped green onions:** For a fresh, mild onion flavor.
- **1 dash hot sauce:** For a gentle kick.
Instructions: Mixing, Rolling, and Baking
Follow the steps carefully, paying special attention to the folding technique for a professional-looking burrito.
Phase 1: Preparing the Filling
- Chop Vegetables: Ensure the **bell peppers** are chopped into pieces no larger than 1/4 inch. If using fresh onion, mince it very finely.
- Mix Filling: In a large bowl, combine the **shredded chicken, chopped bell peppers, ranch dressing, and cheese**. If you’re using **black beans, corn, and any optional seasonings (like hot sauce or green onions)**, add those too.
- **Season Well:** Season the mixture generously with **salt and pepper**. Because this is a cold filling, it’s often best to slightly over-season to ensure the flavors pop after chilling or baking.
Phase 2: Rolling the Burritos (The Critical Fold)
- **Warm Tortillas:** **Warm the tortillas** in a pan for 15 seconds per side or microwave for 10–15 seconds wrapped in a damp paper towel. Warming makes them pliable and prevents tearing.
- **Place Filling:** Take a warmed tortilla and place a generous amount of the chicken mixture (about 1 cup) in the center, positioning it closer to one edge, and leaving 1–2 inches of space on the sides.
- **Fold and Roll:**
- **Fold in the sides** of the tortilla over the filling.
- Starting from the edge closest to the filling, **roll the tortilla up tightly and firmly** toward the opposite side. Pulling the roll toward you as you wrap ensures a tight, secure seal.
- **Repeat:** Repeat with the remaining tortillas and filling.
Phase 3: Finishing Options (Baked or Crisp)
The burritos can be served immediately or finished for a firmer texture.
- **Option A: Simple Bake (Soft Finish):** Place the burritos seam-side down in a lightly greased baking dish. Optional: Top with extra cheese (1/2 cup total) or a light drizzle of ranch. Bake at **$350^\circ\text{F}$ ($175^\circ\text{C}$) for about 10–15 minutes**, or until the filling is warm and the cheese is melted.
- **Option B: Pan-Fried (Crisp Finish):** For a crunchy, taquito-like exterior, lightly brush the rolled burritos with oil or cooking spray. Place them seam-side down in a skillet over medium heat. Cook for **3–4 minutes per side**, turning until golden brown and crisp on all sides.
- **Serve:** Serve warm with salsa, sour cream, or extra ranch dressing for dipping.
Tips: Maximizing Filling and Minimizing Spillage
Burrito Master Secrets:
- **Shredding the Chicken:** For the best texture, shred the chicken using a **stand mixer** (use the paddle attachment on low speed) or two forks. Shredded chicken mixes better with the dressing than diced chicken.
- **Preventing a Soggy Bottom:** If you plan to bake the burritos, do not overfill them with ranch dressing. The filling should be creamy but not wet. Too much liquid will cause the bottom tortilla layer to become soggy.
- **Make-Ahead:** You can assemble the filling mixture up to **24 hours in advance** and store it in the refrigerator. Wait to roll the burritos until just before serving or baking to prevent the tortillas from getting soggy.
- **Freezing for Meal Prep:** Roll the burritos tightly (Option A or B recommended), wrap them individually in plastic wrap, then foil, and freeze for up to 3 months. To reheat, remove the plastic, wrap in a paper towel, and microwave for 3–5 minutes, or bake from frozen (wrapped in foil) at $400^\circ\text{F}$ for 35–45 minutes.
Variations: Customizing Your Flavor
Flavor Profiles:
- **Spicy Southwest:** Substitute 1/4 cup of the ranch dressing with **1/4 cup of creamy salsa** or a blend of ranch and chipotle sauce. Add 1/2 teaspoon of smoked paprika to the filling.
- **Fajita Style:** Instead of raw chopped bell peppers, quickly **sauté the peppers** and onions in a little oil until tender-crisp. Cool completely before mixing with the ranch dressing.
- **Crunchy Greens:** Add **1/2 cup of finely shredded lettuce or cabbage** for extra fresh crunch (add right before rolling, not when mixing the filling, to prevent wilting).
Conclusion: A Convenient and Delicious Handheld Meal
These Chicken Bell Pepper Ranch Burritos are a perfect example of how simple ingredients can create a major flavor impact. Whether you enjoy them cold, baked, or pan-fried, mastering the tight roll and preparing the filling with pre-cooked chicken makes this a fantastic, versatile option for any mealtime.
ADVERTISEMENT