ADVERTISEMENT
Phase 1: Onion Preparation (The Pre-Cooking Protocol)
- **Pre-Cook Onions:** Peel and slice the **4 large sweet onions** into $\frac{1}{4}$-inch rings. Heat the **1 tsp olive oil** in a large skillet over medium heat. Add the onions and sauté gently for **10–12 minutes**, stirring occasionally, until they are soft and translucent, but not caramelized. Drain off any excess liquid and transfer the onions to a bowl.
- **Prep Pan and Oven:** Preheat your oven to **$375^\circ\text{F}$ ($190^\circ\text{C}$)**. Lightly grease an $8 \times 8$ inch baking dish.
Phase 2: Assembling the Cheesy Binder
- **Create Cheesy Binder:** In the bowl with the cooked onions, add the **$\frac{1}{4}$ cup mayonnaise or sour cream**, **2 tbsp flour/cornstarch**, **$\frac{1}{4}$ cup of the mozzarella**, **$\frac{1}{4}$ cup of the cheddar**, **1 tsp garlic powder**, **$\frac{1}{2}$ tsp salt**, and **$\frac{1}{4}$ tsp pepper**. Gently toss until the onions are evenly coated in the creamy, seasoned mixture.
- **Layer and Top:** Spoon the coated onions into the prepared baking dish, leveling the top slightly. Scatter the remaining **$\frac{1}{4}$ cup mozzarella** and **$\frac{1}{4}$ cup cheddar** over the top. If using, sprinkle the **buttered cracker crumbs** over the cheese layer.
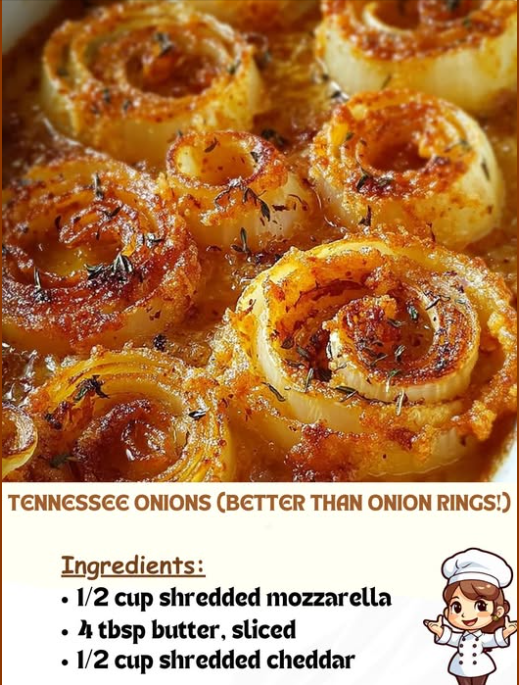
- **Add Butter Slices:** Distribute the **4 tbsp butter, sliced** evenly over the top layer. The melting butter will soak into the cheese and crumbs, promoting a rich, golden crust.
Phase 3: Baking and Serving
- **Bake (GOLDEN-BROWN FINISH):** Bake for **20–25 minutes**, or until the cheese is melted and bubbling, and the crumb topping is deeply golden brown.
- **Rest and Serve:** Remove from the oven and let the Tennessee Onions rest for **5–10 minutes** before serving. This allows the cheesy binder to set slightly, making the dish easier to scoop.
Serving and Storage: The Perfect Side
Optimal handling for this savory casserole:
- **Serving:** Best served warm after the short resting period (Step 7), allowing the flavors to settle but the cheese to remain soft.
- **Storage:** Store leftovers in an airtight container in the refrigerator for up to **4 days**.
- **Reheating:** Reheat portions gently in the microwave or place the entire dish, covered, back into a $350^\circ\text{F}$ oven until heated through.
Tips: Essential Techniques for Deep Flavor
Onion Selection: Always use a **sweet onion** (Vidalia, etc.) (Step 1). The high sugar content is crucial for the mellow, caramelized flavor needed to contrast the sharp cheese. Yellow or red onions may be too pungent.
Shred Your Own Cheese: Pre-shredded cheese contains anti-caking agents that can inhibit a smooth melt. Shredding your own **mozzarella and cheddar** (Step 3) ensures the best, creamiest texture for the topping.
Binder Choice: The **mayonnaise or sour cream** (Step 3) acts as the essential fat and liquid binder. Mayonnaise provides a richer flavor, while sour cream offers a tangier contrast. Use full-fat for the best results.
Moisture Control:** After pre-cooking the onions (Step 1), ensure you **drain off any liquid** that accumulates in the bowl. Excess moisture will lead to a watery casserole base.
Crunch Topping: The buttered cracker or breadcrumb topping (Step 4) is optional but highly recommended. It adds a textural dimension that elevates the dish beyond a simple cheesy casserole.
Variations: Customizing Richness and Heat
Easily adapt the flavor and components of this casserole:
- **Spicy Tennessee:** Add **$\frac{1}{2}$ teaspoon of cayenne pepper** and substitute the cheddar with Pepper Jack cheese (Step 3) for a mild kick.
- **French Onion Flavor:** Substitute the sour cream with **beef broth** and replace the cheddar/mozzarella blend with **Gruyère cheese**. Add a splash of dry sherry to the onions before baking.
- **Cream Cheese Boost:** Add **2 ounces of cubed cream cheese** (softened) into the cheesy binder mix (Step 3) for an even richer, denser sauce.
- **Bacon Accent:** Mix **$\frac{1}{4}$ cup of crispy bacon bits** into the onion and binder mixture (Step 3) for a savory, smoky element.
**Flour/Cornstarch Function:** The **2 tbsp flour or cornstarch** (Step 3) is necessary to ensure the binder sauce does not separate during the baking process, keeping the casserole cohesive.
**No-Bake/Stovetop:** For a faster version, fully caramelize the onions, mix with the cheese/binder mix (omitting the butter slices), and serve warm, skipping the oven entirely. The cheese will simply be melted rather than baked into a crust.
**Baking Check:** Check the casserole after 15 minutes (Step 6). If the topping is browning too quickly, loosely cover the dish with aluminum foil for the remainder of the bake time.
**Slicing Consistency:** Slice the onions **uniformly** (Step 1). Uneven slices will result in some pieces being crunchy while others turn to mush.
Conclusion: Comfort in Every Golden Slice
The **Tennessee Onions** recipe is a testament to how simple ingredients can create deep, satisfying comfort food. By adhering to **The Pre-Cooking Protocol** to sweeten the onions and utilizing **The Cheesy Binder Method** to create a moist base, you guarantee a side dish that far surpasses the texture of onion rings. The final product, with its golden, bubbly cheese and tender, caramelized onions, is a must-have on any table.
Frequently Asked Questions (FAQ)
Q: Why are my onions still crunchy/harsh?
A: The onions were **not pre-cooked long enough** (Step 1) to break down their cell structure. The baking time alone is not sufficient to fully soften raw onions.
Q: Why is my casserole watery after baking?
A: There was **excess liquid** from the pre-cooked onions (Step 1) that was not drained, or the **flour/cornstarch was omitted** (Step 3), causing the sauce to separate during baking.
Q: Can I use different cheeses?
A: **Yes.** (Step 4). Any good melting cheese will work. Monterey Jack, Colby, or Swiss cheese are excellent substitutes, but ensure the ratio remains balanced.
Q: Can I prepare this ahead of time?
A: **Yes.** Assemble the entire casserole (up to Step 5), cover tightly, and refrigerate for up to 24 hours. Add an extra 5–10 minutes to the bake time if baking straight from the fridge.
ADVERTISEMENT