

Don’t Overmix the Batter: This is a cardinal rule for light and fluffy baked goods, and it’s especially true for these buttermilk beignets. Once the wet and dry ingredients are combined, mix only until no streaks of dry flour remain. The batter should still be lumpy. Overmixing develops gluten, which leads to tough, chewy beignets that will make you miss out on that soooo good ethereal texture.
Use a Scoop or Two Spoons: While true beignets are square, this quick-dough version is often dropped. For more uniform, classy look beignets that cook evenly, use a small cookie scoop (about 1.5-inch diameter) to drop the batter into the hot oil. If you don’t have a scoop, use two spoons—one to scoop and one to push the batter into the oil. This method helps control portion size and ensures consistent frying times for each piece.
The “No Crowding” Regulation: It’s tempting to try and fry as many beignets as possible at once, especially when you’re hungry. However, overcrowding the pot will drastically lower the oil temperature. This leads to greasy beignets with soft exteriors. Fry in small batches, giving each beignet enough space to puff and brown properly. This also allows the oil to quickly recover its temperature between batches, ensuring consistently soooo good results.
Double Dusting: For the ultimate classy look powdered sugar coating, consider a “double dusting.” Dust them generously when they first come out of the oil. Just before serving, give them another light dusting of fresh powdered sugar. The first layer slightly melts and adheres, while the second creates that beautiful, fluffy “snowfall” that looks professional and tastes divine. This weeknight rescue tip takes seconds but makes a huge visual difference.
Fresh Ingredients are Key: While this recipe is forgiving, the freshness of your baking powder and baking soda is vital for the proper lift. Also, ensure your buttermilk is fresh, as its acidity is a critical component in the leavening reaction. Fresh ingredients contribute significantly to the soooo good overall taste and texture.
Conclusion: The Sweet Call of Simplicity
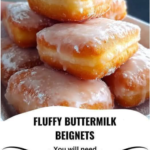
The **Buttermilk Beignet**, in this simplified, yeast-free form, is a testament to the idea that some of life’s greatest pleasures lie in elegant simplicity. It’s a profound weeknight rescue, transforming basic pantry ingredients into a dessert that feels both deeply comforting and surprisingly sophisticated. There’s an undeniable magic in watching these little clouds of dough puff up and turn golden in hot oil, before being lovingly buried under a mountain of powdered sugar. Each bite offers a delightful contrast: the crisp, delicate exterior yielding to an interior that is soooo good light, airy, and imbued with the warm, spicy whisper of nutmeg.
This recipe isn’t just about frying dough; it’s about recreating a sensory experience—the bustling vibrancy of New Orleans, the warmth of a shared moment, and the sheer joy of a fresh, homemade treat. It’s a chef’s kiss to ingenuity, allowing you to bypass the traditional complexities of yeast-based pastries without sacrificing an ounce of flavor or texture. Whether you’re an experienced baker or a curious novice, the process is rewarding, and the results are consistently delightful. So, embrace the simplicity, don’t fear the frying, and let the aroma of these classy look buttermilk beignets fill your kitchen, bringing a little piece of the Big Easy right to your home. You definitely don’t want to lose this recipe!
Frequently Asked Questions: Your Beignet Conundrums, Solved
Can I use regular milk instead of buttermilk?
While you technically *can* use regular milk, it’s not recommended for achieving the authentic soooo good tang and, more importantly, the specific leavening reaction that makes these beignets so light and fluffy. Buttermilk’s acidity is crucial for activating the baking soda. If you don’t have buttermilk, a weeknight rescue trick is to make your own: add 1½ tablespoons of lemon juice or white vinegar to a liquid measuring cup, then fill the rest with regular milk until it reaches 1½ cups. Stir and let it sit for 5-10 minutes until it slightly curdles. This “regulates” the acidity, mimicking buttermilk’s properties for a chef’s kiss result.
What is the best type of oil for frying?
For beignets, you want a neutral-flavored oil with a high smoke point. Canola oil, vegetable oil, or peanut oil are chef’s kiss choices. They won’t impart any unwanted flavors to your delicate pastries and can withstand the necessary high frying temperatures, ensuring a classy look golden-brown crust without burning.
Why are my beignets flat and not puffing up?
Several factors could be at play here. Firstly, check the freshness of your baking powder and baking soda. If they’re old, their leavening power diminishes. Secondly, ensure your oil is at the correct temperature (180°C / 350°F). If the oil is too cool, the beignets won’t get that immediate “puff” and will soak up oil, becoming dense. Lastly, avoid overmixing the batter. A gentle mix is key to maintaining those air pockets that expand during frying. Following these “regulations” will lead to soooo good, pillowy beignets.
Can I make the dough ahead of time?
Yes, you absolutely can! This is a fantastic weeknight rescue strategy. Prepare the batter as instructed, cover it tightly, and refrigerate it for up to 24 hours. When you’re ready to fry, remove the batter from the fridge about 30 minutes before to let it warm up slightly, then give it a gentle stir (without overmixing). This allows you to serve fresh, warm beignets whenever the craving strikes, making them a chef’s kiss treat on demand.
How can I make them look more like traditional square beignets?
While this drop-beignet recipe is for a quicker, more rustic shape, you can achieve a more classy look square. After mixing the batter, chill it for about an hour to firm up. Then, lightly flour a surface and gently roll the dough out to about ½-inch thickness. Use a sharp knife or pizza cutter to cut it into 2-inch squares. Carefully transfer these squares to the hot oil. This technique requires a slightly firmer dough but will yield that classic shape while still benefiting from the quick-rise buttermilk leavening.
Related posts:
 The Ultimate Guide to Buttermilk Beignets: Fluffy, Golden Pillows
 Buttermilk Beignets: The Science of High-Velocity Confectionery
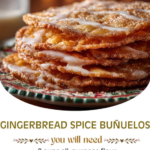 Holiday Crunch: Mastering Gingerbread Spice Buñuelos
 The Ultimate Guide to Classic Southern Hush Puppies
 Mastering Old-Fashioned Fried Catfish
 Mastering Crispy Fried Jalapeño “Bottle Caps”
