ADVERTISEMENT
Phase 1: Truffle Base Prep
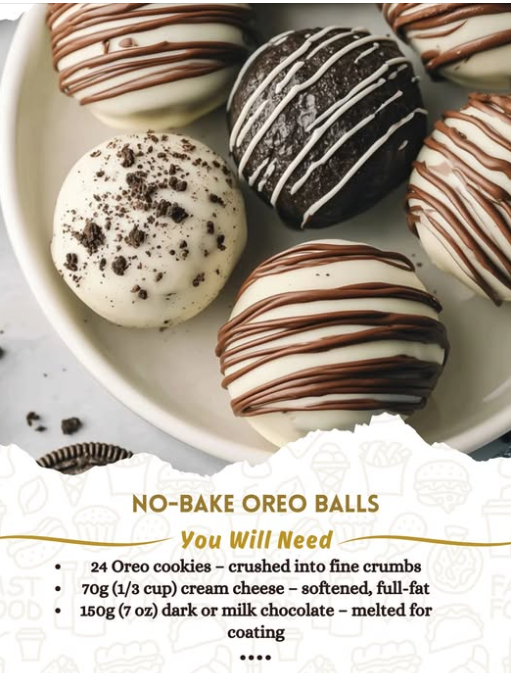
- **Crush Cookies:** Crush the **24 Oreo cookies** into fine, sand-like crumbs. This is best achieved using a food processor, or by placing the cookies in a sealed bag and crushing them with a rolling pin. Reserve 1 tablespoon of crumbs for garnish, if desired.
- **Mix Base (CRUMB-TO-CHEESE RATIO):** In a medium bowl, combine the **Oreo crumbs** with the **70g (1/3 cup) of softened cream cheese**. Mix thoroughly with a spatula or electric mixer until a uniform, dense “dough” forms. If adding vanilla extract, mix it in now.
- **Roll and Chill (THE CHILL FACTOR):** Using a small scoop or teaspoon, roll the dough into small balls, approximately **1 inch in diameter**. Place the balls on a parchment-lined baking sheet. Freeze for **30 minutes** or refrigerate for **1 hour** until completely firm.
Phase 2: Coating and Finish
- **Melt Chocolate:** Melt the **150g (7 oz) of dark or milk chocolate** using a double boiler or in the microwave in 30-second intervals, stirring until smooth. If the chocolate seems too thick, stir in **1 teaspoon of vegetable or coconut oil** to thin it slightly.
- **Coat Balls (QUICK-DIP CHOCOLATE METHOD):** Remove the chilled balls from the freezer/fridge. Using a fork or dipping tool, submerge one ball completely into the melted chocolate. Tap the fork gently on the side of the bowl to allow excess chocolate to drip off.
- **Decorate and Set:** Return the coated ball immediately to the parchment-lined sheet. While the chocolate is still wet, sprinkle with reserved **Oreo crumbs** or other decorations. Repeat with the remaining balls.
- **Final Set:** Allow the chocolate to set completely at room temperature, or return them to the refrigerator for **15–20 minutes** for a quick set.
Serving and Storage: Maximizing Freshness
Optimal handling for this no-bake treat:
- **Serving:** Best served slightly chilled. Remove from the refrigerator 10 minutes before serving.
- **Storage (Refrigerated):** Store the finished Oreo balls in an airtight container in the refrigerator for up to **2 weeks**.
- **Storage (Frozen):** The finished truffles can be frozen in an airtight container for up to **2 months**. Thaw overnight in the refrigerator before serving.
Tips: Essential Techniques for a Perfect Truffle
The Cream Cheese Temperature: The **70g of cream cheese** (Step 2) *must* be softened. Cold cream cheese will not mix evenly, resulting in a clumpy, difficult-to-roll dough.
Microwave Melting: When melting the **chocolate** (Step 4), use 30-second intervals and stir aggressively between each. Chocolate retains its shape even when melted, so stirring is essential to prevent scorching.
Dipping Tool: Using a **two-tined dipping fork** or a regular dinner fork (Step 5) is better than using a spoon, as it allows the excess chocolate to drain completely, preventing a pool of chocolate beneath the ball.
Full-Fat Cream Cheese: **Full-fat cream cheese** (Step 2) is highly recommended. Low-fat varieties contain more water, which can create a sticky dough that is harder to roll and sets less firmly.
Chocolate Quality: Use high-quality melting chocolate or baking chocolate (Step 4). Chocolate chips are formulated not to melt smoothly and may require additional oil or shortening to achieve a fluid consistency for dipping.
Variations: Customizing the Flavor and Coating
Easily adapt the flavor profile of the truffles:
- **Mint Chocolate:** Use **mint Oreos** (if available) or add **$\frac{1}{4}$ teaspoon of peppermint extract** to the truffle base (Step 2).
- **Peanut Butter Swirl:** Add **2 tablespoons of creamy peanut butter** to the cream cheese mixture (Step 2). Reduce the cream cheese slightly if the mixture becomes too soft.
- **White Chocolate Base:** Substitute the dark/milk chocolate with **white chocolate** (Step 4). Drizzle with melted milk chocolate for a striking visual contrast.
- **Alcohol Infusion:** Add **1 teaspoon of espresso liqueur or Irish cream** to the cream cheese mixture (Step 2) for an adult-friendly truffle.
**Crumb Density:** The **finely crushed crumbs** (Step 1) are critical. If there are large chunks of cookies, the dough will be loose and difficult to roll into smooth balls.
**Preventing Stickiness:** If your hands become too warm and the dough starts to stick during rolling (Step 3), **wash and chill your hands** under cold water for a moment, then dry them thoroughly.
**Double Coating (Optional):** For an extra thick, professional-looking shell, you can **double-dip** the balls (Step 5). Dip the balls once, let the first coat set completely, and then dip them a second time.
**Chocolate Thinning:** If your melted chocolate is not coating smoothly (Step 4), adding a little **vegetable oil** or, better yet, **cocoa butter** helps reduce the viscosity, creating a much thinner, more fluid shell.
Conclusion: The Ultimate Easy Confection
The **No-Bake Oreo Ball** is proof that minimal effort can yield maximum reward. By rigorously controlling **The Crumb-to-Cheese Ratio** for a dense core, utilizing **The Chill Factor** for firm handling, and mastering **The Quick-Dip Chocolate Method** for a flawless coating, you create a batch of perfect truffles. These bite-sized delights are the ultimate easy confection for holidays, parties, or simple sweet cravings.
Frequently Asked Questions (FAQ)
Q: My dough is too soft and sticky. What went wrong?
A: The **cream cheese was likely too warm**, or you used too much (Step 2). Add a tablespoon of extra crushed Oreos to the mixture to absorb the excess moisture and fat.
Q: My chocolate coating hardened immediately and is clumpy. Why?
A: The chocolate either **seized** (water contamination, too high heat) or was **too cold** (Step 4). If the chocolate is too thick, try thinning it with **1 tsp of vegetable oil**.
Q: Can I use Double Stuf Oreos?
A: **Yes**, but the final mixture will be slightly creamier due to the extra filling (Step 1). You may need to add 1-2 extra crushed cookies to maintain the desired density.
Q: How long should the final set take?
A: If the truffles were cold when dipped, the chocolate should set in **15–20 minutes** in the refrigerator (Step 7). At room temperature, setting may take up to an hour.
ADVERTISEMENT