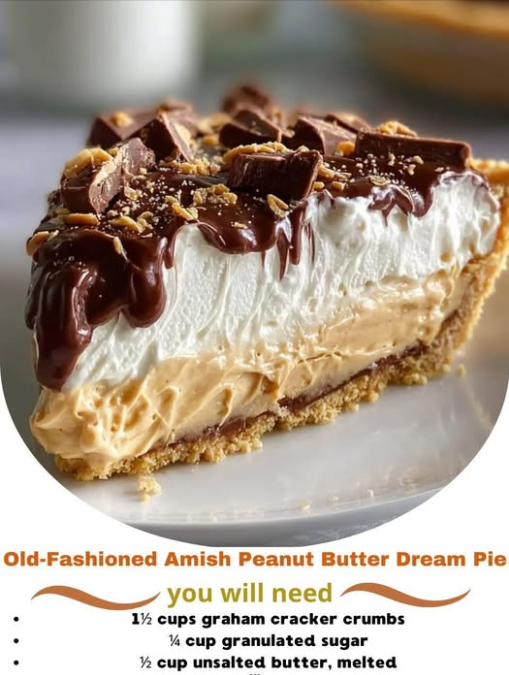
Step 1: Construct the Crust
Preheat your oven to 350°F (175°C). In a medium bowl, combine the graham cracker crumbs, sugar, and melted butter. Stir until the mixture resembles wet sand. Press the mixture firmly into the bottom and up the sides of a 9-inch pie plate. Bake for 8–10 minutes until golden and fragrant. Set aside to cool completely.
Step 2: Prepare the Peanut Butter “Dust”
This is the secret Amish technique. In a small bowl, combine the powdered sugar and peanut butter. Using a pastry cutter or your clean fingertips, rub the peanut butter into the sugar. Continue until the mixture transforms into fine, sandy crumbs. Divide this mixture: set aside about 1/3 of the crumbs for the topping, and sprinkle the remaining 2/3 over the bottom of your cooled crust.
Step 3: Cook the Vanilla Custard
In a heavy-bottomed saucepan, whisk together the sugar and cornstarch. Gradually whisk in the milk and egg yolks. Cook over medium heat, stirring constantly with a whisk. As the mixture reaches a simmer, it will begin to thicken rapidly. Once it coats the back of a spoon (or reaches the consistency of thick pudding), remove from heat and stir in the vanilla extract. Let it cool for about 10 minutes, stirring occasionally to prevent a skin from forming.
Step 4: Assembly
Pour the warm custard gently over the peanut butter crumbs in the crust. The heat from the custard will slightly soften the crumbs, creating a fudge-like layer. Smooth the top with a spatula.
Step 5: The Final Flourish
Top the custard with the reserved peanut butter crumbs. For a truly “dreamy” look, you can also add a layer of fresh whipped cream before adding the final crumbs, though the traditional version often features the crumbs directly on the custard.
Service and Storage Tips
The Amish Peanut Butter Dream Pie is a temperature-sensitive dessert. Because it relies on a cooked custard, it must be handled with care to maintain its structural integrity.
- Chilling is Non-Negotiable: The pie must refrigerate for at least 4 hours (ideally overnight) before slicing. This allows the cornstarch to fully set.
- The Perfect Slice: Use a sharp, thin-bladed knife dipped in hot water and wiped dry between each cut. This prevents the custard from sticking and ensures clean layers.
- Storage: Keep the pie covered in the refrigerator for up to 3 days. Note that the graham cracker crust will begin to soften after the second day.
- Do Not Freeze: Custard-based pies generally do not freeze well, as the emulsion can break upon thawing, resulting in a watery texture.
Variants: Creative Twists on a Classic
While the purist version is a marvel, many Amish kitchens adapt the recipe based on the season or the occasion.
- The Chocolate Ganache Layer: Spread a thin layer of melted semi-sweet chocolate over the crust before adding the peanut butter crumbs for a “Reese’s” style experience.
- Chocolate Custard: Add 1/4 cup of cocoa powder to the sugar and cornstarch mixture in the custard step for a Dark Dream Pie.
- Pretzel Crust: Replace the graham cracker crumbs with crushed salted pretzels to lean into the salty-sweet profile.
- Meringue Topping: Some traditionalists use the leftover egg whites to create a toasted meringue topping instead of whipped cream.
Tips for Success
If you want your pie to look like it belongs at a blue-ribbon county fair, keep these professional tips in mind:
- Temper Your Eggs: When making the custard, if you are worried about curdling, whisk a small amount of the hot milk into the egg yolks first to warm them up before adding them to the main pot.
- Sift the Sugar: Powdered sugar often has small, hard lumps. Sifting ensures the peanut butter crumble is light and airy rather than crunchy.
- Full-Fat Only: The “dream” aspect of the pie comes from the mouthfeel. Using 2% or skim milk will result in a translucent, runny filling.
Conclusion
The Old-Fashioned Amish Peanut Butter Dream Pie is more than just a dessert; it is a slice of culinary history. It reminds us that luxury doesn’t require expensive, exotic ingredients—just the right technique and a little bit of patience. By carefully layering the salty-sweet peanut butter dust with a velvety homemade custard, you create a dish that appeals to both the nostalgia of childhood and the refined palate of adulthood. Whether served at a summer potluck or a quiet family Sunday dinner, this pie is guaranteed to live up to its “dreamy” namesake.
Frequently Asked Questions
- Can I use natural peanut butter?
- It is best to avoid “stir-style” natural peanut butter. The separation of oils makes it difficult to achieve the “crumb” texture, often resulting in a greasy paste instead of a fine dust.
- Why is my custard runny?
- This usually happens if the custard didn’t reach a sufficient boil. The cornstarch must reach a specific temperature to activate its thickening properties. Also, ensure you used whole milk.
- Can I make this dairy-free?
- You can substitute the milk with full-fat coconut milk and the butter with a plant-based stick butter, but the flavor profile will shift significantly toward the coconut.
- How do I prevent a skin from forming on the custard?
- While cooling, you can press a piece of plastic wrap directly onto the surface of the custard. This prevents air from drying out the top layer.
Would you like me to suggest a beverage pairing or perhaps a guide on how to make the perfect homemade whipped cream for this pie?