The beauty of this recipe lies in its use of highly convenient, accessible ingredients:
I. Structural Components (The Crust):
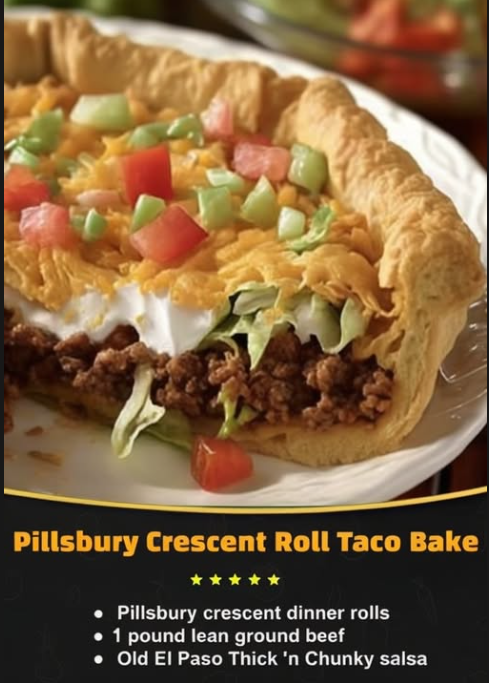
- **1 (8 ounce) can Pillsbury refrigerated crescent dinner rolls:** The base and topping; its butter content ensures flakiness and rapid browning.
II. The Savory Filling (The Core):
- **1 pound lean (at least 80%) ground beef:** Chosen for minimal fat rendering and rich flavor.
- **¾ cup Old El Paso Thick ‘n Chunky salsa:** Provides moisture, acidity, and vegetable texture; contributes to the “taco” moisture balance.
- **1 (1 ounce) packet taco seasoning mix:** The primary flavor agent, composed of spices like chili powder, cumin, paprika, and garlic.
- **1 cup shredded Mexican cheese blend:** The binder and flavor element; chosen for its superior melting qualities (Monterey Jack/Cheddar combination).
III. Finishing Touches (Optional but Recommended):
- Shredded lettuce, diced tomatoes, sour cream, black olives, extra salsa: Used for post-bake customization and cooling contrast.
Instructions: The Path to Flaky Perfection
Phase 1: Prepping the Filling (Moisture Control)
1. Preheat & Prep: Preheat your oven precisely to **$375^\circ\text{F}$ ($190^\circ\text{C}$)**. This moderate heat allows the crescent dough to puff quickly without burning. Lightly grease a $9 \times 13$ inch baking dish.
2. Brown and Drain the Beef (Crucial Step): In a large skillet, cook the **ground beef** over medium heat, breaking it up with a spatula, until it is thoroughly browned. **Immediately and thoroughly drain off all excess grease.** Use a colander lined with paper towels if necessary to achieve maximum drainage. This step directly dictates the crispness of your final crust.
3. Flavor and Reduce Moisture: Return the drained beef to the skillet. Stir in the **taco seasoning** and the **salsa**. Cook uncovered for another **3–5 minutes** over medium heat. This cooking period serves two purposes: it blooms the seasoning for maximum flavor release, and it reduces excess liquid from the salsa, preventing a soggy crust.
Phase 2: Assembly and Sealing
4. Create the Base Crust: Unroll the crescent dough and separate it into its 8 triangles. Arrange **4 of the triangles** in the bottom of your prepared baking dish. Start at the center and work outward, pressing all perforations firmly to seal them completely and form a cohesive, single sheet crust. Gently stretch the dough to cover the entire bottom.
5. Layer the Goodness: Spoon the warm, reduced **ground beef mixture** evenly over the crescent roll crust. Use the back of the spoon to gently spread the filling without tearing the dough. Sprinkle the **shredded cheese** generously over the top of the beef mixture, covering it from edge to edge.
6. Form the Top Crust: Arrange the **remaining 4 crescent roll triangles** over the cheese layer. Align the triangles to meet the edges of the bottom crust. Press the seams and perforations together gently but firmly, sealing the filling inside the ‘pocket.’ This sealing action ensures the cheese melts inward, not outward, creating a beautiful layered presentation.
Phase 3: Baking and Finishing
7. Bake to Golden Perfection: Place the dish in the preheated oven. Bake for **15–20 minutes**. The casserole is done when the top crescent rolls are a deep, uniform golden brown, and the cheese underneath is visibly melted and bubbly around the edges.
8. Rest and Serve: Remove the casserole from the oven. **Let it cool for 5–10 minutes** before slicing. This brief resting period allows the filling to settle and firm up slightly, making for cleaner slices and preventing the filling from running out. Slice into squares and serve immediately. Top with your chosen cold, crisp toppings (lettuce, tomatoes, sour cream, etc.).
Serving and Storage: Maintaining Flakiness
This dish is best served warm, shortly after its brief resting period. The warmth ensures the cheese is gooey and the crust is still flaky. The cold, fresh toppings (lettuce, tomatoes, sour cream) provide a crucial textural contrast to the warm, rich interior.
- **Serving:** Slice into 8 squares for standard portions, or 12 smaller pieces for party appetizers.
- **Storage:** Store leftovers, tightly covered in aluminum foil or plastic wrap, in the **refrigerator for up to 3 days**.
- **Reheating:** Reheat individual slices in the microwave (which may soften the crust) or, ideally, in a toaster oven or standard oven at $350^\circ\text{F}$ ($175^\circ\text{C}$) for 5–7 minutes to help re-crisp the crescent roll dough.
- **Freezing:** This dish is **not recommended for freezing**. The crescent dough will become soggy and lose its integrity after thawing.
Tips: Essential Techniques for Crust Integrity
Maximizing Drainage: Re-emphasize the importance of draining the beef. Even if you use very lean beef, the cooking process releases water. Pat the drained beef with paper towels before returning it to the skillet for the seasoning step (Step 3) for the driest possible filling.
The Dough Seal: When pressing the crescent dough seams (Steps 4 and 6), use your fingers to vigorously pinch and seal them. A small gap in the bottom crust can result in liquid seepage, leading to a localized soggy spot. A small rolling pin or the bottom of a glass can help flatten and seal the bottom layer.
Bake Color Check: The visual test is key. Don’t rely solely on the timer. The crescent dough should be a rich, deep golden brown, not just light blonde. That deep color indicates the buttery dough is fully cooked and has achieved its maximum flakiness.
Cooling Contrast: Always add the cold toppings *after* the bake and rest. Adding them before baking will release too much moisture and steam the top crust, ruining the flaky texture.
Variations: Customizing the Filling and Dough
The flexibility of the crescent roll bake allows for easy flavor substitutions:
- **Protein Swap:** Replace ground beef with **ground chicken, ground turkey**, or a plant-based crumble. Be mindful that turkey tends to be drier, so you may need to add an extra tablespoon of salsa.
- **Spice Intensity:** Substitute the taco seasoning mix and salsa with a different flavor profile, such as **Chili Mac** (canned chili + elbow macaroni) or a **Pizza Bake** (pizza sauce, oregano, pepperoni, mozzarella).
- **Adding Vegetables:** Stir in a half cup of well-drained **canned corn**, **black beans** (rinsed and drained), or sautéed **mushrooms** to the beef mixture before layering. Ensure these additions are as dry as possible to maintain crust integrity.
- **Cheese Layer Boost:** For extra richness, spread a thin layer of **cream cheese** (mixed with a tablespoon of milk) over the bottom crescent crust before adding the meat filling. This acts as a moisture barrier and adds creamy tang.
Tips: Troubleshooting and Presentation
Troubleshooting Undercooked Center: If the dough looks done on the edges but still appears doughy or pale in the center where the triangles meet, lightly brush that area with a small amount of melted butter and continue baking for 2-3 minutes. This aids browning and finish cooking the thicker part of the dough.
Serving Presentation: To make slicing easier and cleaner, use a pizza cutter rather than a knife. The sharp rolling blade will slice through the crisp crescent dough without dragging the cheese and filling out of the crust.
Scaling the Casserole: This recipe is written for a standard $9 \times 13$ inch dish. If you are baking for a smaller crowd, you can halve the recipe and use an $8 \times 8$ inch square baking dish. The baking time will remain approximately the same.
Dough Temperature: Work with the crescent dough while it is still slightly cool. If the dough gets too warm, the butter melts prematurely, and it becomes sticky and difficult to unroll and press into the pan without tearing.
Conclusion: The Defining Weeknight Keeper
The Crescent Roll Taco Bake stands as the defining recipe for flavor, speed, and convenience. By mastering the crucial steps of moisture control and dough sealing, you ensure a perfectly flaky crust every time. This dish delivers an exceptional combination of creamy, savory filling and crispy pastry, proving that a home-cooked meal doesn’t need hours of preparation to achieve outstanding results. It is truly a keeper for busy schedules and demanding appetites.
Frequently Asked Questions (FAQ)
Q: My bottom crust was soggy. What can I do next time?
A: Soggy crust is always due to excess moisture. Next time, be absolutely certain to drain the beef completely and cook the beef and salsa mixture for the full 5 minutes (Step 3) to allow the liquid to evaporate and the sauce to thicken before layering.
Q: Can I use different ground meat besides beef?
A: Yes, ground turkey or chicken works well. Since they are leaner, you may want to add a tablespoon of olive oil when browning to prevent them from drying out, or simply ensure the salsa mixture is slightly wetter than with beef.
Q: Can I assemble this the night before?
A: It is not recommended. Assembled and refrigerated, the wet filling will slowly seep into the crescent dough, making it soggy before it even hits the oven. It is best to cook the filling the night before, refrigerate it separately, and then assemble and bake the casserole right before serving.
Q: What if I don’t have a $9 \times 13$ inch pan?
A: You can use two $8 \times 8$ inch square pans, dividing the ingredients equally. Alternatively, you can layer the ingredients in a large, round pizza pan, arranging the crescent triangles like spokes of a wheel.
Q: What kind of cheese melts best?
A: Cheeses with high moisture content melt best. Mexican blends (containing Monterey Jack), Cheddar, and Colby Jack are all excellent choices. Avoid hard cheeses like Parmesan, which will not achieve the desired gooey texture.