Step 1: Prepare the Chocolate Biscuit Base
- **Crush Biscuits:** Break the biscuits into small, bite-sized pieces. They should not be pulverized into crumbs—texture is key! Set aside.
- **Make Pudding Base:** In a medium mixing bowl, whisk together the **milk, sugar, cornstarch, and cocoa powder** until completely smooth and lump-free.
- **Cook:** Pour the mixture into a saucepan and cook over **low heat**, stirring constantly with a whisk. Cook until it thickens into a pudding-like consistency (about 5–7 minutes). This step is crucial for stability.
- **Melt Chocolate:** Remove the saucepan from the heat. Stir in the **4 ounces of dark chocolate** and **1 tablespoon of butter** until fully melted, smooth, and combined.
- **Combine:** Fold the **crushed biscuits** into the chocolate mixture until they are evenly coated.
- **Set Base:** Transfer the mixture to a 9×9-inch baking pan that has been lined with parchment paper (allowing excess paper to hang over the sides for easy removal). Press the mixture down evenly with a spatula.
Step 2: Make the Chocolate Ganache Topping
- **Heat Cream:** Heat the **heavy cream** in a small saucepan until it is hot but not boiling (look for small bubbles around the edges).
- **Combine:** Remove the cream from the heat and add the **4 ounces of dark chocolate, 2 tablespoons of butter, and vanilla extract**.
- **Melt and Stir:** Let the mixture sit undisturbed for 1 minute to allow the chocolate to melt. Then, stir until the ganache is smooth, glossy, and fully emulsified.
Step 3: Assemble, Chill, and Finish
- **Assemble:** Pour the smooth ganache evenly over the biscuit mixture in the baking pan. Smooth the top with a spatula to create an even layer.
- **Refrigerate:** Refrigerate for at least **2 hours**, or until the dessert is completely firm and set. A full chill of 4 hours or overnight is recommended for the cleanest cuts.
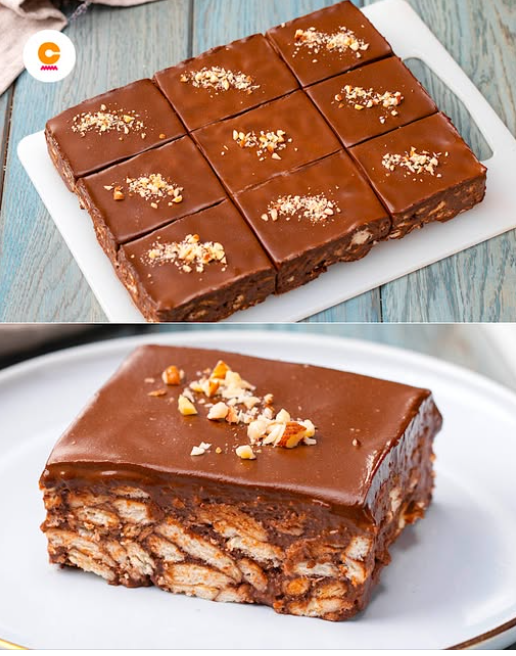
- **Finish and Slice:** Use the parchment paper overhang to lift the dessert out of the pan. Place it on a cutting board. Sprinkle the top with **hazelnut pieces** or crushed hazelnuts.
- **Serve:** Slice the block into 16 or 25 small squares and serve chilled.
Why You’ll Love This Recipe: Convenience and Customization
This recipe has gained massive popularity not only because it is deeply satisfying, but because of the practical advantages it offers to home cooks and party hosts:
No-Bake Convenience: Perfect for Hot Days and Busy Schedules
The single greatest advantage is the complete absence of oven time. This makes the Chocolate Salami Squares perfect for:
- **Summer Parties:** When turning on the oven is unthinkable, this dessert sets perfectly in the refrigerator.
- **Holiday Prep:** It frees up oven space for other crucial dishes, making it an ideal make-ahead component for large meals.
- **Speed:** While chilling is required, the active preparation time is incredibly short (about 20 minutes).
Family-Friendly: Easy to Make with Kids
The simplicity of the steps makes this a wonderful recipe to introduce children to cooking. Tasks like breaking the biscuits, stirring the pudding base (with supervision), and pressing the base into the pan are perfect for little hands. The ability to customize the toppings also gives them ownership over the final look.
Customizable: Swap Hazelnuts for Personalized Touches
While hazelnuts provide a wonderful flavor and texture complement to dark chocolate, the topping is easily personalized:
- **Different Nuts:** Use toasted almonds, crushed walnuts, or pecans.
- **Confections:** Try mini chocolate chips, colorful sprinkles, or crushed dehydrated raspberries.
- **Flaky Finish:** A dusting of powdered sugar or sea salt flakes can provide a sophisticated finish.
How to Store Chocolate Salami Squares: Maintaining Freshness and Form
Proper storage is essential to maintain the texture and firmness of these no-bake squares. Since the dessert relies on fat and chilling to hold its shape, temperature stability is key.
Refrigerator: Optimal Short-Term Storage
For best results within the first week, use the refrigerator:
- Container: Store the squares in an **airtight container** to prevent them from absorbing odors from other foods.
- Longevity: They will remain fresh and firm in the refrigerator for up to **5 days**.
- Serving Tip: For slightly softer squares, allow them to sit at room temperature for 10 minutes before serving. However, do not leave them out for extended periods, as the ganache will soften significantly.
Freezer: Excellent Long-Term Storage (Make-Ahead)
The squares freeze beautifully, making them an excellent choice for meal prep or future gatherings:
- Wrapping: For individual portions, wrap each square tightly in **plastic wrap or parchment paper** before freezing. This prevents freezer burn.
- Container: Place the wrapped squares in a freezer-safe container or zip-top bag to protect them.
- Longevity: Freeze for up to **2 months**.
- Thawing: To serve, thaw them overnight in the refrigerator, or at room temperature for a few hours. This preserves the firm texture of the base and prevents the ganache from becoming oily.
Tips: Troubleshooting and Achieving the Perfect Texture
Tip 1: The Ideal Biscuit Crush
Avoid using a food processor to crush the biscuits, as this creates too many fine crumbs. The **contrast between the large, chunky biscuit pieces and the smooth chocolate base** is what gives the dessert its signature texture. Break them by hand or place them in a bag and crush them with a rolling pin.
Tip 2: Ensuring a Glossy Ganache
For the shiniest, smoothest ganache, ensure the **heavy cream is hot** and you allow the chocolate to melt completely before stirring. When stirring, use a spatula in the center of the bowl, expanding outward. This method, called emulsification, guarantees a beautiful, glossy finish. If your ganache splits or looks oily, add a tiny splash (1 teaspoon) of cold milk or cream and stir vigorously to bring it back together.
Tip 3: The Importance of Dark Chocolate
Use a good quality **dark chocolate** (60% to 70% cocoa solids) for both the base and the ganache. This balances the sweetness from the sugar and condensed milk, providing the deep, complex chocolate flavor necessary for a sophisticated dessert. Milk chocolate can be used, but the overall result will be much sweeter.
Variations: Customizing the Base and Flavor
1. Boozy Salami Squares (Adult Version)
Stir **1–2 tablespoons of dark rum, brandy, or orange liqueur (like Grand Marnier)** into the chocolate biscuit base mixture (Step 1, after the chocolate is melted). The alcohol will enhance the chocolate flavor and provides a lovely warmth that complements the nuts.
2. White Chocolate Swirl
Instead of a plain dark chocolate ganache, make a smaller batch of white chocolate ganache (swap dark chocolate for white chocolate). Drizzle the white ganache over the dark ganache layer and use a toothpick to gently swirl the two colors together before chilling.
3. Coffee Kick
Dissolve **1 teaspoon of instant espresso powder** into the $\frac{1}{2}$ cup of heavy cream when heating it for the ganache topping. This creates a mocha ganache that adds an extra layer of richness to the chocolate base.
Advanced Tips: Scaling and Presentation
Tip 4: Clean, Professional Slices
To achieve clean, professional edges when cutting the squares, use a **long, sharp chef’s knife**. Dip the knife into **hot water** and wipe it dry between each cut. The heat prevents the chocolate from dragging and gives you perfect, neat slices every time.
Tip 5: Making a Cylinder (The Traditional Salami)
If you prefer the classic salami look, substitute the 9×9-inch pan with **plastic wrap**. After folding the biscuits into the base mixture, transfer the mixture onto a large sheet of plastic wrap. Roll the mixture tightly into a 2-inch diameter log. Chill completely, then slice and serve. You can dust the log with powdered sugar after chilling to mimic the “mold” on an aged salami.
Tip 6: Adding Salt
Adding a **pinch of flaky sea salt** to the top of the dark chocolate ganache immediately after pouring it can dramatically enhance the chocolate flavor. The salt acts as a flavor multiplier, making the dark chocolate taste even richer and deeper.
Conclusion: A Decadent Dessert with Zero Fuss
The No-Bake Chocolate Salami Squares Dessert is a triumph of convenience and flavor. By replacing the oven with the refrigerator, and the tedious rolling with a simple pan set, you create a dessert that is not only visually appealing but boasts a perfect harmony of crunchy texture and rich, smooth chocolate.
Perfect for any chocolate craving, this recipe is a guaranteed favorite that requires minimal effort for maximum impact.
Frequently Asked Questions: Troubleshooting and Prep
Q: Why is my biscuit base too soft and not holding its shape?
A: This is likely because the **pudding base was not cooked long enough** (the cornstarch did not fully activate) or the **ratio of milk/sugar/cocoa was slightly off**. Ensure the mixture is thick, like a proper pudding, before adding the biscuits. A good chill (overnight) should help solidify it.
Q: My ganache is too hard to spread. How do I fix it?
A: Your ganache cooled too much before spreading. Gently microwave it for **10–15 seconds** and stir until it loosens to a pourable consistency. Alternatively, add 1 tablespoon of warm heavy cream and stir until smooth.
Q: Can I use different types of biscuits?
A: Yes. Any dry, plain biscuit like **digestive, rich tea, shortbread, or even graham crackers** will work well. Avoid heavily flavored or cream-filled biscuits, as they can interfere with the base flavor and texture.
Q: Is it safe to eat the cocoa/cornstarch mixture without heating it to a boil?
A: Yes, because this is a no-bake dessert, the cocoa/cornstarch/milk mixture is heated enough to fully cook the starch and pasteurize the milk, transforming it into a safe, shelf-stable “pudding” base, which is the functional binder for the biscuits.