Step 1: Controlled Thermal Melting
Melt the white chocolate chips with the peanut butter over low heat (or in 30-second microwave bursts). The “Seizing” Risk: Avoid high heat. White chocolate has a low Thermal Tolerance; if it exceeds 110°F (43°C), the proteins will clump, causing the emulsion to “break” and become gritty.
Step 2: Homogenization
Stir in the vanilla until the mixture is glossy. The “Shear Force” Factor: Vigorous stirring ensures the vanilla molecules are evenly distributed throughout the Lipid Phase before the fudge begins to set.
Step 3: Integration of Inclusions
Gently fold in half of the chopped peanut butter cups. The “Latent Heat” Rule: Ensure the fudge base has cooled slightly before adding the cups. If the base is too hot, the cups will undergo Phase Transition (melt), turning your fudge into a muddy swirl rather than a layered mosaic.
Step 4: Surface Tension and Setting
Spread the mixture into a lined pan and press the remaining cups on top. The “Crystalline Set” Physics: Chill for at least 2 hours. As the temperature drops, the cocoa butter crystals realign into a stable Lattice Structure, locking the peanut butter and inclusions in place.
Serving and Storage: Maintaining Structural Integrity
Serving: Slice into small squares using a warm, dry knife. The “Fracture Point” Secret: A warm blade melts a microscopic layer of the fudge as it passes through, preventing the pressure from “smushing” the soft center.
Storage: Store in an airtight container in the refrigerator for up to 2 weeks. The “Hygroscopic” Warning: Fudge can absorb odors from the fridge. Ensure the seal is airtight to protect the delicate vanilla and milk-solid volatiles.
Tips: Pro-Level “Fudge” Nuances
- The “Luster” Factor: If your fudge looks dull, add a teaspoon of coconut oil during the melting phase. This increases the Surface Gloss.
- Salt Balance: If using very sweet white chocolate, add a tiny pinch of fine sea salt. This suppresses the Sweetness Receptors on the tongue and amplifies the peanut butter umami.
- Cheesecake Twist: For a true cheesecake flavor, whisk in 2 tablespoons of softened cream cheese to the warm chocolate mixture for added Lactic Tang.
Variations: Iterative Design Adjustments
| Variation | The Adjustment | The Result |
|---|---|---|
| Dark Contrast | Drizzle with melted dark chocolate after the fudge sets. | Increased bitter-sweet complexity. |
| Crunchy Texture | Use crunchy peanut butter instead of creamy. | Higher Mechanical Resistance and mouthfeel contrast. |
| Pretzel Twist | Add crushed pretzels to the top layer. | High-salt contrast and crisp Structural Inclusions. |
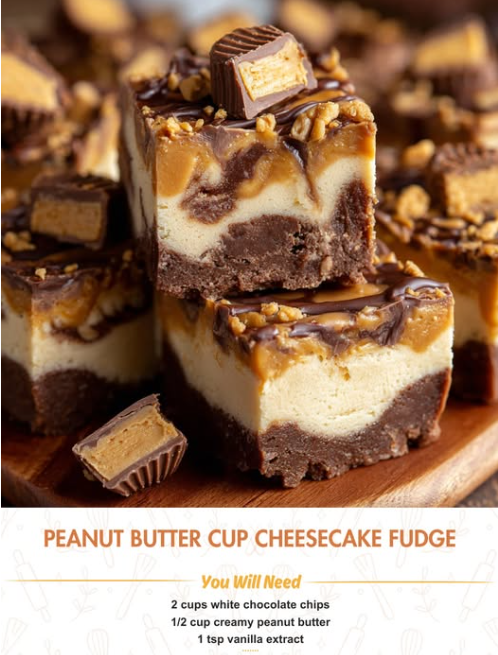
Conclusion: A Triumph of Confectionery Physics
This Peanut Butter Cup Cheesecake Fudge is a masterpiece of Thermodynamic Balancing. By successfully layering stable lipids with high-impact flavor inclusions, you create a treat that is both structurally sound and sensorially rich. On this December 26, 2025, enjoy the perfectly executed results of lipid-state engineering. Happy snacking!
Frequently Asked Questions
- Why is my fudge oily?
- This is Lipid Separation. It occurs if the chocolate was overheated or if the peanut butter was not fully emulsified. Stirring a teaspoon of milk into the warm mixture can sometimes help re-bind the fats.
- Can I use chocolate chips instead of white chocolate?
- Yes, but dark or milk chocolate has a different Fat-to-Solid Ratio. The result will be richer but slightly firmer; you may need to increase the peanut butter by 2 tablespoons to keep it soft.
- Does it need to stay refrigerated?
- While it is stable at room temperature for several hours, it is best kept cold to maintain its Mechanical Stiffness and “cheesecake” mouthfeel.
Would you like me to suggest a “Chocolate Ganache Drizzle” for a decorative finish, or perhaps show you how to turn this recipe into “Fudge-Stuffed Cookies”?