ADVERTISEMENT

When you whip heavy cream, you are forcing air into the liquid. The fat globules in the cream partially collapse and “stick” to one another, forming a protective wall around the air bubbles. This is a Foam-Phase Emulsion.

The “Folding” step is the most critical regulatory moment in the recipe. If you stir vigorously, you pop the air bubbles (deflation), leading to a soupy cheesecake. By gently folding, you integrate the dense pistachio-cream cheese mixture into the light foam without compromising the air-gap structure.

4. The Instructions: A Step-by-Step Methodology

Stage 1: The Foundation
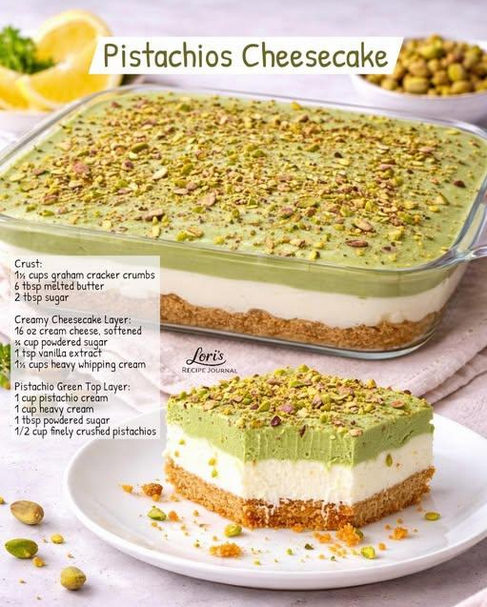
Crust Consolidation

Combine graham crumbs and melted butter. Pressing “firmly” is not just for shape; it’s to eliminate air pockets that could allow the cream layer to seep through and make the base soggy. Chilling for 15 minutes initiates lipid crystallization, locking the crumbs in place.

Stage 2: The Creamy Emulsion

Aerating the Core

Beat the cream cheese until smooth before adding sugar. This ensures there are no protein clumps. When adding the pistachio cream and vanilla, you are creating a “concentrated base.” In a separate bowl, whip the cream to Stiff Peaks—the stage where the cream stands straight up when the whisk is lifted. Fold this into the base to create the primary cheesecake volume.

Stage 3: Thermal Setting

The Intermediate Chill

Chill the first layer for 30–45 minutes. This is a Surface Tension play. If you add the green top layer immediately, the two will bleed into each other, destroying the clean aesthetic. You need the surface of the first layer to “skin over” so the topping can be spread without dragging the white filling underneath.

Stage 4: The Finishing Layer

Pistachio Saturation

The top layer is a Ganache-style topping. By whisking pistachio paste with cream, you create a rich, emerald-green finish. Sprinkle the crushed pistachios immediately so they adhere to the moist surface before the final set.

5. Serving and Storage: The Maturation Window

The “Overnight” Rule: While 6 hours is the minimum, 12–24 hours is the Flavor Maturation Window. During this time, the moisture in the cream cheese migrates slightly into the crust, softening it just enough to slice cleanly, while the pistachio aromatics fully infuse the fat molecules in the cream.
Condition Recommendation Texture Result
Refrigerated Up to 5 Days Perfectly creamy and set.
Frozen Up to 1 Month Becomes an “Icebox Cake” texture. Thaw for 30 mins before serving.

6. Expert Tips for 2026

  • The “Room Temp” Mandate: Your cream cheese must be genuinely soft. Cold cream cheese will result in tiny white lumps that no amount of beating can remove.
  • Clarity of Flavor: If your pistachio cream is too sweet, omit the optional sugar in the top layer. Balance the richness with a tiny pinch of flaky sea salt on top to highlight the nuttiness.
  • Clean Slicing: For those perfect “Instagrammable” layers, dip your knife in hot water and wipe it dry between every single cut. The heat slices through the butter in the crust and the fats in the cream like a razor.

7. Variations & Customizations

  • The White Chocolate Twist: Fold 1/2 cup of melted (and cooled) white chocolate into the cheesecake layer for extra stability and sweetness.
  • The Berry Contrast: Layer fresh raspberries at the bottom of the crust before adding the cream for a tart surprise.
  • The Rosewater Infusion: Add 1/2 tsp of rosewater to the pistachio cream for a classic Middle Eastern flavor profile.

8. Conclusion: The Final Set

Mastering this Pistachio Cheesecake is about respecting the physics of cold fats. It is a dessert of patience—the longer it sits in the cold, the more its structural integrity and flavor profile improve. By following the staging of the layers and the science of the fold, you are creating a professional-grade dessert that celebrates the emerald-green elegance of the pistachio. Enjoy the results of your labor!


ADVERTISEMENT
⬇️ Ready for the rest? Click Next Page below to continue reading. ⬇️
ADVERTISEMENT

Leave a Comment