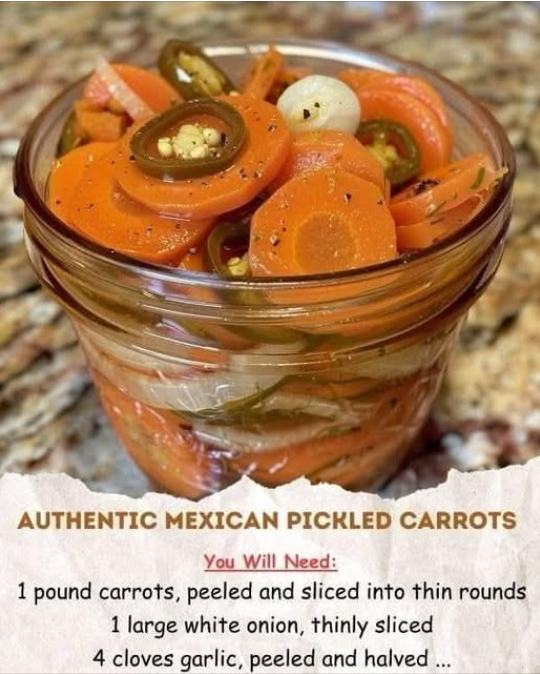
The full ingredient list for an authentic and vibrant Zanahorias en Escabeche:
I. The Crunch Components (Vegetables):
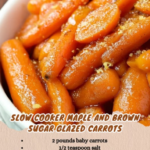
- **4 cups** carrots, peeled and sliced into thick $\frac{1}{4}$-inch rounds or sticks
- **3** jalapeños, sliced into $\frac{1}{4}$-inch rounds (Include seeds for heat)
- **1 large** white onion, thinly sliced
- **4 cloves** garlic, smashed or thinly sliced
II. The Aromatic Base (Sauté):
- **3 tablespoons** vegetable oil or olive oil
- **1 teaspoon** dried oregano (Mexican preferred)
- **2** bay leaves
- **½ teaspoon** whole black peppercorns
III. The Brine (Tangy Liquid):
- **1 ½ cups** white distilled vinegar ($5\%$ acidity)
- **1 ½ cups** water
- **1 tablespoon** kosher or sea salt (Non-iodized recommended)
- **1 teaspoon** granulated sugar (Balance the acid)
Instructions: Sautéing Aromatics and Brine Preparation
Phase 1: Vegetable Preparation and Sauté
- **Prep Vegetables:** Ensure the **4 cups carrots** are uniformly sliced thick ($\frac{1}{4}$-inch) and the **jalapeños and onion** are thinly sliced.
- **Sauté Aromatics (FLAVOR BASE):** In a large skillet or Dutch oven, heat the **3 tablespoons of oil** over medium heat. Add the sliced **onion and garlic**. Cook for 3 minutes until softened.
- **Bloom Spices and Peppers:** Add the **sliced jalapeños**, **dried oregano, bay leaves, and black peppercorns** to the skillet. Cook for another 3 minutes until the jalapeños brighten and the oregano becomes fragrant. This releases the oils into the fat base.
- **Add Carrots (CRUNCH PROTOCOL):** Add the **sliced carrots** to the skillet. Sauté for only **2–3 minutes**. This brief cooking period is just enough to soften the raw exterior slightly while preserving the interior crunch. Do not cook them fully.
Phase 2: Brine Boiling and Assembly
- **Prepare Brine:** While the vegetables are sautéing, combine the **$1 \frac{1}{2}$ cups white vinegar, $1 \frac{1}{2}$ cups water, 1 tablespoon salt, and 1 teaspoon sugar** in a separate small saucepan. Bring the mixture to a rolling boil, stirring until the salt and sugar are completely dissolved.
- **Pack Jars:** Transfer the warm, sautéed vegetables (including all the oil, spices, and liquid from the skillet) into clean, **heat-safe glass jars** (quart or pint size). Pack them snugly but do not crush them.
- **Pour Brine (THERMAL SHOCK):** Carefully pour the **hot, boiling brine** over the vegetables in the jars, ensuring all solids are fully submerged and leaving at least $\frac{1}{2}$-inch of headspace (space between the brine and the rim).
- **Seal and Cool:** Wipe the rims of the jars clean. Seal the jars tightly with lids. Let the jars cool to room temperature on the countertop (this process creates a light vacuum seal for storage).
Phase 3: Curing and Serving
- **Refrigerate:** Once cooled to room temperature, transfer the jars to the refrigerator. **Cure for at least 24 hours** before consuming. This allows the carrots to absorb the full flavor of the brine and spices.
- **Serve:** The carrots are ready to eat and are best enjoyed cold.
Serving and Storage: The Quick Pickling Rules
Since this is a quick pickle and not a traditional canning method (which uses high heat processing to sterilize and seal), it must be refrigerated.
- **Curing Time:** The carrots must cure in the refrigerator for a minimum of 24 hours to achieve the full tangy, spicy flavor.
- **Storage (Refrigerated):** Store the sealed jars in the refrigerator for up to **3–4 weeks**. The carrots will retain their crunch and flavor throughout this period.
- **Safety Protocol:** Always ensure the vegetables are completely submerged under the brine. Any pieces exposed to air may spoil. Use non-reactive utensils (stainless steel, glass) throughout the preparation process.
- **Serving Suggestions:** Serve alongside tacos al pastor, cochinita pibil, scrambled eggs, or as a garnish for soups and stews.
Tips: Essential Techniques for Crunch and Flavor
Salt Type: Use **kosher salt or pickling salt** (Step 5). Iodized table salt contains anti-caking agents that can cloud the brine, dulling the vibrant color of the carrots.
Spice Bloom: Do not add the **oregano or peppercorns** (Step 3) at the beginning of the sauté. They should be added with the jalapeños to “bloom” in the hot oil for maximum flavor extraction without burning.
Brine Boiling: Bring the brine to a **full rolling boil** (Step 5) immediately before pouring it over the vegetables (Step 7). This ensures the thermal shock necessary to keep the carrots crunchy and maintains the safety integrity of the brine.
Adding Cauliflower: For an authentic mix, add **1 cup of raw cauliflower florets** along with the carrots in Step 4. Cauliflower requires minimal cooking and pickles beautifully.
Aromatic Oil: Ensure all the **aromatic oil** from the skillet (Step 6), which now carries the flavor of the jalapeños and oregano, is scraped into the jars. This is critical for the final *escabeche* flavor.
Variations: Customizing Spice and Acidity
This traditional recipe is easily customized by adjusting the spice and vegetable mix:
- **Habañero Heat:** Substitute one of the **jalapeños** with **$\frac{1}{2}$ of a sliced habañero pepper** (use gloves when handling) for significantly higher heat.
- **Sweeter Brine:** Increase the **granulated sugar** (Step 5) to 2 teaspoons for a slightly sweeter, less aggressively tangy pickle.
- **Mexican Oregano:** Seek out **Mexican oregano** (Step 3) if possible. It has a citrus and earthy profile, unlike Mediterranean oregano, which has a distinct minty note.
- **Cilantro Stem Inclusion:** Add **$\frac{1}{4}$ cup of chopped cilantro stems** (thick part) to the jar (Step 6). The stems are crunchy and carry a potent cilantro flavor that pickles well.
- **Quick Version (Less Crunch):** For a softer, quicker-to-eat carrot, simmer the carrots in the boiling brine (Step 5) for 2 minutes before pouring everything into the jars.
**Jar Sterilization:** While quick pickling doesn’t require the intense processing of canning, using clean jars is paramount. **Sterilize the jars** by running them through a dishwasher hot cycle or boiling them in water for 10 minutes before use (Step 6).
**Headspace:** Maintaining the **$\frac{1}{2}$-inch headspace** (Step 7) is important. It allows the brine to expand slightly when cooled and ensures the jar is fully filled without overflowing.
**Non-Iodized Salt:** **Do not use rock salt or large crystal salts** that don’t dissolve easily. Ensure the salt is completely dissolved in the brine before pouring, or the final pickle will be over-salted at the bottom.
**Vinegar Acidity:** Always use vinegar labeled as **$5\%$ acidity** (Step 5). Lower acidity vinegars (like some flavored vinegars) are not safe for quick pickling.
Conclusion: Flavor that Lasts
The mastery of **Zanahorias en Escabeche** lies in the perfect execution of the thermal shock technique: lightly sautéing the aromatics to bloom the spices, briefly warming the carrots to soften them slightly, and immediately dousing them in hot, acidic brine. Adhering to the correct vinegar ratio and allowing the mixture to cure for at least 24 hours results in a vibrant, intensely flavored, and satisfyingly crunchy condiment that epitomizes authentic Mexican cuisine.
Frequently Asked Questions (FAQ)
Q: Why did my carrots lose their crunch and become soft?
A: The most common reason is **overcooking** (Step 4). The carrots were sautéed for too long, or they were left in the boiling brine (Step 5) for an extended period. The entire cook time should be minimal.
Q: Is this method safe for long-term storage (canning)?
A: **No.** This is a **quick pickle** and must be stored in the refrigerator because it has not been processed in a boiling water bath (canning). It is good for about 3–4 weeks refrigerated.
Q: My brine looks cloudy. Is it still safe?
A: If you used **iodized salt** (Step 5), the cloudiness is likely due to anti-caking agents and is usually safe. If the carrots are exposed to air, the brine smells foul, or there is mold, discard immediately.
Q: Can I use apple cider vinegar?
A: Yes, provided it is **$5\%$ acidity** (Step 5). It will impart a slightly fruitier flavor, which works well but is less traditional than plain white distilled vinegar.