
🍮 Ingredients: The Blueprint for Flavour and Structure
Achieving a transcendent cheesecake bar begins with the quality and preparation of its components. Think of this list not just as items to buy, but as foundational layers, each serving a critical structural and flavour role.
Snowflake Crust (The Foundation)
- **2 cups Graham Cracker Crumbs (or Vanilla Wafer Crumbs):** The choice here dictates the flavour profile. Graham crackers lend a warm, honey-graham note, while vanilla wafers offer a smoother, more neutral, vanilla-forward base. Ensure crumbs are finely processed for a uniform, packed foundation.
- **½ cup Unsalted Butter, Melted:** The binding agent. Unsalted butter allows you to control the total sodium content. Melting the butter releases its fat content, which, when mixed with the crumbs, recrystallizes upon cooling to form a solid, crumbly matrix. The amount must be precise: too little, and the crust crumbles; too much, and it becomes greasy.
- **2 tbsp Sugar (Granulated):** Provides necessary sweetness and assists in caramelization during the pre-bake, enhancing the crust’s golden hue and flavour depth.
- **¼ tsp Cinnamon (Optional, but Cozy!):** The quintessential winter spice. Its volatile oils release aroma upon baking, connecting the crust to the festive theme.
Blueberry Cheesecake Filling (The Core)
- **3 (8 oz) Blocks Full-Fat Cream Cheese, Softened:** This is the heart of the cheesecake. It must be full-fat and softened to true room temperature (ideally 68-70°F or 20°C). Cold cream cheese will result in a lumpy batter, which overmixing to smooth will introduce too much air, leading to cracks during baking.
- **1 cup Granulated Sugar:** Provides sweetness and contributes to the creamy texture by interfering with the coagulation of the egg proteins.
- **4 Large Eggs, Room Temperature:** The primary emulsifier and thickener. Eggs must be added one at a time and only mixed until *just* combined to avoid excessive aeration.
- **2 tsp Pure Vanilla Extract:** Adds depth and counterpoints the tang of the cream cheese. Use a high-quality extract for best results.
- **1/4 cup Sour Cream or Full-Fat Greek Yogurt, Room Temperature (Optional but highly recommended):** The “secret weapon” for a smooth, crack-free, and tangy filling. The extra acid and fat contribute to a velvety mouthfeel and prevent the eggs from setting too quickly.
Blueberry Swirl and Garnish (The Accent)
- **1 cup Fresh or Frozen Blueberries (plus extra for garnish):** The star fruit. Frozen blueberries should ideally not be thawed, as their excess moisture can make the swirl too watery.
- **1/4 cup Granulated Sugar:** Used to create the simple blueberry compote/swirl base.
- **1 tbsp Cornstarch (or Maizena):** A critical thickener for the blueberry swirl, preventing the fruit juices from bleeding excessively into the white cheesecake batter.
- **1/2 tsp Lemon Zest:** Provides a bright, aromatic lift that cuts through the richness of the cheese.
- **1 tbsp Lemon Juice:** The acid enhances the blueberry flavor and prevents the fruit from oxidizing.
🏓 Instructions: A Disciplined Path to Perfection
Timing and technique are non-negotiable in cheesecake preparation. Follow these steps meticulously to ensure a structurally sound and flawlessly creamy bar.
Step 1: Prep the Pan and Preheat (The Setup)
Preheat your oven to **325°F (160°C)**. Line a 9×13 inch baking pan with parchment paper, allowing a significant overhang on the long sides. This parchment “sling” will be essential for lifting the chilled bars out cleanly for cutting. Lightly grease any exposed pan sides. The lower temperature is key to prevent the rapid heating of the edges, which is the main cause of cracks.
Step 2: Prepare and Bake the Snowflake Crust (The Foundation Set)
In a medium bowl, combine the graham cracker crumbs, 2 tablespoons of sugar, and cinnamon (if using). Pour the ½ cup of melted butter over the mixture and stir with a fork until all crumbs are evenly moistened and resemble wet sand. Press the mixture firmly and evenly into the bottom of the prepared pan. Use the flat bottom of a measuring cup to achieve a dense, level surface. **Bake for 10 minutes** to set the crust. Remove from the oven and let it cool partially while preparing the filling.
Step 3: Craft the Blueberry Swirl Compote (The Jewel Tone)
In a small saucepan, combine 1 cup of blueberries, ¼ cup of sugar, cornstarch, lemon juice, and zest. Cook over medium-low heat, stirring constantly, for 5-7 minutes. The mixture will thicken significantly as the cornstarch activates and the berries soften. **Do not overcook;** you want some berries to remain intact. Remove from heat and allow to cool slightly. This cooling step prevents the hot compote from ‘cooking’ the raw cheesecake batter.
Step 4: Mix the Cheesecake Filling (The Critical Emulsion)
In the bowl of a stand mixer fitted with a paddle attachment (or using a hand mixer), beat the softened cream cheese until it is **perfectly smooth and lump-free**—about 2-3 minutes. Stop and scrape down the bowl frequently. Add the 1 cup of sugar and beat until just combined. Next, incorporate the vanilla extract and sour cream (if using). Finally, add the eggs one at a time, mixing on **low speed** only until the yellow yolk disappears. **THE GOLDEN RULE:** Do not overmix after the eggs are added, as excessive whipping incorporates air, which expands in the oven, then collapses, causing cracks.
Step 5: Assembly, Swirl, and Bake (The Transformation)
Pour the finished cheesecake batter evenly over the pre-baked crust. Drop spoonfuls of the cooled blueberry compote randomly over the white batter. Using a butter knife or skewer, gently pull through the batter and compote to create an elegant, marbled swirl pattern. Sprinkle a few fresh blueberries over the top. **Bake for 35-45 minutes** or until the edges are set and the center still has a slight, noticeable ‘jiggle’ when the pan is gently nudged. Do not wait for the center to look completely firm. Turn off the oven, prop the door open slightly, and let the bars **cool slowly inside the oven for 30 minutes**. This gradual temperature reduction is critical for preventing thermal shock and subsequent cracking.
Step 6: Chill and Set (The Patience Test)
Remove the pan from the oven and cool on a wire rack to room temperature (about 1 hour). Once cooled, cover the pan tightly with plastic wrap and **refrigerate for a minimum of 3–4 hours, or preferably overnight.**
🍽️ Serving and Storage: Presentation and Preservation
The final steps are dedicated to ensuring a stunning presentation and maintaining the quality of your hard work.
Cutting and Plating (The Snowflake Effect)
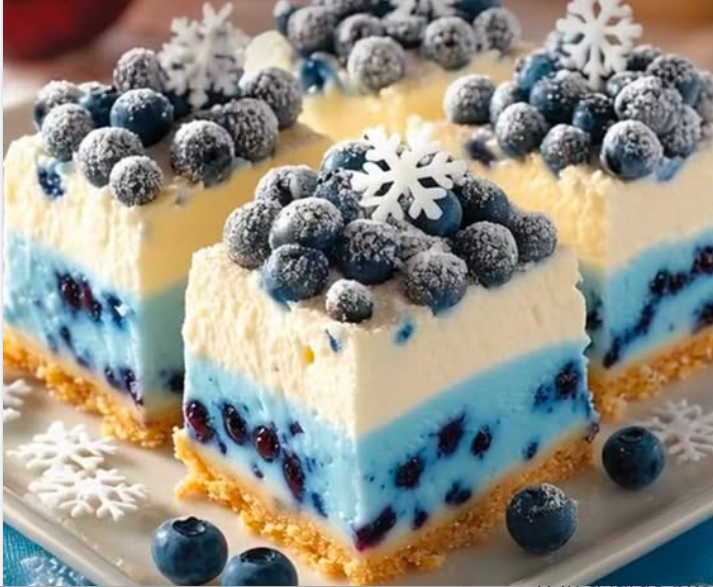
Using the parchment paper overhang, lift the entire cheesecake bar slab out of the pan and place it on a large cutting board. To achieve clean, “snowflake-sharp” edges, use a long, non-serrated chef’s knife. **Dip the knife blade into hot water and wipe it clean and dry** before *each* cut. This technique warms the blade just enough to glide smoothly through the dense, chilled cheesecake without dragging or tearing the crust. Slice first into halves, then quarters, then into 12 or 16 perfect bars. For the “Snowflake” aesthetic, dust the top of the bars with a fine layer of powdered sugar just before serving. Garnish with a sprig of mint or a single, perfect blueberry.
Maximizing Shelf Life (Storage)
Due to the dairy content, these bars must be stored in the refrigerator. Place the bars in an airtight container, separated by sheets of parchment paper if stacking. They will maintain their quality and flavor for **up to 5 days** in the refrigerator. For longer storage, cheesecake bars freeze beautifully. Cut the chilled bars, wrap each one tightly in plastic wrap, and then place them in a freezer-safe zip-top bag or container. They can be frozen for up to 3 months. Thaw individual bars overnight in the refrigerator before serving. Freezing can enhance the “blondie-like” density of the bar texture.
🧣 Tips: Mastering the Cheesecake Emulsion and Temperature Control
These advanced tips will help you navigate the common pitfalls of cheesecake baking, ensuring a velvety smooth and crack-free result every time.
The Science of Cream Cheese Temperature
As noted in the ingredient section, room temperature is paramount. Cold cream cheese contains tightly bound fat globules. When beaten, these cold fats are resistant to emulsification with sugar and eggs, leading to lumps. The impulse is to beat harder, which incorporates excessive air. **Solution:** Plan ahead. Take the cream cheese and eggs out 2 hours before beginning. If you are pressed for time, you can microwave the cream cheese blocks for 10-15 seconds per side on low power, checking frequently, but be careful not to melt them.
Preventing Cracks: The Slow Cool Technique
Cracks are caused by a sudden, drastic drop in temperature, which causes the surface to contract faster than the center. The center, still warm and expanded, pulls the cooled surface apart. **The Solution** is the slow cooling detailed in the instructions: turning off the oven and leaving the door ajar for 30 minutes. This allows the internal and external temperatures to equalize gradually. Alternatively, a low-profile water bath (placing the cheesecake pan in a larger pan filled with about an inch of hot water) can also provide a stable, humid thermal environment, though it is more complex for bars than for a full round cake.
The Role of Acid and Fat
Incorporating sour cream or Greek yogurt does two important things: it adds extra fat, contributing to richness, and the lactic acid helps to create a tender, creamy texture by slightly delaying the coagulation of the egg proteins. This delay prevents the filling from setting too hard, too fast, resulting in a silkier end product.
🏁 Variations: Seasonal Shifts and Flavour Twists
While the classic Blueberry Cheesecake Bar is a showstopper, the basic recipe can be adapted to embrace other seasonal flavours and themes.
The Gingerbread Spice Bar (Deep Winter)
Swap the graham cracker crumbs for crushed **gingersnap cookies**. Increase the cinnamon in the crust to ½ tsp and add ¼ tsp of ground ginger and a pinch of cloves. For the filling, add 1 tablespoon of molasses and ½ tsp of ground ginger to the cream cheese mixture. Swirl with a homemade **Cranberry Compote** instead of blueberry, creating a beautiful red and white holiday contrast.
The Citrus Snowdrift Bar (Late Winter Brightness)
Replace the blueberries with the zest and juice of two **Blood Oranges**. Instead of a swirl, flavour the entire filling with the citrus. Once baked and chilled, top the bars with a thin layer of **Orange Glaze** (powdered sugar, orange juice, and a tiny bit of zest) and dust heavily with powdered sugar to emulate a snowdrift.
Nutty Pecan Praline Crust
Substitute half of the graham cracker crumbs with finely ground toasted pecans. For the filling, swirl in a homemade **caramel sauce** instead of the blueberry compote. This transforms the bar into a decadent, deeply comforting dessert perfect for New Year’s celebrations.
A Clean White Finish
For a true ‘Snowflake’ effect, omit the blueberry swirl entirely. Bake a simple, plain cheesecake bar, and after cooling, top it with a thin layer of **white chocolate ganache** (melted white chocolate mixed with a touch of heavy cream) before chilling. Use a stencil to dust cocoa powder or finely chopped nuts in a snowflake pattern before cutting.
🍪 Tips: Ingredient Quality and Troubleshooting
These final tips address the critical selection of ingredients and offer solutions for common post-bake issues.
The Case for Full-Fat Dairy
Cheesecake is a fat-driven dessert. Using reduced-fat cream cheese, or non-full-fat Greek yogurt/sour cream, introduces more water into the batter. This excess water results in a filling that is more susceptible to separation, cracking, and a grainy, less desirable texture. **Always invest in full-fat brick-style cream cheese** for the best structural integrity and mouthfeel.
The Blueberry Density and Placement
When creating the swirl, ensure the compote is thick enough. If the compote is too thin or runny, the blueberry juices will sink immediately to the crust and create a soggy layer. The cornstarch is vital for maintaining a thick viscosity. If using fresh blueberries for the garnish, gently press them into the top of the batter slightly, but not all the way down. Berries left on the surface can sometimes burst and burn; partially submerged berries retain their shape and provide a pop of color.
Cutting Technique for Presentation
As previously mentioned, the hot-knife method is key. A simple extension: do not attempt to cut the bars until they have been chilled for the minimum specified time. The filling is a custard, and only when fully set through chilling does it achieve the proper density to hold a clean, sharp edge. Cutting warm or partially set cheesecake will always result in a messy, crumbling disaster, ruining the “bar” aesthetic.
🎉 Conclusion: The Reward of Patience
The **Christmas Snowflake Blueberry Cheesecake Bar** is a recipe that demands respect for process. It is a testament to the fact that the most impressive and flavourful results in baking are often achieved not through speed, but through patience and meticulous attention to detail. Every step, from the careful softening of the cream cheese to the controlled cooling in a gradually opening oven, is designed to culminate in a dessert that is a perfect marriage of flavour and flawless texture.
The satisfying crunch of the spiced crust, the silky, slightly tangy cheesecake core, and the bright, fruity pockets of blueberry swirl come together to form an unforgettable holiday treat. By following this detailed blueprint, you have mastered the foundational and advanced techniques required. These bars represent the very best of holiday baking: a dessert that is as beautiful to look at as a freshly fallen layer of snow and utterly delicious to eat. Go forth, slice with your hot knife, and enjoy the fruits of your disciplined labour.
❓ Frequently Asked Questions
Q1: Why did my cheesecake bars crack?
A: Cracking is almost always caused by one of two factors: **overmixing** the batter after the eggs are added (introducing too much air), or **thermal shock** (too rapid a temperature change after baking). Solution: Mix eggs gently on low speed until just blended, and use the slow-cool method (leaving the bars in the turned-off oven with the door ajar).
Q2: My crust is too crumbly/too greasy. What went wrong?
A: **Crumbly:** You likely didn’t use enough melted butter or didn’t press the crust firmly enough into the pan. **Greasy:** You likely used too much melted butter. Precision in measuring the butter is key to the crust’s success.
Q3: Can I use frozen blueberries straight from the freezer for the swirl?
A: Yes, but only in the compote. Do not thaw them first. Thawing releases excess water. You can add them straight to the saucepan with the sugar and cornstarch. They will release their liquid as they cook, which the cornstarch will then thicken. If you are scattering fresh berries on top of the batter, use fresh or slightly frozen ones—not berries that have been completely thawed and are mushy.
Q4: How do I know when the bars are done baking?
A: The center test is the most reliable method. The edges should look set and slightly puffed, but when you gently nudge the pan, the very center (about a 2-inch circle) should still have a slight, jiggly movement, similar to firm Jell-O. The residual heat will continue to set the center during the cooling phase.
Q5: Can I make these in a different sized pan?
A: Yes, but the baking time will change. An 8×8 inch pan will require slightly less time (check after 30 minutes) but will produce thicker bars. A 10×15 jelly roll pan will make thinner bars and will require less baking time (check after 25 minutes). Always watch for the ‘jiggle’ test, not the clock.
Related posts:
 The Decadent and Delightful Strawberry Cheesecake Bars
 The Art of the Swirl: Mastering Blueberry Cheesecake Cookies
 Easy Turtle Bars
 The Holiday Magic Bar: Santa’s Simplified No-Bake Cookie Bars
 The Ultimate Guide to Strawberry Cheesecake Turnovers
 Decadent Caramel Cheesecake Bars – Creamy, Rich, and Irresistible
