ADVERTISEMENT
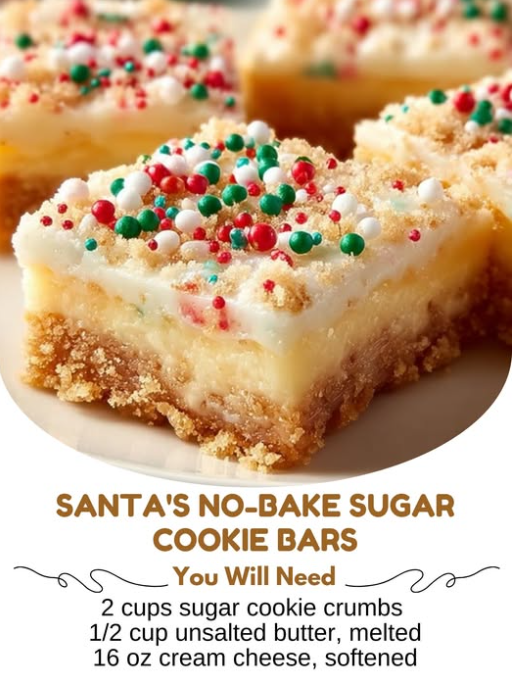
The success of the Santa’s No-Bake Sugar Cookie Bar depends on the careful balance between the structure of the crust and the light aeration of the filling. The ingredients are divided into the crust, the cream cheese binder, and the aerating element.
The Structural Foundation (Crust):
- 2 cups sugar cookie crumbs (about 16 cookies, crushed): The core flavor and structure. This can be pre-made crushed cookies, or homemade leftovers. The crumbs must be finely ground to press into a firm, cohesive crust.
- 1/2 cup unsalted butter, melted: The necessary binder for the crust. The melted fat coats the crumbs, allowing them to fuse tightly upon chilling.
The Creamy Core (Filling Binder):
- 16 oz cream cheese, softened: The primary base for the filling. It must be **fully softened** to room temperature to ensure a smooth, lump-free mixture upon beating.
- 1 cup powdered sugar: The sweetener for the filling. Powdered sugar (confectioners’ sugar) dissolves instantly into the cream cheese, ensuring a silky, non-gritty texture.
- 1 teaspoon vanilla extract: Essential for enhancing the sugar cookie flavor profile in the filling.
The Aerating and Flavor Agents:
- 2 cups heavy whipping cream: The lifting agent. When whipped with sugar, this cream creates a light, stable foam that is gently folded into the cream cheese to create the mousse-like texture.
- 1/4 cup granulated sugar: The stabilizer for the whipped cream. This sugar helps the cream hold its stiff peaks, ensuring the filling remains voluminous and does not collapse.
- 1 cup sugar cookie pieces, chopped: The internal texture and flavor boost. Folding these pieces into the filling ensures that the familiar chew and texture of the sugar cookie are present throughout the creamy layers.
- Red and green sprinkles for decoration: The festive finish. The color contrast is vital for the visual appeal of these holiday bars.
A Note on Temperature: The rule of opposites applies here: the cream cheese must be warm (softened) for smooth mixing, but the heavy whipping cream must be **ice cold** to whip up properly. Using chilled bowls and utensils for the cream step can also aid in achieving stiff peaks.
Instructions: The Two-Phase Assembly Blueprint
The bars are constructed in two distinct phases: creating and chilling the crust, and preparing and spreading the aerated filling.
Phase 1: The Cookie Crust (Steps 1–3)
- Create the Crust Base: In a medium bowl, combine the **sugar cookie crumbs** and **melted butter**. Mix thoroughly until all crumbs are evenly moistened.
- Press and Chill: Press the mixture firmly and evenly into the bottom of a greased 9×9 inch baking dish to form the crust. Use the flat bottom of a measuring cup or glass to ensure a tight, compact layer. Chill in the refrigerator for a minimum of **15 minutes** to solidify the crust.
Phase 2: The Mousse Filling (Steps 4–8)
- Whip the Cream Cheese: In a large mixing bowl, beat the **softened cream cheese** until it is completely smooth and airy.
- Sweeten the Base: Add the **powdered sugar** and **vanilla extract** to the cream cheese. Beat again until the mixture is fully combined, lump-free, and tastes sweet and creamy.
- Whip the Aerating Agent: In a separate, clean bowl, whip the **heavy cream** with the **granulated sugar** using an electric mixer on high speed until **stiff peaks form**. The cream should stand up on its own when the whisk is removed.
- Fold the Mousse: Gently fold the **whipped cream** into the cream cheese mixture using a rubber spatula. Use a cutting and lifting motion to maintain the airiness of the whipped cream. Stop folding the moment the mixture is uniform and fluffy.
- Integrate the Cookie Pieces: Gently fold in the **chopped sugar cookie pieces**. The key is integration, not pulverization—you want discernible chunks of cookie.
- Assembly and Decorating: Spread the cheesecake/mousse mixture evenly over the chilled crust. Decorate the top immediately with **red and green sprinkles**.
Phase 3: The Critical Chill (Steps 9–10)
- Set the Bars: Refrigerate the bars for at least **4 hours** or, ideally, **overnight** until the filling is completely firm and set. This allows the fat in the cream cheese and whipped cream to solidify, ensuring clean cuts.
- Cut and Serve: Cut into squares (16 is the recommended yield) and serve chilled.
Serving and Storage: Maximizing Freshness and Slicing Perfection
The quality of the final serving depends entirely on proper chilling and the technique used for cutting the dense, creamy dessert.
Slicing Perfection (Tip Recap):
Achieving clean, professional-looking squares is easy with two simple techniques:
- The Hot Knife Rule: Run a sharp, non-serrated knife under **hot water** for 30 seconds, wipe it dry, and make your first cut. Repeat this process—rinsing, drying, and cutting—before each slice. The hot blade slides cleanly through the chilled cream filling without dragging or tearing.
- Serving Temperature: Serve the bars directly from the refrigerator. If they sit out too long, the mousse layer will soften, making slicing messy.
Storage Guidelines (Tip Recap):
The structure and dairy content of the bars require consistent refrigeration.
- Refrigeration: These bars must be stored in an airtight container in the refrigerator. They can be stored for up to **one week**, making them an excellent choice to prepare several days in advance of a major gathering.
- Freezing: The assembled bars can be frozen for up to **2 months**. Wrap the entire chilled dish tightly in plastic wrap, followed by a layer of aluminum foil. Thaw overnight in the refrigerator before slicing and serving.
Tips: Refining Flavor and Technique
Advanced Tips for Flawless Bars:
- Almond Extract Boost: For a more complex, bakery-style flavor, consider adding a **few drops (start with 1/4 teaspoon)** of almond extract along with the vanilla extract to the cream cheese mixture (Tip 1). Almond extract is a natural pairing for sugar cookies.
- The Perfect Crush: For the crust, pulse the sugar cookies in a food processor until fine, uniform crumbs are achieved. Avoid large chunks, which compromise the crust’s integrity.
- Preventing Crumbling: When pressing the crust, spend extra time pushing the crumbs up the very edges of the pan. This provides a clean, supportive wall for the filling and prevents crumbling corners.
- Whipping Cream Stability: If your heavy cream struggles to form stiff peaks, ensure your bowl and whisk are chilled, and the cream is straight from the coldest part of your refrigerator.
Variations: Customizing the Festive Filling
The No-Bake Sugar Cookie Bar template is highly flexible, allowing for festive variations by adjusting the extract, sprinkles, and cookie type.
Gingerbread Spice Bars:
Replace the sugar cookie crumbs and pieces with **gingerbread cookies**. Add **1 teaspoon of ground cinnamon and 1/2 teaspoon of ground ginger** to the cream cheese mixture. Finish the top with a light sprinkle of nutmeg instead of holiday colors.
Peppermint Chocolate Bars:
Use **chocolate wafer cookies** for the crust base. Add **1/2 teaspoon of peppermint extract** to the cream cheese mixture. Fold in **chopped peppermint candies (or candy canes)** instead of plain cookie pieces. Garnish with crushed peppermint and a drizzle of melted dark chocolate.
Birthday Cake Bars:
Use **funfetti-style sugar cookie crumbs** and pieces. Replace the vanilla extract with **1/2 teaspoon of butter extract** and **1/2 teaspoon of vanilla extract**. Use multi-colored, round sprinkles and top with a thin layer of melted white chocolate before sprinkling.
The Citrus Zest Bars:
Add the **finely grated zest of one whole orange** to the cream cheese mixture, replacing the vanilla extract with the zest and **1 teaspoon of orange liqueur (like Grand Marnier)**. Garnish with candied orange peel.
Conclusion: The Ultimate Holiday Time Saver
The Santa’s No-Bake Sugar Cookie Bar is a truly inspired dessert solution for the bustling holiday season. By mastering the two-phase assembly—the sturdy, buttery crust and the light, stabilized mousse filling—you can achieve a complex, multi-textured treat with minimal effort. We have provided the full blueprint, from the non-negotiable step of chilling the crust to the precise technique of cutting the chilled bars with a hot knife.
This recipe delivers on all fronts: flavor, texture, and festive appearance. It allows you to produce a large, shareable dessert that remains fresh for days, fulfilling the promise of a homemade treat without the oven commitment. Embrace the no-bake magic, utilize the expert tips for clean slicing and flavor augmentation, and let these creamy, crunchy bars become your new favorite holiday tradition.
Frequently Asked Questions: Troubleshooting and Clarifications
Q: Why did my filling turn out runny instead of firm and sliceable?
A: Runny filling is usually due to two reasons: 1) The **heavy cream was not whipped to stiff peaks** (it collapsed when folded), or 2) The filling **wasn’t chilled long enough**. The full 4 hours is the absolute minimum, and overnight chilling is highly recommended to ensure the fats fully solidify.
Q: Can I use store-bought graham cracker crumbs instead of sugar cookie crumbs?
A: Yes, graham cracker crumbs can be substituted for the crust, but the flavor will change significantly from “sugar cookie” to “classic cheesecake.” To maintain the sugar cookie theme, use only sugar cookie crumbs, either store-bought or homemade.
Q: My cream cheese was cold and now my filling is lumpy. Can I fix it?
A: If the cream cheese was cold when beaten, you likely have small, firm lumps of unmixed cream cheese. You can try transferring the mixture to a clean bowl set over a bowl of warm water (a makeshift double boiler) for 2–3 minutes, then beat again quickly. If the lumps persist, the best solution is to let it soften for 30 minutes and beat vigorously again before folding in the whipped cream.
Q: I don’t have a 9×9 dish. Can I use a 9×13 dish?
A: Yes, but the bars will be much thinner. To maintain the height and thickness of the recipe, you should increase the recipe scale by 1.5x (using approximately 3 cups of crumbs, 24 oz cream cheese, 3 cups heavy cream, etc.) and extend the chill time to ensure the larger volume sets.
ADVERTISEMENT