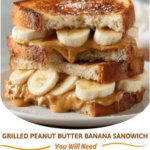
Because this recipe relies on only four primary elements, the quality of each ingredient will dictate the final outcome. Here is what you will need:
- 2 Tablespoons Peanut Butter: While creamy is the standard for a smooth melt, extra-crunchy peanut butter adds a delightful structural contrast to the soft fruit. For the best result, look for a brand with minimal added sugars.
- 2 Slices Whole Wheat Bread: Whole wheat is preferred over white bread for this specific recipe because its nutty flavor profile complements the peanuts. It also possesses a sturdier crumb that can withstand the weight of the fillings without becoming soggy.
- 1 Medium Banana: The ripeness of the banana is the “X-factor.” A banana with a few brown spots on the skin is ideal; it will be sweet enough to stand up to the salty butter and soft enough to melt slightly during the cooking process.
- Cooking Spray (or a pat of butter): This is used to achieve the Maillard reaction—that beautiful, golden-brown crust on the exterior of the bread that provides the necessary “crunch” to every bite.
Instructions: The Path to the Perfect Sear
Step 1: Preparing the Foundation
Begin by laying your two slices of whole wheat bread on a clean cutting board. Spread one tablespoon of peanut butter onto each slice, ensuring you cover the surface from edge to edge. This acts as a “sealant” that prevents the banana juices from soaking into the bread and making it mushy.
Step 2: Slicing and Stacking
Peel your banana and slice it into uniform rounds, roughly 1/4-inch thick. Arrange the slices across one of the bread pieces. Don’t be afraid to overlap them slightly to ensure that every bite of the finished sandwich contains fruit. Place the second slice of bread on top, peanut butter side down, to close the sandwich.
Step 3: The Griddle Setup
Set a non-stick skillet or a cast-iron griddle over medium-low heat. Lightly coat the pan with cooking spray. It is essential to let the pan heat for at least 60 seconds before adding the sandwich; putting bread into a cold pan leads to grease absorption rather than a crisp sear.
Step 4: The Toasting Process
Place the sandwich in the center of the skillet. Using a flat spatula, press down gently but firmly. This helps the peanut butter melt and “grip” the bananas, creating a unified center. Cook for approximately 2 to 3 minutes, or until the bottom is a deep golden brown. Flip carefully and repeat on the other side.
Step 5: The Resting Phase
Once both sides are toasted to perfection, remove the sandwich from the heat and place it on a plate. Wait 60 seconds before cutting. This allow the molten peanut butter to stabilize slightly, ensuring that the fillings don’t slide out when the knife passes through the bread.
Serving and Storage: Enjoying the Result
Serving: The griddled PB&B is best enjoyed immediately while the center is warm and the bread is crisp. Cut it on a diagonal to maximize the “dip-ability” if you are serving it with a side of cold milk or a yogurt dip. For a more festive presentation, a light dusting of powdered sugar or a drizzle of honey can be added to the exterior.
Storage: While this sandwich is designed to be eaten fresh, you can wrap a cooked sandwich in foil and keep it in the refrigerator for up to 24 hours. To reheat, avoid the microwave, as it will make the bread rubbery. Instead, place it back in a dry skillet or an air fryer for 2-3 minutes at 350°F to restore the crunch. We do not recommend freezing this sandwich, as the texture of the bananas will become unpleasantly mushy upon thawing.
Tips: Mastering the Texture
- Temperature Control: The biggest mistake home cooks make is using heat that is too high. Peanut butter has a high sugar content and can burn easily. A “low and slow” approach ensures the bananas get warm without charred bread.
- The “Lid” Trick: If your bread is getting brown but the bananas still feel cold, place a lid over the skillet for 30 seconds. This traps the steam and helps the center melt faster.
- Symmetry Matters: Ensure your banana slices are of equal thickness. Uneven slices will cause the bread to sit at an angle, leading to uneven browning in the pan.
Variations: Creative Twists on a Classic
Once you have mastered the basic griddled PB&B, you can begin to experiment with flavor profiles that suit your specific palate:
- The “Elvis” (The King’s Favorite): Add two slices of crispy, thick-cut bacon inside the sandwich. The smoky saltiness of the bacon against the sweet banana is a culinary revelation.
- The Apple-Cinnamon Crunch: Add thin slices of Granny Smith apple alongside the banana and a dash of cinnamon. The apple adds a tart “snap” that cuts through the richness of the peanut butter.
- The Chocolate Hazelnut Swap: For a dessert-inspired version, replace one tablespoon of peanut butter with a chocolate hazelnut spread (Nutella). This turns the sandwich into a decadent chocolate-banana crepe-style meal.
- The Superfood Boost: Sprinkle a teaspoon of chia seeds or hemp hearts over the peanut butter before adding the bananas. This adds a subtle crunch and a boost of Omega-3 fatty acids.
Tips: Beyond the Bread
- Bread Alternatives: While whole wheat is classic, this recipe is incredible when made with sourdough (for a tangy twist) or even cinnamon raisin bread for an extra layer of sweetness.
- Preventing “The Slide”: If you find your banana slices sliding out of the sandwich during the flip, try mashing the bananas slightly into the peanut butter rather than leaving them as whole rounds. This creates a “paste” that is much more stable.
- Salt is Key: If you are using an unsalted, natural peanut butter, add a tiny pinch of flaky sea salt directly onto the bananas before closing the sandwich. It makes the fruit flavors “pop.”
Conclusion: More Than Just a Sandwich
The Peanut Butter and Banana sandwich is a testament to the idea that great food does not need to be complicated. By taking ten minutes to thoughtfully select your ingredients and apply a little bit of heat, you transform a basic snack into a warm, comforting meal that nourishes both the body and the soul. It is a dish that carries a sense of nostalgia while remaining perfectly relevant in a modern, fast-paced world.
Whether you choose to follow the traditional path or branch out into savory bacon additions or sweet chocolate drizzles, the core principle remains the same: balance. The harmony between the creamy, the sweet, the salty, and the crunchy is what makes this sandwich a permanent fixture in the culinary landscape. So, the next time you see those spotted bananas on your counter, don’t just reach for a loaf pan—reach for a skillet and experience the griddled PB&B for yourself.
Frequently Asked Questions
- Is this sandwich healthy?
- Yes! It provides a balance of healthy fats, protein, fiber, and essential vitamins like Potassium and Vitamin B6. To keep it as healthy as possible, use 100% whole grain bread and natural peanut butter with no added oils.
- Can I use a toaster instead of a skillet?
- You can toast the bread in a toaster first and then assemble, but you will miss out on the way the peanut butter and banana melt together. The skillet method is highly recommended for the best texture.
- My bread is burning before the peanut butter melts. What do I do?
- Turn your heat down. If you are using butter instead of cooking spray, the milk solids in the butter may be burning. Try a mix of oil and butter, or lower your flame to the lowest setting.
- Can I make this nut-free?
- Absolutely. Sunflower seed butter (SunButter) or soy-based nut butter alternatives work excellently with this exact same method.
Would you like me to provide a recipe for a “Homemade Honey Peanut Butter” to use as a base for this sandwich?