ADVERTISEMENT
The ingredients are divided into three functional categories: the savory filling core, the melting cheese binder, and the fresh toppings that provide crunch and cooling contrast.
I. The Savory Filling Core:
- 1 lb ground beef: The main protein. Using a lean-to-medium fat ratio (85/15 or 80/20) provides flavor, but thorough draining (Step 1) is crucial to prevent a soggy pocket.
- 1 small onion, chopped & 2 cloves garlic, minced: The aromatic base. These are cooked down to provide a necessary depth of savory flavor.
- 1 packet taco seasoning mix: Provides the classic Tex-Mex flavor profile (chili powder, cumin, oregano, etc.).
- 1/4 cup water: Used to dissolve and activate the spices in the seasoning mix, creating a thick, cohesive sauce that binds the meat.
II. The Cheese and Shell Components:
- 1 cup shredded cheddar cheese & 1 cup shredded mozzarella cheese: The critical melting agents. **Cheddar** offers sharp flavor, while **mozzarella** provides moisture and the essential stretch and gooeyness. This blend optimizes both taste and texture.
- 8 medium flour tortillas: The golden pocket shell. Flour tortillas are preferred over corn for their pliability, which allows for tight folding, and their ability to crisp up beautifully when pan-fried.
- 2 tablespoons vegetable oil: The necessary medium for crisping the tortilla shell. Oil facilitates heat transfer and helps create the desired golden-brown, crunchy exterior.
III. The Fresh Toppings (Optional Contrast):
- 1/2 cup sour cream: A cooling, creamy contrast to the heat and richness of the filling.
- 1/4 cup chopped green onions & 1/4 cup chopped fresh cilantro: Fresh aromatics that provide a sharp, bright flavor.
- 1 cup shredded lettuce, 1/2 cup diced tomatoes, & 1/4 cup sliced black olives: Offer cool, crisp, and fresh texture contrasts to the hot, savory filling.
A Note on Filling Cohesion: The filling must be **thick and low in moisture**. Excess liquid from the beef or the sauce will steam the tortilla from the inside, leading to a soggy texture instead of the intended crispy crust.
Instructions: From Simmer to Sealed Pocket
The instructions are a two-stage process focusing on creating a perfect filling and mastering the art of the tight, sealed fold.
Step 1: Prepare the Ground Beef Filling (The Savory Core)
- Sear and Drain: In a large skillet over medium heat, add the **ground beef and chopped onion**. Cook until the beef is browned and the onion is soft, about 5–6 minutes. **Drain any excess fat completely.** This prevents sogginess.
- Aromatics and Seasoning: Add the **minced garlic** and cook for an additional 1 minute until fragrant. Stir in the **taco seasoning mix and water**.
- Simmer and Thicken: Simmer for 3–4 minutes, or until the mixture has **thickened significantly**. The goal is a cohesive, almost paste-like filling. Remove from heat and let cool slightly. *The filling should be warm, not piping hot, for easier handling.*
Step 2: Assemble the Pocket Tacos (The Folding Technique)
The folding technique is similar to an envelope or a burrito, ensuring a fully sealed pocket.
- Lay the Base: Lay a **tortilla** flat on a clean surface. Sprinkle a **small amount of shredded cheddar and mozzarella cheese** in the center of the tortilla. This first layer acts as a “glue” to seal the folds and protect the tortilla from the meat’s warmth.
- Spoon the Filling: Spoon a portion of the **ground beef mixture** over the cheese. The filling should be centered, leaving ample space around the edges for folding.
- Fold the Sides: Fold the **sides of the tortilla in towards the center** first (like folding a shirt collar).
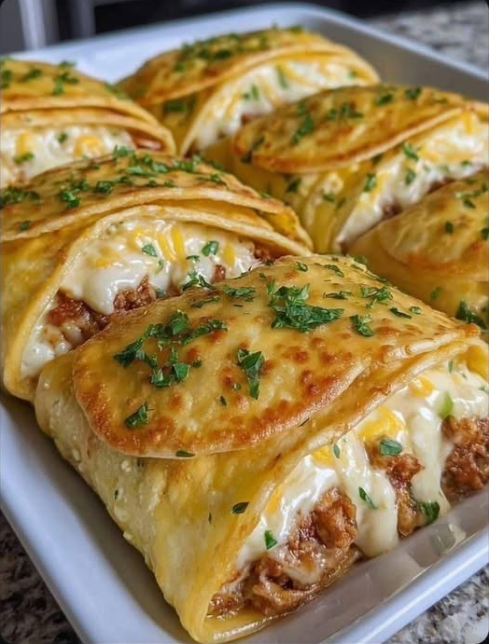
- Fold the Ends: Next, fold the **bottom and top edges in** to create a sealed pocket. Press gently to ensure the folds overlap. Repeat with the remaining tortillas, beef mixture, and cheese. [Image illustrating the 4-sided envelope-style fold of a flour tortilla for a pocket taco]
Step 3: The Golden Crisp (Final Cook)
- Heat the Oil: In a large skillet or griddle, heat the **2 tablespoons vegetable oil** over medium heat until shimmering.
- Sear the Pockets: Place the assembled pockets **seam-side down** in the hot oil. Cook for 3–4 minutes per side, pressing lightly with a spatula, until each side is **golden brown and crispy**, and the cheese inside is fully melted and gooey. Cook in batches to avoid overcrowding.
- Serve and Garnish: Remove the hot pockets from the pan. Slice in half and immediately top with **sour cream, lettuce, diced tomatoes, green onions, black olives, and cilantro** (optional). Serve warm and crispy.
Serving and Portability: Snacking Game Up a Level
These babies will quickly become your favorite treat no matter what time of day it is or where life takes you. The sealed pocket design is the key to their versatility.
Portability and Convenience:
- Ideal for On-the-Go: Since the filling is fully sealed within the crispy shell, these pockets are perfect for taking to work, school, or for rushing somewhere. Unlike traditional tacos, the filling stays contained.
- Party Perfection: The pocket shape makes them easier to handle than crunchy taco shells. They can be placed on a platter and eaten without utensils, making them excellent for having friends over.
Serving Suggestions:
- The Deconstructed Topping: While the primary recipe suggests adding the fresh toppings immediately, for maximum crispness, you can serve the pockets plain and place the cold toppings (lettuce, sour cream, tomatoes) in small bowls on the side.
- Sauce Dip: Offer a variety of dipping sauces, such as **guacamole, salsa verde, or a spicy chipotle mayo**, instead of piling all the toppings directly onto the hot pocket.
Tips: Ensuring the Crispy Exterior and Gooey Interior
Advanced Tips for Pocket Perfection:
- The Cold Filling Rule: If the filling is too hot during assembly, the cheese will melt prematurely, making the tortilla sticky and impossible to fold tightly. Allowing the meat to cool slightly (Step 3) is critical.
- Press and Seal: During the final sear (Step 9), the act of pressing the pocket ensures a strong seal where the folds overlap. This also maximizes the surface contact with the hot oil for a superior crisp.
- Shred Your Own Cheese: Pre-shredded cheeses contain anti-caking agents that can inhibit a smooth, gooey melt. For the ultimate cheesy taste, buy blocks of cheddar and mozzarella and shred them yourself.
- Use Low Heat for Assembly: To prevent tearing the tortilla, you can lightly microwave or warm the tortillas before folding (Step 4), but ensure the meat filling is cool enough not to melt the cheese yet.
Variations: Creating Fusion and Unique Tastes
The adaptability of this snack allows for personalized fusion dishes.
Smoked Turkey and Jalapeño Pocket:
As suggested: Substitute the ground beef with **shredded smoked turkey** (or chicken). Use **Colby Jack and Pepper Jack cheese** instead of cheddar and mozzarella, and mix **diced jalapeños** into the turkey filling before folding.
Philly Cheesesteak Pocket:
Substitute the ground beef with **thinly sliced shaved steak** and omit the taco seasoning. Sauté the meat with **onions and bell peppers** and season with salt and pepper. Use **Provolone cheese** instead of mozzarella/cheddar, and top with a sprinkle of fresh oregano.
Spicy Chorizo and Potato Pocket:
Substitute the ground beef with **spicy ground chorizo**. Mix the cooked chorizo with **diced, pre-cooked potatoes** and use the taco seasoning. Serve with a dollop of lime crema instead of sour cream.
Vegetarian Black Bean Pocket:
Substitute the meat filling with a mixture of **mashed black beans, corn, and diced bell peppers** seasoned heavily with the taco mix. This makes a hearty, fiber-rich vegetarian option.
Conclusion: The Irresistible Combination
The Loaded Cheesy Pocket Tacos are a successful innovation because they solve the fundamental problem of portability and structural integrity in handheld snacks. By creating a fully sealed, crispy shell around a perfectly seasoned, savory, and gooey filling, this recipe delivers an irresistible combination of crispy texture, cheesy taste, and just plain yummy goodness!
Mastering the simple folding technique and ensuring the filling is drained and thick are the keys to a non-soggy, perfectly sealed result. Whether you need something quick but satisfying during your lunch break or want some late-night munchies, these pockets are the ultimate customizable treat.
Frequently Asked Questions: Troubleshooting and Best Practices
Q: Why did my pocket taco unfold during cooking?
A: The pocket unfolded because the cheese inside was not melted enough to seal the folds, or the initial placement was incorrect. Always place the folded pocket **seam-side down** first (Step 9) in the hot oil. The initial heat will melt the bottom cheese layer, effectively gluing the folds shut.
Q: Why is my tortilla soft instead of crispy?
A: Softness is usually caused by **too low heat** or **excess oil**. Ensure the oil is hot before adding the pockets and the heat is medium (not low) to encourage crisping. Also, ensure the meat filling was thoroughly drained of excess fat and liquid (Step 1).
Q: Can I bake these instead of pan-frying?
A: Yes. For a lighter version, brush both sides of the assembled pockets with a light coat of **vegetable oil or melted butter**. Bake at $400^\circ\text{F}$ ($200^\circ\text{C}$) for 10–12 minutes, flipping halfway through, until golden brown and crispy.
Q: Can I make the beef filling ahead of time?
A: Yes, you can prepare the filling (Step 1) up to three days in advance and store it in the refrigerator. **Reheat it gently** before assembly, but allow it to cool slightly before placing it on the cheese (Step 4) to prevent premature melting.
ADVERTISEMENT