
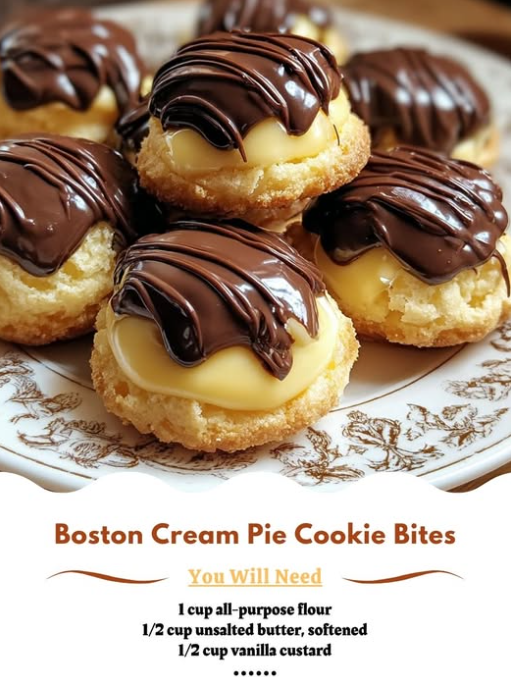
Phase 1: Shaping the Foundation
Preheat your oven to 350°F (175°C). In a medium bowl, cream together the softened butter, powdered sugar, and vanilla until smooth. Gradually add the flour. The “Thumbprint” Regulation: Roll the dough into 1-inch balls and place them on a baking sheet. Use your thumb (or the back of a small measuring spoon) to create a deep well in the center of each ball. Bake for 10–12 minutes until the edges are just barely golden.
Phase 2: Reinforcing the Well
Immediately upon removing the cookies from the oven, you may find the centers have puffed up. While still warm, gently press the centers down again to redefine the well. Let the cookies cool completely on a wire rack before filling; a warm cookie will cause the custard to melt and seep.
Phase 3: The Custard Injection
Once the cookie bases are cold, spoon or pipe about one teaspoon of vanilla custard into the center of each well. For a professional look, ensure the custard is level with the top edge of the cookie rim.
Phase 4: The Ganache Enrobing
In a small microwave-safe bowl, combine the chocolate chips and heavy cream. Heat in 20-second intervals, stirring until the mixture is glossy and smooth. Let the ganache sit for 5 minutes to thicken slightly. Spoon a small amount over the top of the custard, allowing it to spread naturally to the edges of the cookie.
Service and Storage Tips:
Because this dessert combines a dry baked good with a high-moisture cream, the “shelf-life regulation” is quite specific.
- The “Set” Period: After assembly, refrigerate the bites for at least 30 minutes. This allows the ganache to firm up and the custard to “bond” with the cookie.
- Storage: Store in a single layer in an airtight container in the refrigerator. They are best enjoyed within 48 hours; beyond this, the cookie base will begin to soften from the moisture of the custard.
- Temperature: Serve chilled for a clean, snappy bite, or let them sit at room temperature for 10 minutes for a softer, more “cake-like” experience.
Variants:
Explore these “dreamy” variations on the Boston classic:
- The “Mocha” Bite: Add 1/2 teaspoon of instant espresso powder to the ganache for a coffee-infused finish.
- Salted Caramel Center: Place a tiny drop of salted caramel at the bottom of the cookie well before adding the custard.
- White Chocolate Boston: Use white chocolate chips for the ganache cap and add a drop of yellow food coloring to the custard for a vibrant, retro look.
- Nutty Edge: Roll the cookie balls in finely chopped walnuts before baking for added crunch.
Tips:
- Consistency is Key: Ensure your custard is thick. If the custard is too “pourable,” it will soak into the cookie and make it mushy.
- The Butter Temperature: Ensure your butter is “cool-room temperature.” If the butter is too soft or oily, the cookie cups will spread too much in the oven and lose their shape.
- Ganache Gloss: If your ganache looks dull, stir in a tiny half-teaspoon of corn syrup or butter at the very end to give it a high-patisserie shine.
conclusion:
The Boston Cream Pie Cookie Bite is a triumph of miniature engineering. By respecting the three distinct layers—the buttery shortbread, the silky vanilla center, and the rich chocolate cap—you create a “melt-in-your-mouth” experience that honors a century-old tradition in a modern, “yummy” format. It is a foolproof recipe that delivers a sophisticated result with minimal equipment, proving that you don’t need a full-sized cake to achieve “dreamy” holiday magic. One bite and you’ll understand why this combination remains a perennial favorite.
Frequently asked questions:
- Can I use vanilla pudding instead of custard?
- Yes! Instant vanilla pudding works well as long as you use slightly less milk than the package calls for, ensuring it is thick enough to stand up in the cookie well.
- Why did my cookies crack when I pressed them?
- This usually means the dough was too cold or had too much flour. If the dough feels dry, add a teaspoon of milk before rolling the balls.
- Can I make the cookie bases in advance?
- Absolutely. You can bake the cookie “vessels” up to 3 days in advance. Store them at room temperature and fill them with custard and chocolate only on the day you plan to serve them.
- Is there a way to make these gluten-free?
- Substitute the all-purpose flour with a high-quality 1:1 gluten-free baking blend. Since there are no eggs in the cookie dough, the gluten-free flour works exceptionally well here.
Would you like me to provide a recipe for a 5-minute homemade pastry cream to use as the filling, or perhaps a guide on how to decorate these for a festive holiday party?
Related posts:
 Milktart Cookie Cups—Irresistibly Creamy and Homemade Delights
 Boston Cream Pie Cupcakes: The Architecture of the Perfect Fill
 Mastering Brownie Cookie Cakes
 The Best Banana Pudding Ever: A Classic Dessert with a Creamy Twist
 Elegant Simplicity: Boston Cream Pie Cookie Bites
 White German Chocolate Cake with a Cheesecake Center
