
Precision is paramount here. Once the mixture hits the heat, the “window of perfection” is narrow.
Step 1: The Base Mix
In a medium saucepan, combine the butter, sugar, milk, and cocoa. Place the pan over medium heat. Stir occasionally as the butter melts and the sugar begins to dissolve into a dark, glossy liquid.
Step 3: Prep for Speed
While you wait for the mixture to begin to boil, have your peanut butter and oats measured and ready. Open your vanilla jar. Once the boil finishes, you must stir in the remaining ingredients immediately before the fudge begins to set.
Step 3: The Critical Boil
Bring the mixture to a rolling boil (where the surface is covered in bubbles that do not disappear when stirred). Once it reaches a full boil, set your timer for exactly 1 minute and 15 seconds. This specific duration ensures the sugar reaches the “soft ball” stage.
Step 4: Incorporate and Bind
Remove the pan from the heat immediately after the timer goes off. Stir in the peanut butter until melted and smooth. Quickly add the oats and vanilla, stirring until every oat is completely cloaked in chocolate.
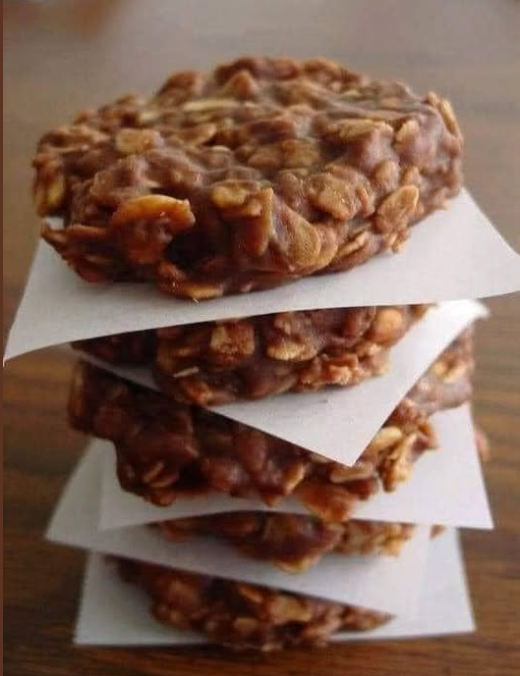
Step 5: Scoop and Set
Working quickly, drop the mixture by rounded tablespoons onto baking sheets lined with wax paper or parchment. Let them cool undisturbed for at least 30 minutes. As they cool, the fudge will firm up, creating that iconic “snap” and chew.
Service and Storage Tips
Service: These are the perfect companion to a glass of cold milk. For a gourmet twist, sprinkle a tiny pinch of sea salt on top while they are still warm.
Storage: Store in an airtight container at room temperature for up to 5 days, or in the refrigerator for up to 2 weeks. If your kitchen is humid, the refrigerator is best to keep them from becoming tacky. These also freeze beautifully; place them in a freezer bag for a quick snack that tastes great even when cold!
Variants
- The “Crunchy” Twist: Use crunchy peanut butter instead of creamy for added texture.
- Coconut Macaroon Style: Replace 1/2 cup of oats with 1/2 cup of shredded sweetened coconut.
- Mocha No-Bakes: Add 1 teaspoon of espresso powder to the cocoa mixture for a sophisticated coffee undertone.
Tips for Success
- The Timer is King: Don’t guess the 75 seconds. Use a digital timer. Start it the moment the entire surface is bubbling vigorously.
- Weather Warning: Believe it or not, humidity affects no-bakes! On very rainy or humid days, the sugar may not set correctly. Try making these on a dry day for the most reliable results.
- Don’t Over-Stir: Once you add the oats, stir just enough to combine. Over-stirring can cause the sugar to crystallize, leading to a grainy texture.
Conclusion
Mastering the Chocolate & Peanut Butter No-Bake Cookie is a rite of passage for any home baker. It’s a recipe that relies on rhythm and timing rather than complex equipment. By respecting the 1 minute and 15-second boil, you ensure a cookie that is fudgy, rich, and perfectly set every single time. It’s a timeless classic that proves some of the best things in life don’t need an oven—just a saucepan and a little bit of patience.
Frequently Asked Questions
Q: Why are my cookies dry and crumbly?
A: This usually means you boiled the mixture for too long, or your heat was too high. This causes too much moisture to evaporate, making the sugar “over-cook.”
Q: Why won’t my cookies set?
A: This is usually the result of an insufficient boil. If the mixture doesn’t reach the proper temperature, the sugar won’t bond. Ensure you have a “rolling” boil before starting your timer.
Q: Can I use margarine?
A: You can, but real butter provides a much better flavor and a superior set. If using margarine, avoid “light” or whipped versions as they have too much water content.
Related posts:
 Speed & Sweetness: Mastering No-Bake White Chocolate Raspberry Cookies
 Mastering No-Bake Cottage Cheese Peanut Butter Bites
 The Quick Confection: Mastering No-Bake Salted Caramel Cookies
 Holiday Magic: The Ultimate Guide to Two-Ingredient No-Bake Fudge
 Mastering Paula Deen’s 5 Minute Fudge
 Peanut Butter Microwave Fudge: A 15-Minute Modern Miracle
