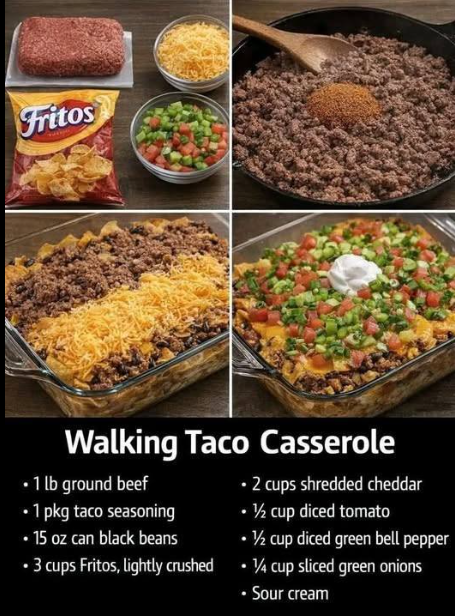
The secret to a non-soggy walking taco is the order of assembly. Follow these steps for the perfect result:
- The Beef Prep: Preheat your oven to 175°C (350°F). In a large skillet, brown the ground beef until fully cooked. Drain the excess fat (this is crucial to keep the chips from getting greasy!).
- The Flavor Build: Stir in the taco seasoning, salsa, black beans, and corn. Let it simmer for 3–5 minutes until the flavors meld and the mixture is thickened.
- The Base: Pour the beef and bean mixture into a greased 9×13-inch baking dish, spreading it into an even layer.
- The Cream & Cheese: Spread the sour cream carefully over the beef mixture (it’s easier to “dollop” and then spread). Sprinkle the shredded cheese generously over the top.
- The Bake: Place in the oven for 15–20 minutes, or until the cheese is melted and bubbly.
- The Final Crunch: Remove the dish from the oven and top with a thick layer of crushed Fritos or Doritos. Return to the oven for just 5 more minutes to toast the chips.
- The Fresh Finish: Top with your fresh garnishes (lettuce, tomato, etc.) right before serving.
Serving and Storage: The Freshness Factor
How to Serve
Serve this “chef’s kiss” dish family-style, letting everyone add their own extra hot sauce or jalapeños. It pairs beautifully with a side of Mexican street corn (Elote) or a simple cilantro-lime rice.
Storage Tips
Taco casserole is best enjoyed immediately while the chips are crispy. If you have leftovers, store them in the fridge for up to 3 days. Pro Tip: To avoid soggy chips when reheating, scrape the chip layer off before storing. Reheat the beef and cheese base, then add fresh crushed chips on top!
Tips: Pro-Level Casserole Secrets
- The Chip Barrier: Adding the chips after the initial bake prevents them from absorbing too much moisture from the meat and sour cream, ensuring that “walking taco” crunch remains.
- Salsa Selection: If you find the casserole too dry, add an extra 1/2 cup of salsa. If you like it thick and meaty, stick to the 1 cup measurement.
Variations: Flipping the Flavors
Make this casserole your own with these simple substitutions:
- The “Cool Ranch” Twist: Use Cool Ranch Doritos instead of Nacho Cheese for a tangier, herb-forward flavor.
- The Lean Fiesta: Swap the ground beef for ground turkey or shredded rotisserie chicken.
- The Veggie Power: Omit the beef and add an extra can of beans (like pinto or kidney) and some diced bell peppers.
Tips: Why Sour Cream First?
Why do we spread the sour cream before the cheese?
“Placing the sour cream directly on the beef mixture acts as an ‘insulator.’ It prevents the heat from the meat from drying out the cheese too quickly, and it creates a creamy, molten center that holds the beans and corn in place when you scoop it out.”
Conclusion: A New Family Favorite
The Walking Taco Casserole is proof that the best meals don’t have to be complicated. It’s a vibrant, crunchy, and savory explosion of flavors that satisfies both kids and adults. By mastering the layering technique, you’ve turned a stadium snack into a “weeknight rescue” masterpiece. Grab your baking dish and let the fiesta begin!
Frequently Asked Questions
Can I make this ahead of time?
You can prep the beef, bean, and corn mixture up to 24 hours in advance. Just wait to add the sour cream, cheese, and chips until you are ready to bake.
Which chip is best?
Fritos are the traditional choice for their saltiness and sturdy crunch. However, Nacho Cheese Doritos add a “chef’s kiss” level of extra flavor that many people prefer!
Is this spicy?
It’s as mild or spicy as you make it! Control the heat by choosing Mild or Hot salsa and opting for a taco seasoning that fits your preference.