Stage 1: Preparation and Low Baking (The “Smoke” Phase)
- **Prep Ribs:** Remove the thin, silvery membrane from the bone side of the ribs. This is essential, as the membrane blocks seasoning and prevents the ribs from becoming tender.
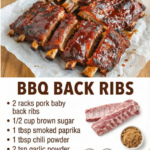
- **Apply Rub:** In a small bowl, mix all the dry rub ingredients. Generously coat both sides of the ribs with the rub, massaging it in thoroughly.
- **Low Bake:** Preheat oven to **$275^{\circ}\text{F}$ ($135^{\circ}\text{C}$)**. Tightly wrap each rack of ribs in heavy-duty aluminum foil, sealing the edges completely to trap moisture.
- **Bake Slow:** Bake for **2.5–3 hours**. The ribs are ready when the meat has pulled back from the bone ends and is very tender but not yet falling apart (they should still hold their shape).
Stage 2: Finishing on the Grill (The “Glaze” Phase)
- **Prep Grill:** Preheat a gas or charcoal grill to medium-high heat ($350–400^{\circ}\text{F}$).
- **Remove Foil:** Carefully unwrap the ribs, discarding the foil and any liquid inside.
- **Sear:** Place the ribs directly on the hot grill grates (bone-side down first) for 5 minutes to develop a sear on the rub/bark.
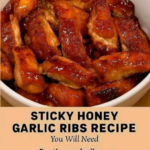
- **Glaze and Caramelize:** Turn the ribs meat-side up. Generously brush the tops with **BBQ sauce**. Grill for 3–5 minutes until the sauce begins to bubble and caramelize into a sticky glaze. Repeat with another layer of sauce if desired.
- **Rest:** Remove the ribs from the grill and let them **rest for 10 minutes**, loosely tented with foil, before slicing and serving. This allows the juices to redistribute.
Stage 3: Grilling the Corn
- **Grill Corn:** Place the husked **corn on the cob** directly on the medium-high grill grates. Grill for 8–10 minutes, turning every 2–3 minutes, until the corn is tender and features light golden-brown char marks on all sides.
- **Butter and Season:** Brush the grilled corn generously with **melted butter**. Season to taste with **salt** and the **optional chili powder or lime zest**.
Serving and Storage: The Complete BBQ Spread
The Best Sides
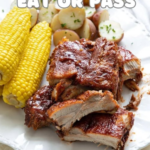
These ribs and corn form the center of a classic BBQ plate. Complement them with: creamy **coleslaw** (the acidity cuts through the richness), smoky **baked beans**, and creamy **potato salad** or crunchy cornbread.
Storage and Reheating
Store leftover ribs, sliced or unsliced, in an **airtight container** in the refrigerator for up to **4 days**. To reheat, wrap the ribs tightly in foil with a small splash of water or extra BBQ sauce and bake at $300^{\circ}\text{F}$ ($150^{\circ}\text{C}$) for 15–20 minutes until heated through. Do not microwave, as this will dry out the meat.
Tips: Rib Tenderness and Flavor Depth
Tip 1: The Membrane Removal Trick
If the membrane is difficult to remove, use a **paper towel** to grab a corner of it. The paper towel provides friction and a firm grip, allowing you to easily pull the entire strip off in one go.
Tip 2: Boosting Smoke Flavor (Without a Smoker)
To infuse a genuine smoky flavor during the oven baking (Stage 1), sprinkle a pinch of **Liquid Smoke** over the ribs before wrapping them in foil. Alternatively, use a heavy amount of Smoked Paprika in the dry rub.
Tip 3: The 3-2-1 Rib Method Adaptation
The “3-2-1” method (3 hours smoke, 2 hours foil, 1 hour unfoiled) is a traditional smoking sequence. This recipe uses an adaptation: **2.5–3 hours foiling in the oven**, followed by a **5–10 minute glaze on the grill**. The long foil period in the oven acts as the tenderizing steam phase.
Variations: Customizing the Ribs and Corn
1. Apple Cider Steam
Before sealing the ribs in the foil (Stage 1), pour **$1/4$ cup of apple cider or apple juice** over the meat. The apple steam tenderizes the meat even further and imparts a subtle fruity sweetness that pairs exceptionally well with pork.
2. Spicy Memphis Rub
For a Memphis-style dry rub (known for being slightly spicier and vinegar-forward), double the **Cayenne Pepper** to 2 teaspoons and add **1 teaspoon of chili powder** to the rub mix. Finish with a vinegar-based BBQ sauce rather than a thick, sweet sauce.
3. Mexican Street Corn (Elote) Style
For the corn, after grilling and buttering, brush the corn with a light layer of **mayonnaise**, then roll it in a mixture of **cotija cheese**, **chili powder**, and **lime juice**. Finish with a sprinkle of chopped cilantro for a vibrant, tangy side.
Advanced Tips: Grilling and Slicing
Tip 4: Controlling the Glaze
BBQ sauce contains sugar and will burn quickly on the grill. When finishing the ribs (Stage 2), ensure the grill is **medium-high**, not high. Keep the ribs moving every few minutes after applying the sauce and watch constantly for burning. The goal is a sticky, glossy caramelization, not a charred black crust.
Tip 5: Slicing Against the Bone
Always slice the ribs **between the bones** using a long, sharp knife. If the ribs are done correctly, the knife should pass through the meat easily with only minimal effort required to separate the bones.
Tip 6: Achieving the Perfect Corn Char
If you prefer a deep, dramatic char on your corn, use a **hotter grill** for the last 2 minutes of cooking. Stand the corn upright on its end and allow one side to blacken slightly before quickly rotating it for a uniform charred texture.
Conclusion: A Taste of American Summer
The BBQ Ribs with Corn recipe successfully translates the complex, smoky flavor of pit-style barbecue into an accessible, home-kitchen method. The combination of the long, slow oven bake for supreme tenderness and the high-heat grill finish for that essential caramelized crust is a technique that yields perfect results every time.
Paired with the sweet, smoky goodness of grilled corn, this meal is not just food; it’s an experience—a guaranteed path to backyard BBQ bliss that is perfect for any gathering.
Frequently Asked Questions: Troubleshooting and Prep
Q: My ribs were tough even after 3 hours. What went wrong?
A: Your oven temperature might be inaccurate, or the ribs may have lost too much moisture. **Double-check the seal on the foil.** The foil must be completely airtight to trap the steam necessary for tenderizing the tough collagen fibers in the meat.
Q: Should I put the BBQ sauce on before the oven phase?
A: No. Sugar in the sauce will burn during the long, low bake time. **Only use the dry rub** for the oven phase, and only add the liquid sauce during the final 5–10 minutes of high-heat grilling.
Q: Can I skip the grill phase?
A: Yes, but the flavor won’t be as complex. To finish in the oven, remove the foil, brush the ribs with sauce, and place them back in the $275^{\circ}\text{F}$ oven for 15 minutes, or under the broiler for 1–2 minutes (watch carefully) until the sauce caramelizes.
Q: Can I make the dry rub ahead of time?
A: Absolutely. The dry rub can be mixed and stored in an airtight container for several months. For the best results, apply the rub to the ribs up to **12 hours in advance** and keep them refrigerated, allowing the salt to work into the meat.