ADVERTISEMENT
Phase 1: Preparation (The Dump and Go)
- **Prep Roast:** If your roast is particularly large or uneven, you can cut it into $2\text{–}3$ smaller, uniform pieces to ensure faster and more even cooking. Place the **Beef Chuck Roast** directly into the slow cooker basin.
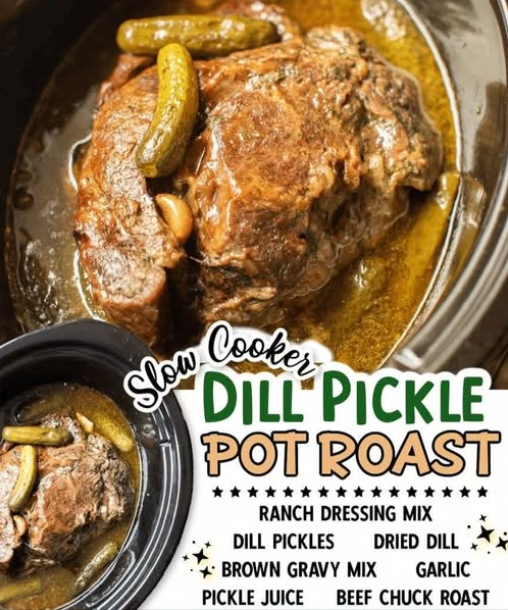
- **Add Seasoning (ACID MANDATE):** Evenly sprinkle the **dry Ranch Dressing Mix** and the **dry Brown Gravy Mix** over the top of the roast. Add the **whole or minced garlic cloves** and the **dried dill**. Pour the **$\frac{1}{2}\text{ cup}$ of pickle juice** over the roast.
- **Set and Forget (COLLAGEN CONVERSION):** Cover and cook on **LOW for $8\text{–}10\text{ hours}$** (ideal) or on **HIGH for $4\text{–}5\text{ hours}$**. The roast is done when it shreds easily with two forks and has reached an internal temperature of $195^\circ\text{F}$ to $205^\circ\text{F}$ ($90^\circ\text{C}$ to $96^\circ\text{C}$).
Phase 2: Finishing and Serving
- **Shred and Mix:** Once tender, remove the roast to a cutting board. Use two forks to **shred the meat** into bite-sized pieces. Skim excess fat from the sauce in the slow cooker, if desired.
- **Return to Sauce:** Return the shredded beef to the slow cooker and toss it thoroughly with the rich, tangy gravy. If the sauce is too thick, add a small splash of beef broth or water. If it is too thin, cover and cook on High for another $15\text{ minutes}$ with the lid off to reduce.
- **Serve:** Serve the shredded beef and gravy over mashed potatoes, rice, or on toasted buns. Top with the remaining **whole dill pickles** for a burst of fresh flavor and crunch.
Tips & Technical Insights:
Searing (Optional but Recommended): For deeper flavor (Maillard Reaction), pat the **chuck roast** dry and sear it in $1\text{ tbsp}$ of oil in a skillet for $3\text{ minutes}$ per side before placing it in the slow cooker. This step builds color and complex savory notes.
The Fat/Gravy Control: The **chuck roast** is fatty. The fat renders out during the long cook time and contributes immense flavor and richness to the gravy. After cooking, let the sauce settle for a few minutes and **skim the excess fat** from the surface with a spoon (Instruction 4) for a cleaner gravy consistency.
Adjusting Tanginess: Start with the **$\frac{1}{2}\text{ cup}$ of pickle juice** (Ingredient III). If you want a more pronounced pickle flavor, wait until the last $2\text{ hours}$ of cooking to add the remaining $\frac{1}{2}\text{ cup}$. This prevents the volatile dill and acid notes from cooking off completely.
Tenderization Time: The collagen in a large $5\text{ lb}$ chuck roast requires time to convert. If the roast feels tough when checked at $8\text{ hours}$, it is simply not done yet. Be patient; low-and-slow cooking is the only way to achieve tenderness.
Serving Suggestion: The strong savory and tangy flavor profile of this roast is perfectly balanced by the starchy neutrality of creamy mashed potatoes or rice. The whole dill pickles (Garnish) provide essential textural contrast.
Variations: Customizing Flavor and Serving
Easily adapt the flavor and richness of your dill pickle pot roast:
- **Spicy Pickle Twist:** Replace the regular dill brine with **spicy pickle brine** or add $1\text{ tsp}$ of **red pepper flakes** to the seasoning mix for a kick.
- **Added Creaminess:** After shredding, stir in $\frac{1}{4}\text{ cup}$ of **sour cream or cream cheese** into the sauce (off-heat) for a creamy, stroganoff-like finish.
- **Vegetable Bulk:** Add $1\text{ cup}$ of baby **carrots** and $1\text{ cup}$ of quartered **potatoes** to the slow cooker at the beginning of the cook time. They will cook perfectly alongside the meat.
- **Mushroom Earthiness:** Add $8\text{ oz}$ of **sliced cremini mushrooms** during the last $2\text{ hours}$ of cooking for added savory depth.
Conclusion: Flavor Meets Efficiency
The **Dill Pickle Pot Roast** is a culinary triumph of flavor and convenience. By intelligently utilizing the acidic properties of the brine (The Acid Tenderization Mandate) and relying on the extended cooking time to break down tough proteins (The Low-and-Slow Collagen Conversion Protocol), you achieve a deeply flavored, tender roast with minimal effort. This recipe proves that the slow cooker is the ideal tool for converting tough cuts into unforgettable meals.
Frequently Asked Questions (FAQ)
Q: My roast is dry and tough after 6 hours. What happened?
A: The roast is simply **not done yet** (Instruction 3). At $6\text{ hours}$, the collagen is likely still contracting, making the meat tough. Continue cooking on LOW until the meat reaches the $200^\circ\text{F}$ range, which is essential for tenderizing chuck roast.
Q: Do I need to add water or broth?
A: **No**. The meat will release a significant amount of its own liquid as the fat renders and the collagen converts. The **pickle juice** and the moisture from the soup/gravy packets are usually sufficient.
Q: Will it taste overwhelmingly like pickles?
A: **No**. The flavor is surprisingly balanced. The acid tenderizes, but the savory flavors from the **Ranch and Gravy mixes** dominate, resulting in a rich, herby roast with a subtle, refreshing tang.
Q: Can I use fresh beef broth instead of gravy mix?
A: **Yes**, but the sauce will be thinner. Use $\frac{1}{2}\text{ cup}$ of beef broth and add $1\text{ tbsp}$ of flour or cornstarch mixed with $2\text{ tbsp}$ of cold water (a slurry) at the very end to thicken the sauce.
ADVERTISEMENT