
Step 1: Browning and Seasoning
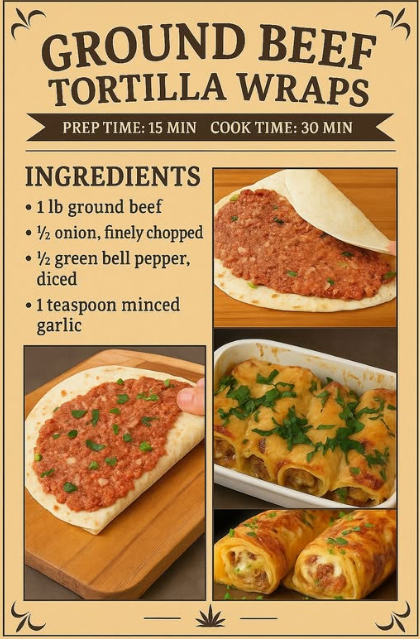
- In a large skillet over medium-high heat, cook the **ground beef** and **onions** together. Break the meat into small crumbles as it browns.
- Once the meat is fully cooked, drain all excess fat from the pan. This is the most important step for a clean-tasting wrap.
- Stir in the **minced garlic** and **seasoning**. Add 1/4 cup of water and simmer for 3–5 minutes until the liquid has reduced into a thick, savory sauce that coats the beef.
Step 2: Preparing the Tortillas
- Warm your **tortillas** for 15 seconds in the microwave or in a dry pan. Warm tortillas are much more pliable and less likely to rip during the folding process.
Step 3: The Assembly
- Lay the tortilla flat. Spread a thin layer of **sour cream** in the center, followed by a generous sprinkle of **cheese**.
- Add a scoop of the **beef mixture** over the cheese (the heat from the beef will help melt the cheese).
- Top with **lettuce and tomatoes**. Avoid overfilling; leaving 2 inches of space around the edges is key for a successful wrap.
Step 4: The Secret “Crunch” Finish
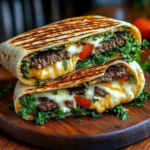
- Fold in the sides of the tortilla, then roll from the bottom up.
- **Pro Move:** Place the wrap, seam-side down, in a clean, lightly oiled skillet over medium heat for **60 seconds per side**. This “seals” the wrap and creates a delicious, golden-brown crust.
Expert Tips for the Home Cook
Tip 1: The “Soggy-Free” Strategy
To prevent the bottom of the wrap from getting soggy, always place your “moisture barrier” first. This can be a layer of cheese or a piece of dry lettuce. This prevents the juices from the beef and tomatoes from soaking directly into the flour tortilla.
Tip 2: Flour vs. Corn
While corn tortillas are traditional for tacos, they are too brittle for large wraps. Always stick with **Flour Tortillas** for this specific recipe to ensure the structural integrity needed for a handheld meal.
Tip 3: Seasoning Beyond the Packet
If you find store-bought seasoning too salty, make your own by mixing 1 tbsp chili powder, 1 tsp cumin, 1 tsp smoked paprika, and a 1/2 tsp of garlic powder. It gives you total control over the sodium and heat levels.
Variations: Keeping the Tradition Fresh
| Variation | Modification | Best For |
|---|---|---|
| **The Breakfast Wrap** | Add scrambled eggs and hash browns to the beef. | Lazy Saturday mornings. |
| **The Healthy Hulk** | Use whole-wheat tortillas and double the spinach/lettuce. | Post-gym refueling. |
| **Cheesy Melt Style** | Dip the finished wrap in a warm queso dip. | True comfort food indulgence. |
| **Crispy Asian Beef** | Season beef with ginger/soy and add shredded slaw. | A fun fusion twist. |
Serving and Storage
These wraps are fantastic fresh, but they also make for excellent leftovers if handled correctly.
- **Serving:** Slice the wraps on a diagonal for a beautiful presentation. Serve with a side of **Mexican Rice** or a simple **Corn Salad**.
- **Fridge:** Store the beef mixture and the fresh toppings in separate containers. Assembled wraps don’t store well in the fridge as they will become soft.
- **Freezing:** You can freeze the “beef and cheese” portion of the wrap! Wrap them tightly in foil and freeze for up to **1 month**. Reheat in the oven at $350^{\circ}\text{F}$ for 15 minutes before adding fresh veggies.
Conclusion: A Staple for Every Kitchen
Ground Beef Tortilla Wraps are a testament to the fact that you don’t need a complicated list of ingredients to create a meal that your family loves. By focusing on high-quality beef, fresh toppings, and that final pan-sear, you create a handheld dinner that is both satisfying and fun. It’s a tradition that’s worth every minute of prep time, especially when you see how fast they disappear!
Happy wrapping!
Frequently Asked Questions
Q: Can I use ground turkey instead of beef?
A: Absolutely! Ground turkey or chicken is a great leaner alternative. Just be sure to add a teaspoon of olive oil to the pan when browning, as poultry has less natural fat than beef.
Q: How do I stop the wrap from unrolling?
A: The “seam-side down” pan sear mentioned in Step 4 is the best way. The heat melts the cheese slightly, acting as a “glue” that keeps the wrap closed.
Q: My tortillas are cracking. Why?
A: This happens when tortillas are too cold or have been in the pantry too long. Warm them thoroughly before folding to make the gluten more flexible.
Related posts:
 The Ultimate Homemade Beef Meximelt
 Tortilla Wraps with Ground Beef: The Ultimate Family-Favorite Meal
 The Ultimate Guide to French Dip Tortilla Roll Ups
 Mastering Air Fryer Cheeseburger Wraps
 The Ultimate Guide to Crispy Parmesan Cottage Cheese Chicken Wraps
 Grilled Cheesy Beef Wraps: The Art of the Golden Crunch
