Pastry Perfection: Mastering the No-Bake Chocolate Eclair Cake
Introduction: The Science of No-Bake Hydration
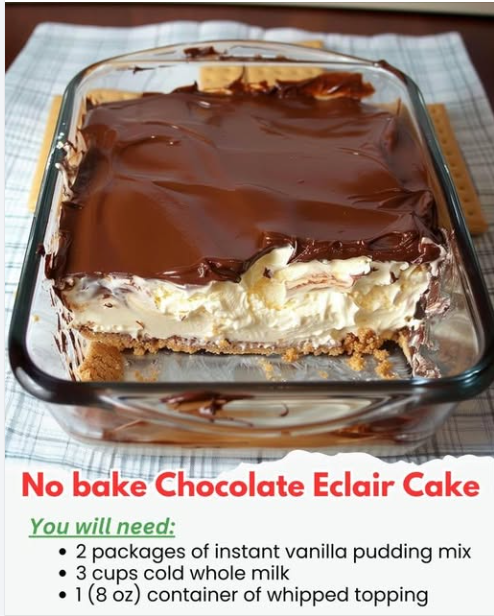
The **No-Bake Chocolate Eclair Cake** is a masterful study in simplified pastry, achieving the rich, layered satisfaction of a classic French eclair using zero baking time. The technique relies entirely on controlled hydration and thermal stabilization, governed by three strict regulations: **Pudding Activation, Crackers Saturation Time, and Ganache Setting Protocols.**
The first regulation, **Pudding Activation**, is crucial for the **creamy filling**. The filling is created using **2 (3.4 oz) packages of instant vanilla pudding mix** and **3 cups of cold whole milk**. The milk *must* be cold; this is non-negotiable, as cold milk delays the initial setting reaction, allowing the cook sufficient time to whisk and ensure the stabilizers (starches and gums) are fully dispersed without clumping. The whisking time of **about 2 minutes** is precise for achieving maximum thickness.
Once thickened, the **1 (8 oz) container of thawed whipped topping** is folded in. This step lightens the heavy pudding, incorporating air to create a delicate, voluminous texture that mimics the light pastry cream found in a traditional eclair. The folding technique is mandatory, as aggressive whisking at this stage would deflate the whipped topping, resulting in a dense, heavy filling.
The second regulation is **Crackers Saturation Time**. The structure is built using **graham crackers** in **three layers**. The crisp crackers are the “pastry,” and their conversion to a tender, cake-like texture requires a minimum **6-hour chilling period** (overnight is optimal). The high moisture content of the pudding and whipped topping slowly wicks into the dry graham crackers through capillary action. The chilling period regulates this moisture transfer, allowing the cracker cellulose structure to soften fully without dissolving, yielding a final result that is easily cut with a fork, much like a baked cake.
Finally, the **Ganache Setting Protocols** ensure a clean, glossy finish. Whether using the simple chocolate frosting shortcut or the homemade ganache (recommended), the topping must be applied while warm and liquid, and then allowed to set firmly in the cold environment. The simple **1:2 ratio of cream to chips ($1/2$ cup heavy cream to 1 cup chips)** ensures the ganache is pourable but thick enough to stabilize into a sliceable layer after chilling.
Ingredients: Defining the Three Layer Components
The ingredients are divided into the three key layers that define the cake’s structure and flavor:
I. The Filling (Creamy Core):
- **2 (3.4 oz) packages** instant vanilla pudding mix (The stabilizer)
- **3 cups** cold whole milk (The activator and hydration source)
- **1 (8 oz) container** whipped topping, thawed (The aerator and lightener)
II. The Layers (Structural Base):
- **1 box** graham crackers (enough for 3 layers in a 9×13 dish)
III. The Topping (Ganache-Style Glaze):
- **1 cup** semisweet chocolate chips (The primary flavor and stabilizer)
- **½ cup** heavy cream (For gloss and emulsification)
- **OR** 1 can of chocolate frosting (The quick substitute)
Instructions: Whipping, Layering, and Hydration Timing
Phase 1: Creamy Filling Preparation (Activation)
- **Activate Pudding:** In a large bowl, whisk together the **instant vanilla pudding mix and the cold whole milk** vigorously for **about 2 minutes**. Whisking is vital for dissolving the starches and preventing lumps.
- **Thicken:** Let the mixture stand for **3–5 minutes** until it thickens to a heavy, pourable consistency.
- **Fold in Whipped Topping (CRITICAL):** Gently fold in the **thawed whipped topping** using a rubber spatula. This gentle folding motion is mandatory to incorporate air and lighten the filling without deflating the whipped topping. Continue folding only until the mixture is uniform and creamy.
Phase 2: Layering and Cake Assembly
- **First Layer (Base):** Arrange a single layer of **graham crackers** in the bottom of a 9×13-inch baking dish. Crack pieces as necessary to fill gaps, maximizing contact between the cracker and the filling.
- **First Filling Spread:** Spread **half of the prepared pudding mixture** evenly over the graham crackers.
- **Second Layer & Spread:** Add a second, single layer of graham crackers. Spread the **remaining pudding mixture** on top.
- **Final Layer:** Top with one last, single layer of graham crackers.
Phase 3: Topping and Chilling Protocol
- **Prepare Ganache (Recommended Method):** Place the **semisweet chocolate chips** in a medium bowl. Heat the **heavy cream** in the microwave until hot (steam rising, but not boiling violently). Pour the hot cream over the chips and let stand for **1–2 minutes** to melt the chips.
- **Emulsify Topping:** Stir the mixture until it is completely smooth, glossy, and uniform (ganache). If using the shortcut, microwave the chocolate frosting until pourable.
- **Apply Topping:** Pour the ganache or warmed frosting evenly over the top graham cracker layer. Use an offset spatula to spread it gently to the edges.
- **Chill (MANDATORY SATURATION TIME):** Cover the pan tightly with plastic wrap or aluminum foil. **Refrigerate for a minimum of 6 hours, or ideally, overnight (12 hours).** This chilling period is the structural heart of the recipe, allowing the moisture from the filling to fully hydrate the crackers.
- **Serve:** Slice into squares and serve cold.
Serving and Storage: The Integrity of the Cracker-to-Cake Conversion
Proper storage is essential to maintain the structural integrity achieved through hydration.
- **Serving:** Serve cold directly from the refrigerator. The cake is easiest to slice when fully chilled.
- **Storage (Refrigerated):** Store leftovers covered tightly in the refrigerator for **up to 5 days**. After 5 days, the graham crackers may become too soft and prone to breaking down.
- **Freezing:** Not recommended. Freezing and thawing will alter the texture of the instant pudding mix, often making it watery and grainy, and the crackers can become soggy instead of tender.
- **Troubleshooting Dry Edges:** If the graham crackers along the edges seem dry, ensure you have spread the filling completely to the edges during layering (Step 5 and 6).
Tips: Essential Techniques for Creaminess and Set
The Cold Milk Rule: Always use the **coldest whole milk possible** (Step 1). The cold temperature ensures the pudding starches set slowly, preventing immediate clumping and guaranteeing a smooth final filling.
Folding Protocol: Use a gentle, sweeping **folding motion** when combining the whipped topping (Step 3). This is mandatory to keep the filling light and airy, preventing the dense, rubbery texture that results from aggressive whisking.
Ganache Ratio Check: The 1:2 ratio of cream to chips (Step 8) is key for a proper ganache. Too much cream makes the topping too liquid and runny; too few chips makes it too hard when chilled. This ratio creates the perfect sliceable glaze.
Cracker Coverage: Be methodical in laying the graham crackers (Step 4, 6, 7). Fill any large gaps with broken pieces. Maximum contact between the cracker and the wet filling is what ensures complete hydration during the chilling phase.
Patience with the Chill: The minimum **6-hour chill** (Step 11) is the core of this recipe. Cutting the cake before this time will result in crisp, crunchy graham crackers, defeating the purpose of the eclair-like texture.
Variations: Customizing Filling and Layers
The core structure of graham crackers and pudding filling is easily adaptable to different flavors:
- **Chocolate Eclair:** Use **instant chocolate pudding mix** instead of vanilla. This provides an even deeper, richer chocolate flavor profile.
- **Banana Cream Eclair:** Use **instant banana cream pudding mix**. Slice thin rounds of fresh banana and place them over the bottom layer of filling before adding the second layer of crackers.
- **Spiced Layers:** Sprinkle a very light dusting of **cinnamon or nutmeg** over the graham crackers before adding the filling. This adds a warm, subtle complexity to the “pastry” layers.
- **Waffle Cone Crumble:** Substitute the graham crackers with **waffle cone pieces or vanilla wafers** for a slightly sweeter, denser layer. Adjust the chilling time accordingly, as wafers may soften faster.
- **Peanut Butter Swirl:** Swirl **1/4 cup of creamy peanut butter** into the pudding mixture (after the whipped topping, Step 3) for a peanut butter cup variation.
Pudding Type: **Instant pudding mix** (Step 1) is mandatory. Cook and Serve pudding requires heat and has different stabilizers that will not set properly in this no-bake application.
Whipped Topping Thaw: Ensure the **whipped topping is thawed completely** (Step 3) before folding. Partially frozen topping will introduce ice crystals and make the final filling lumpy and watery.
Covering the Pan: When covering the pan for chilling (Step 11), place the plastic wrap directly on the surface of the **chocolate topping**. This prevents a skin from forming on the ganache and inhibits the absorption of refrigerator odors.
Using Chocolate Frosting Shortcut: If using the shortcut (Step 9), add **1 teaspoon of light corn syrup** to the frosting before microwaving. This adds a nice shine and helps the topping set with a smoother texture, mimicking true ganache.
Conclusion: Zero Effort, Maximum Dessert
The No-Bake Chocolate Eclair Cake is the perfect demonstration that high-impact dessert is achievable with minimal effort. Success is guaranteed by strictly adhering to the pudding activation and the non-negotiable long chill time. This chilling period is the culinary regulation that transforms simple graham crackers into a tender, cake-like base, creating the perfect moisture level for the layers to meld. The resulting dessert is a creamy, chocolate-glazed classic—a true pastry perfection without turning on the oven.
Frequently Asked Questions (FAQ)
Q: Why did my filling turn out watery or thin?
A: You likely used **warm or low-fat milk** (Step 1). The stabilizers in instant pudding require cold, high-fat dairy to activate and set correctly. The milk must be cold whole milk.
Q: Why are the graham crackers still crunchy after chilling?
A: The chilling time was **not sufficient** (less than 6 hours, Step 11). The crackers need time for capillary action to fully hydrate and soften. Ensure you chill for at least 6 hours, or overnight.
Q: My ganache topping separated or looks oily/grainy. What happened?
A: The **cream was too hot** (boiled) or the ratio was slightly off (Step 8). If separation occurs, try stirring in a tablespoon of *cold* cream until it comes back together (emulsifies).
Q: Can I use instant cheesecake pudding mix?
A: Yes. Any instant pudding mix (vanilla, chocolate, cheesecake, butterscotch) can be used, provided you adhere to the correct amount (**2 packages**) and the **cold whole milk** requirement (Step 1).