The Art of the Melt-Away: A Masterclass in Hand-Pressed Cream Cheese Mints
Introduction
In the world of confectionery, there is a distinct category of treats that transcends generations. They aren’t quite candy, yet they aren’t exactly cookies. They are the Classic Cream Cheese Mint—the quintessential “wedding mint” that has graced bridal showers, holiday platters, and graduation parties for decades. What makes these little gems so enduring is their unique sensory profile: a cool, refreshing peppermint snap followed by a rich, velvety dissolve that only high-quality fats can provide.
Unlike hard candies or chewy gummies, cream cheese mints rely on a delicate balance of moisture and sugar. When prepared correctly, they possess a matte, suede-like finish on the outside and a soft, buttery interior. This article explores the nuanced process of creating these nostalgic treasures from scratch, ensuring that every bite is a perfect symphony of sweetness and minty freshness.
Ingredients
To achieve the legendary texture of a professional-grade mint, the quality of your base ingredients is paramount. Ensure all items are at room temperature before beginning to prevent lumping.
- 8 oz (one block) Full-Fat Cream Cheese: It is vital to use the brick-style cheese rather than the spreadable tub variety. The moisture content in tubs is too high, which will compromise the structural integrity of the dough.
- 2 Tablespoons Unsalted Butter: Softened to room temperature. This adds a layer of richness and helps the mints “shorten,” creating that iconic melt-away texture.
- 8 Cups (about 2 lbs) Powdered Sugar: Sifted if it appears particularly lumpy. You will also need a small bowl of extra sugar for dusting your tools.
- ¼ Teaspoon Fine Sea Salt: A tiny amount of salt is the secret to cutting through the intense sweetness of the sugar, brightening the peppermint notes.
- 1 ½ Teaspoons Peppermint Extract: Adjust according to your preference, but remember that peppermint oil or extract strengthens as the mints dry.
- Gel Food Coloring (Optional): Gel is preferred over liquid drops to avoid adding unnecessary moisture to the dough.
Instructions
Part 1: Make the Mint Dough
The foundation of a great mint is a perfectly emulsified dough. Follow these steps to ensure a smooth, grit-free finish.
- The Creaming Process: In the bowl of a stand mixer fitted with a paddle attachment, beat the softened cream cheese and butter together. Continue for about 2–3 minutes until the mixture is completely smooth and pale. Scrape down the sides of the bowl to ensure no lumps remain.
- Initial Sweetening: Turn the mixer to the lowest speed. Add the sea salt and the first 2 cups of powdered sugar. Mix until just incorporated. At this stage, pour in the peppermint extract.
- The Slow Build: This is the most critical phase. Gradually add the remaining 6 cups of powdered sugar, roughly one heaping tablespoon at a time. Patience here prevents a “sugar cloud” in your kitchen and ensures the sugar is fully absorbed. Once all the sugar is in, increase the speed to medium-low and beat for 2 full minutes. The resulting dough should be stiff, similar to the consistency of play-dough.
- Customizing Color: If you wish to create a variety of shades, divide the dough into separate bowls. Dip a toothpick into your gel coloring and fold it into the dough. Knead by hand or mix on low until the color is uniform.
Part 2: Shape the Mints
Shaping is where you can get creative, though the classic ridged look remains a fan favorite.
- Portioning: To keep the dough from drying out, work with only one-quarter of the batch at a time, keeping the rest covered with plastic wrap. Roll teaspoon-sized portions into smooth, crack-free balls (about ¾ inch in diameter).
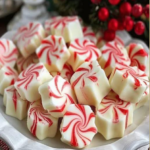
- The Signature Press: Line a baking sheet with parchment paper. Arrange the balls about an inch apart. Dip the prongs of a fork into your reserve bowl of powdered sugar and press down firmly but gently on each ball. This flattens the mint and leaves a beautiful decorative ridge. If the fork sticks, re-dip it in sugar.
Part 3: Dry & Store
Proper curing is the difference between a “doughy” mint and a professional “melt-away” mint.
- The Cure: Leave the mints on the parchment-lined sheets, uncovered, at room temperature. They need at least 2 hours to develop a slight “crust” on the exterior. In humid climates, this may take up to 4 hours.
- Packaging: Once the surface feels dry to the touch, they are ready for storage.
Serving and Storage
Cream cheese mints are remarkably shelf-stable if handled correctly, but because they contain dairy, temperature control is important for long-term quality.
- Airtight Security: Always store mints in a single layer or separated by parchment paper in an airtight container. This prevents them from picking up “fridge odors.”
- Refrigeration: They stay fresh and delicious for up to 1 month in the refrigerator.
- Freezing: For long-term prep, these freeze beautifully for up to 6 months. To serve from frozen, let them sit at room temperature for 15 minutes to take the chill off.
- Presentation: Serve these in small paper candy cups or arranged in a mosaic pattern on a silver platter for a vintage aesthetic.
Tips
Mastering the “Melt-Away” requires a few insider secrets:
- Avoid High Humidity: If you are making these on a very rainy or humid day, the sugar may absorb moisture from the air, making the dough tacky. You may need to add an extra ¼ cup of sugar to compensate.
- The “No-Stick” Rule: Keep your hands lightly dusted with powdered sugar while rolling the balls to prevent the warmth of your palms from melting the butter in the dough.
- Flavor Maturation: The peppermint flavor actually intensifies over 24 hours. If they taste slightly weak right after mixing, don’t worry—they will be perfect by the next day.
Variations
While peppermint is the gold standard, this dough is a blank canvas for other flavor profiles:
- The Citrus Twist: Swap the peppermint for 1 teaspoon of lemon or orange extract and add a teaspoon of fresh zest. These are wonderful for summer garden parties.
- Almond Cream: Use almond extract instead of mint and top each pressed mint with a tiny sliver of toasted almond.
- Holiday Spice: For autumn, use cinnamon extract and a drop of orange coloring to create “Pumpkin Spice” style bites.
- Chocolate Dipped: Once the mints are fully dried and set, dip one half of each mint into melted dark chocolate for a sophisticated “after-dinner” treat.
Additional Professional Tips
To ensure your mints look like they came from a high-end confectionery shop:
- Using Molds: If you prefer a more intricate design, you can use silicone candy molds. Dust the mold lightly with sugar, press a ball of dough in, and pop it out immediately.
- Uniformity: Use a small measuring spoon or a “half-teaspoon” scoop to ensure every ball is the exact same size. This creates a much more professional look on the serving platter.
Conclusion
The Classic Cream Cheese Mint is a testament to the idea that some of the best things in life are the simplest. With just a handful of ingredients and a bit of patience, you can create a confection that evokes nostalgia and provides a sophisticated palate cleanser. Whether you are prepping for a grand wedding or simply want a sweet treat to keep in the freezer for guests, these mints are a versatile, delicious, and timeless choice. By following these detailed steps, you ensure a result that is perfectly balanced—sweet, cool, and undeniably creamy.
Frequently Asked Questions
- Can I use low-fat cream cheese?
- It is not recommended. Low-fat or “Neufchâtel” cheese has a higher water content, which can result in a runny dough that won’t hold its shape.
- How do I fix dough that is too sticky?
- Simply add more powdered sugar, one tablespoon at a time, until the dough feels like stiff modeling clay and no longer sticks to your fingers.
- Why did my mints “sweat” in the container?
- This usually happens if the mints weren’t allowed to dry long enough before being sealed, or if they were moved from a very cold fridge to a very hot room. Ensure they are dry to the touch before storing.
- Can I use liquid flavorings like vanilla?
- Yes, but keep in mind that vanilla will turn the dough a slightly off-white “cream” color rather than a pure snowy white.
Would you like me to generate a printable recipe card or perhaps a shopping list based on these ingredients?