1. The Sponge (The Vessel)
- All-Purpose Flour & Baking Powder: You need a tighter crumb than a standard birthday cake to ensure the custard doesn’t leak through the bottom. Baking powder provides the Leavening Lift.
- Hot Milk & Butter: Adding hot milk to the batter (the “Hot Milk Method”) partially gelatinizes the flour starches before the cake hits the oven. This creates a flexible, sturdy crumb that can be hollowed out without crumbling.
2. The Pastry Cream (The Core)
- Egg Yolks: Yolks provide Lecithin and fats, creating a rich mouthfeel. When heated, the proteins uncoil and create a thick network.
- Cornstarch: This is your Stabilizer. Cornstarch prevents the eggs from curdling at high temperatures and ensures the cream holds its shape when you bite into the cupcake.
- Vanilla Bean Paste: Since the cream is the star, using paste (with the little black flecks) provides a more intense aromatic experience than liquid extract.
3. The Ganache (The Seal)
- Semi-Sweet Chocolate: Provides the structural snap. Semi-sweet (around 60% cacao) has the right balance of sugar and cocoa butter for a glossy set.
- Heavy Cream: The liquid that turns a hard chocolate bar into a pourable glaze.
The Technique: Engineering the “Pie” in a Cup
Phase 1: The “High-Wall” Cupcake
Bake your vanilla cupcakes using a recipe that includes an extra egg white or the hot milk method. The “Volume” Rule: Fill the liners only 2/3 full. You want a flat top, not a “muffin top,” to provide a level surface for the ganache to pool.
Phase 2: The Custard Thickening (Tempering)
Whisk your hot milk into your egg/sugar/cornstarch mixture slowly. The “Tempering” Secret: If you add the eggs to the hot milk, they will scramble. By adding the milk to the eggs, you slowly raise their temperature, allowing them to remain liquid until they thicken on the stove. Cook until it “bubbles”—cornstarch requires a few seconds of boiling to reach its full thickening power.
Phase 3: The “Core and Fill”
Once the cupcakes are cool, use a small paring knife or a “cupcake corer” to remove the center. The “Bottom Buffer”: Leave about 1/2 inch of cake at the bottom. If you core all the way through, the moisture from the custard will dissolve the bottom of the cupcake, and it will fall apart in your hand.
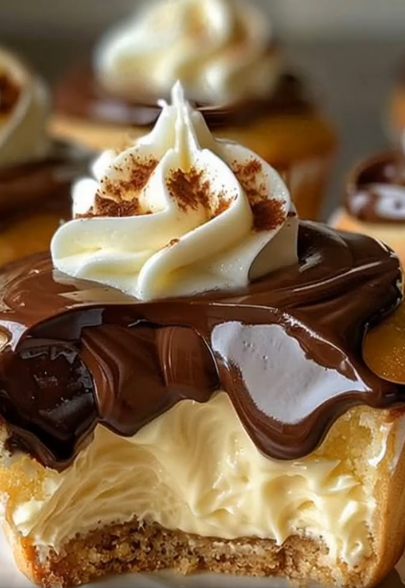
Phase 4: The Mirror Ganache
Heat the cream until it just begins to simmer, then pour it over the chopped chocolate. Let it sit for 2 minutes before stirring. The “Bubble” Warning: Stir gently in small circles from the center outward. If you whisk vigorously, you will introduce air bubbles, ruining the “mirror” finish of your Boston Cream Pie tops.
Phase 5: The Dip and Set
Hold the filled cupcake by its base and dip the top directly into the warm ganache. Give it a slight twist as you pull it up to create a clean break. Let the ganache set at room temperature for 30 minutes before refrigerating. This ensures the chocolate stays glossy rather than turning “matte” or gray (fat bloom).
The Science of “Mouthfeel”
What makes a Boston Cream Pie cupcake so irresistible? It’s the Sequential Flavor Release. As you bite down, the snap of the chocolate hits first, followed by the soft, yielding sponge, and finally the cold, velvety custard. Because the custard is “trapped” inside the cake, it stays moist and cool, creating a temperature and texture contrast that keeps the brain engaged. This is known as Sensory Specific Satiety avoidance—you won’t get “bored” of the flavor because it changes with every layer.
Chef’s Tips for a Professional Finish
- The “Skin” Prevention: When cooling your pastry cream, press plastic wrap directly onto the surface of the cream. This prevents oxygen from forming a “skin” on the custard, ensuring it remains perfectly smooth.
- The Syrup Soak: For an extra-decidant cupcake, lightly brush the interior of the cored cupcake with a simple syrup (1 part sugar, 1 part water) before adding the custard. This acts as a moisture barrier and adds a professional sweetness.
- Chocolate Quality: Do not use chocolate chips for the ganache if you want a professional shine. Chips contain stabilizers that prevent them from melting smoothly. Use a high-quality chocolate bar and chop it finely.
Holiday “Boston” Variations
| Variation | The Twist | The Vibe |
|---|---|---|
| Winter Spice | Add 1/2 tsp Nutmeg to the custard. | Warm, festive, and eggnog-like. |
| Dark Raspberry | Place a fresh raspberry at the bottom of the core before the cream. | Tart, fruity, and elegant. |
| Coffee Ganache | Steep 1 tbsp espresso beans in the cream before making the ganache. | Sophisticated “Tiramisu” crossover. |
Conclusion: A Christmas Eve Masterpiece
Boston Cream Pie Cupcakes are a testament to the beauty of culinary engineering. By managing the moisture of the sponge and the stability of the custard, you create a dessert that is far more impressive than a simple frosted cake. On this Christmas Eve 2025, as you serve these glossy, chocolate-capped treasures, you’re offering your guests a slice of history in a perfect, handheld package. Enjoy the creamy, chocolatey bliss!
Frequently Asked Questions
- How long do they last?
- Because of the fresh custard, these must be refrigerated. They are best within 48 hours. After that, the cake may begin to absorb too much moisture from the cream and become “bready.”
- Can I use instant pudding?
- You can, but it won’t have the “heft” or the rich egg flavor of a true pastry cream. If using instant, use 1/2 cup less milk than the box calls for to ensure it’s thick enough to stay inside the cupcake.
- The ganache is too thin!
- If your ganache is running off the sides, let it sit on the counter for 10-15 minutes. It will thicken as it cools. You want it to be the consistency of heavy honey before dipping.
Would you like me to suggest a “French Buttercream” recipe for an extra decorative border, or perhaps show you how to turn this into a “Boston Cream Giant Cake”?