- **Prepare Garlic Butter:** Melt the **butter** in a small bowl. Stir in the **minced garlic** and **Italian seasoning**. Set aside.
- **Mix Filling Base:** In a medium bowl, combine the **cooked chicken** and **shredded mozzarella cheese**.
- **Combine Filling:** Pour the fragrant **garlic butter mixture** over the chicken and cheese. Stir thoroughly until the chicken is evenly coated. Add the **fresh chopped parsley** (and any optional veggies) and stir again.
- **Assemble the Wraps:** Lay a **tortilla** flat. Place $\frac{1}{4}$ of the chicken filling mixture just below the center. Fold the sides inward over the filling, then fold the bottom flap up and tightly roll the wrap upward to create a sealed package (burrito-style). Repeat with the remaining three wraps.
- **Cook for Crispness:** Heat a large, dry non-stick skillet or griddle over medium-high heat. Place the wraps **seam-side down** first. Cook for **2–3 minutes** until the seam is sealed and the bottom is golden brown.
- **Finish Cooking:** Flip the wraps and cook the second side for another **2–3 minutes**, pressing gently with a spatula to ensure good contact and even crisping. The cheese should be fully melted.
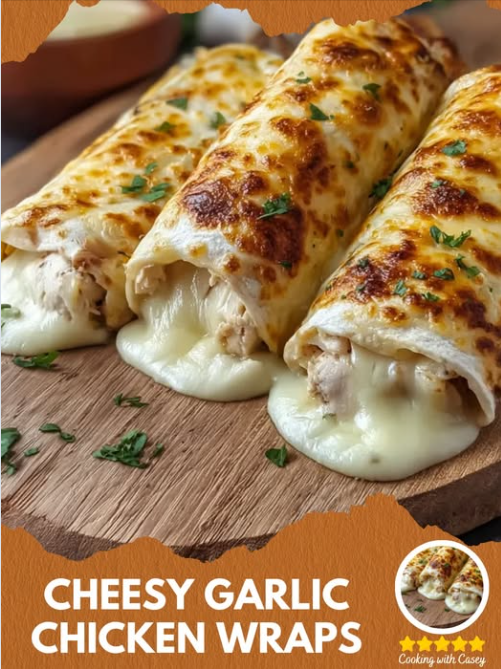
- **Serve:** Remove from the pan, slice in half diagonally, and serve immediately.
💡 Pro Tips and Customization
Achieving the Crispy Finish
To get a beautifully golden and crispy exterior without adding excess fat, cook the wraps in a **dry non-stick skillet**. The butter from the filling will be enough to provide flavor and help with browning. Medium-high heat is necessary to crisp the tortilla quickly before the filling steams it.
Customizing the Filling
- **Cheese Swap:** Substitute mozzarella with a spicy **Pepper Jack** or a richer blend like **Gruyère** for a different flavor profile.
- **Added Veggies:** For a healthier, high-volume wrap, add up to $\frac{1}{2}$ cup of finely **diced bell peppers, fresh baby spinach**, or thinly sliced **red onion** to the chicken mixture.
- **Spice Kick:** Add a small pinch of **red pepper flakes** to the garlic butter mixture for a subtle heat.
Make-Ahead and Storage
- **Filling Prep:** The chicken and cheese filling (Part 1) can be prepared up to **2 days in advance** and stored in the refrigerator. Assemble and cook the wraps right before serving.
- **Reheating:** Leftover wraps can be wrapped in foil and reheated in a **$350^{\circ}\text{F}$ ($175^{\circ}\text{C}$)** oven for 10 minutes to restore the crisp exterior.
🍽️ Serving Suggestions
These savory wraps pair well with fresh, cool, or tangy condiments:
- **Dipping Sauces:** Serve with a side of **ranch dressing, honey mustard, or a simple marinara sauce**.
- **Sides:** Pair with a fresh **garden salad**, **steamed broccoli**, or a quick batch of **baked potato wedges**.
- **Freshness:** Offer a side of **salsa or pico de gallo** for dipping to add a refreshing, acidic element that cuts through the cheese and garlic butter.
The **Cheesy Garlic Chicken Wraps** offer a quick, satisfying, and deeply flavorful alternative to standard sandwiches, making them a perfect addition to your rapid weeknight dinner rotation.