ADVERTISEMENT
Each ingredient is precisely chosen to contribute to the creamy texture, the necessary stability, or the crisp shell.
I. The Cheesecake Base (Creamy Core):
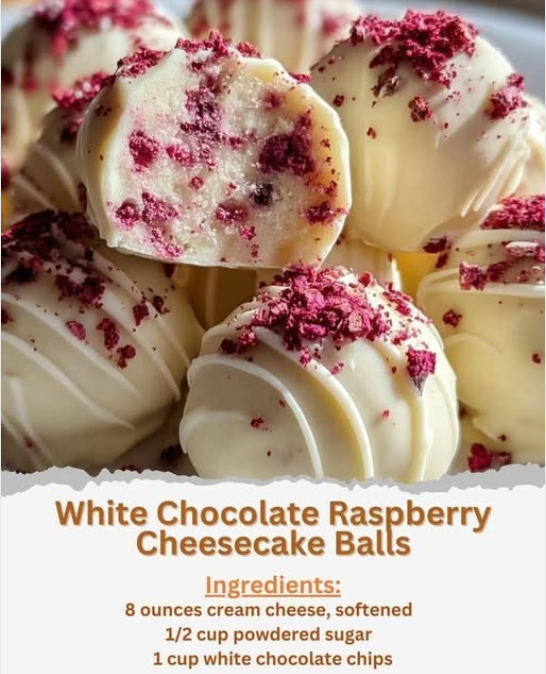
- 8 oz (225g) cream cheese, softened: The foundation. Must be softened to room temperature for a smooth, lump-free mix.
- ½ cup (60g) powdered sugar: Provides sweetness and, crucially, thickens the mixture without making it grainy (unlike granulated sugar).
- 1 tsp vanilla extract: A classic flavor enhancer that complements the cream cheese tang.
- Pinch of salt: Essential for balancing the sweetness and intensifying the flavor of the cream cheese and chocolate.
II. The Stabilizing and Flavor Agents:
- 1 cup (125g) fresh raspberries, mashed: The source of tartness and color. Mashing releases the flavor and moisture, which is then absorbed by the graham crackers.
- 1 cup (100g) crushed graham crackers: The necessary structural binder. Graham crackers absorb the moisture from the cream cheese and mashed raspberries, transforming the mixture from a soft filling into a stable, scoopable dough.
III. The Coating (The Flawless Shell):
- ½ cup (85g) white chocolate chips, melted: Used directly in the filling mixture, adding flavor and structure.
- **2 cups White chocolate melting wafers or high-quality chips (Implied for Coating):** The external coating. Wafers are often easier to melt than chips for coating purposes.
- ¼ cup (60ml) coconut oil or vegetable oil: The key to a smooth, non-clumpy coating. A small amount of oil lowers the melting point and viscosity of the white chocolate, allowing it to coat the chilled balls thinly and evenly.
- Additional white chocolate for drizzling & Fresh raspberries for garnish (optional): For the visual finish.
A Note on Raspberry Texture: For a completely smooth filling, you may press the mashed raspberries through a fine-mesh sieve to remove the seeds before incorporating them into the cream cheese mixture.
Directions: Mixing, Chilling, and Dipping Perfection
The success of this recipe is guaranteed by adhering to the precise chilling times between each phase.
Phase 1: Creating the Filling and Initial Chill
- Mix the Cream Base: In a large mixing bowl, beat the **softened cream cheese, powdered sugar, vanilla extract, and pinch of salt** until the mixture is completely smooth and fluffy.
- Melt Chocolate for Filling: Melt the **1/2 cup of white chocolate chips** gently (microwave in 15-second intervals). Stir the melted chocolate into the cream cheese mixture.
- Add Stabilizers: Gently fold in the **mashed raspberries** and the **crushed graham crackers**. Mix until the graham cracker crumbs are evenly incorporated and the mixture turns a uniform pink color.
- First Chill (The Setup): Cover the bowl and refrigerate the mixture for at least **2 hours**. The mixture must be firm enough to roll into balls.
Phase 2: Rolling, Chilling, and Hardening
- Roll the Balls: Use a small cookie scoop or a spoon to portion the chilled mixture. Roll the mixture tightly between your palms into uniform balls, about 1-inch in diameter. Place the balls on a parchment-lined baking sheet.
- Second Chill (The Critical Freeze): Place the baking sheet with the rolled balls in the freezer for a minimum of **30 minutes to 1 hour**. The balls must be nearly frozen solid before dipping. This prevents the warm chocolate from melting the filling and causing cracking.
Phase 3: Dipping and Finishing
- Melt the Coating: Melt the **white chocolate coating** (2 cups of chips/wafers) in a heatproof bowl using a double boiler or in the microwave. Stir in the **coconut oil or vegetable oil** until the chocolate is smooth, glossy, and very fluid.
- The Dip: Using a fork or a dipping tool, dip one frozen cheesecake ball at a time into the melted chocolate. Gently tap the fork on the edge of the bowl to allow excess chocolate to drip off.
- Set and Finish: Immediately place the coated ball back on the parchment paper. Continue dipping until all balls are coated. While the last balls are setting, use the additional melted white chocolate to drizzle decorative patterns over the finished balls.
- Final Chill: Allow the chocolate coating to fully harden at room temperature or in the refrigerator for 15–20 minutes before serving. Garnish with a fresh raspberry slice just before serving.
Troubleshooting and Timing: The Importance of Temperature Control
Temperature is the single most important factor in the success of this no-bake recipe.
Key Timing & Preparation Notes:
- **First Chill (2 hours):** Essential for stabilizing the mixture and making it rollable.
- **Second Chill (30–60 minutes):** **Absolutely critical.** If the balls are not frozen, the warm coating will melt the outer layer, leading to crumbs breaking off and a messy, uneven shell.
- **Dipping Speed:** Work quickly! The warmer the balls get, the faster the coating process will deteriorate. Only take a few balls out of the freezer at a time.
The Science of the Smooth Shell:
The addition of the coconut or vegetable oil (Step 7) is a professional trick. White chocolate is denser and thicker than dark chocolate. The oil lowers its viscosity, making the coating liquid enough to run off quickly. This results in the desired thin, smooth shell rather than a thick, cracked, or clumped layer.
Tips and Variations: Customizing the Elegance
Expert Tips for Flawless Cheesecake Balls:
- Room Temperature Cream Cheese: Beat the cream cheese alone for several minutes before adding sugar. This ensures there are zero lumps in the final filling.
- Crumb Consistency: Use a food processor to crush the graham crackers finely. Large chunks will make the mixture difficult to roll into smooth balls.
- Easy Cleanup: Dip the balls over a large piece of wax paper or parchment paper to catch the drips, making the cleanup process incredibly fast.
- **Avoiding the “Puddle” Base:** When placing the dipped balls on the parchment, gently slide the dipping fork out from underneath to minimize the formation of a large chocolate puddle at the base.
Flavor Variations:
- **Lemon Zest Twist:** Add **1 tablespoon of fresh lemon zest** to the cream cheese mixture (Step 1). The citrus brightens the flavor and enhances the tartness of the raspberries.
- **Oreo Cheesecake Balls:** Replace the graham crackers with an equal amount of **finely crushed Oreo cookies** (cream filling included) and swap the raspberries for a simple drizzle of dark chocolate after coating.
- **Pistachio Crunch:** Replace the graham crackers with **finely ground pistachios**. The green hue and nutty crunch pair beautifully with the white chocolate.
- **Milk Chocolate Shell:** Substitute the white chocolate coating with **milk or dark chocolate** for a richer, more intense flavor contrast to the tart raspberry core.
Conclusion: Perfect for Every Occasion
The **White Chocolate Raspberry Cheesecake Balls** are a testament to how refined a no-bake dessert can be. By focusing on the essential steps—ensuring a stable filling through the graham cracker binder and using the crucial double-chill method—you guarantee a beautiful, crack-free white chocolate shell around a vibrant, creamy interior.
The tartness of the raspberry cutting through the sweetness of the white chocolate makes this treat addictive, ensuring it will be a show-stopping addition to any party platter or dessert table. This method is a reliable foundation for endless no-bake truffle variations.
Frequently Asked Questions: Troubleshooting and Clarifications
Q: Why is my filling too sticky to roll?
A: The filling is too sticky because it needs **more chilling time** (First Chill, Step 4) or it needs **more binder**. If chilling doesn’t fix it, stir in another **1/4 cup of crushed graham crackers or powdered sugar** until the mixture is firm enough to handle without sticking to your hands.
Q: Why did my white chocolate coating seize or become clumpy?
A: White chocolate is highly prone to seizing if a single drop of **water or steam** touches it during melting. If melting in the microwave, ensure your bowl is dry. If using a double boiler, ensure the boiling water does not touch the base of the chocolate bowl. If it has seized, try stirring in a teaspoon of **hot, melted coconut oil** to potentially salvage the mixture.
Q: Can I use frozen raspberries?
A: **Yes**, but they must be thawed completely and the excess juice drained before mashing and adding them to the mixture. Frozen fruit retains more water, so you may need slightly more graham cracker crumbs to maintain the necessary firmness.
Q: How long can I store these?
A: Due to the cream cheese and fresh fruit, store these balls in an airtight container in the refrigerator for up to **1 week**. They can also be frozen for up to 2 months and thawed in the refrigerator before serving.
ADVERTISEMENT