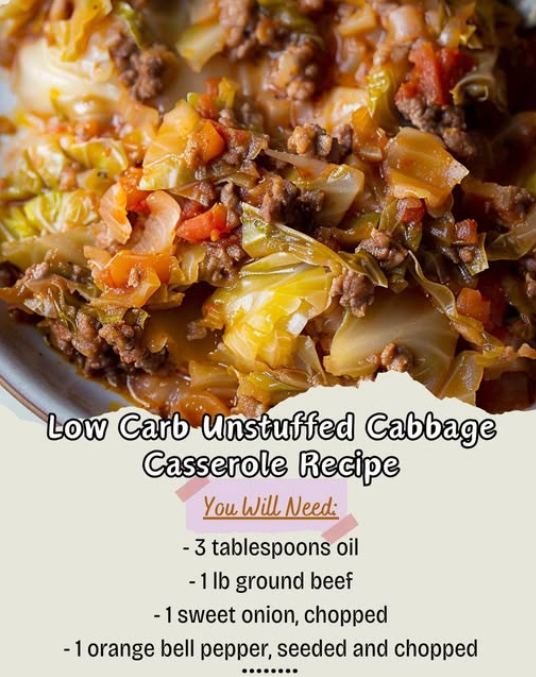
This recipe relies on staple ingredients, with special attention paid to low-carb and flavor-dense choices:
I. The Core Components (Fat, Protein, and Vegetable Base):
- **3 tablespoons oil:** Olive oil or avocado oil, crucial for sautéing and flavor base.
- **1 lb ground beef:** Preferably 80/20 for flavor, though lean cuts work with added oil.
- **1 medium head green cabbage:** The bulk and namesake of the dish; thinly sliced or roughly chopped.
- **1 medium onion, chopped:** An essential aromatic for foundational flavor.
- **1 medium bell pepper, chopped:** Adds color, subtle sweetness, and bulk without excess carbs.
II. The Liquid and Flavor Agents (Tomato and Spice):
- **1 (14.5 oz) can fire-roasted diced tomatoes, undrained:** Provides a smoky, rich tomato flavor and necessary chunks.
- **1 (8 oz) can tomato sauce (low-sugar preferred):** Acts as the thick binding liquid for the sauce.
- **1 teaspoon salt & ½ teaspoon black pepper:** Basic seasoning foundation.
- **1 tablespoon paprika (smoked or sweet):** Provides authentic Eastern European flavor depth.
- **1 teaspoon dried oregano:** Essential herbal note complementing the tomato.
- **1 tablespoon Worcestershire sauce (optional):** A secret ingredient for a deep, savory umami background.
III. The Topping:
- **1 cup shredded sharp cheddar or mozzarella cheese:** Provides a rich, melted crust.
Instructions: Achieving Depth and Preventing Runniness
Phase 1: Browning and Moisture Removal
1. Preheat and Prep: Preheat your oven to **$375^\circ\text{F}$ ($190^\circ\text{C}$)**. Lightly grease a $9 \times 13$ inch casserole dish. Prepare the cabbage by thinly slicing or roughly chopping it.
2. Sauté Aromatics: Heat the **oil** in a large skillet or Dutch oven over medium-high heat. Add the **chopped onion** and **bell pepper**. Sauté for 5–7 minutes until they are softened and fragrant. This step mellows the sharpness of the onion.
3. Brown and Drain the Beef (CRITICAL): Push the sautéed vegetables to one side. Add the **ground beef** to the skillet. Cook, breaking it up, until thoroughly browned. **Crucially, drain off all excess grease.** Failure to remove the fat will lead to a greasy, watery casserole. Use a colander to ensure thorough drainage.
4. Wilt the Cabbage: Return the drained beef and vegetables to the skillet. Add the **thinly sliced cabbage**. Cook, stirring often, for about **5–8 minutes**, or until the cabbage has significantly wilted and reduced in volume. This crucial step drives out excess internal water, preventing the final casserole from becoming soupy.
Phase 2: Simmering the Flavor Base
5. Build the Sauce: Stir in the **fire-roasted diced tomatoes (undrained), tomato sauce, salt, pepper, paprika, oregano, and Worcestershire sauce (if using)**. Stir to ensure all the spices are fully incorporated.
6. Simmer to Soften and Thicken: Bring the mixture to a gentle simmer. Reduce the heat to low, cover the skillet, and let it cook for **10–15 minutes**. This slow simmering time is essential: it finishes softening the cabbage to a tender, palatable texture and allows the tomato base to reduce slightly and the flavors to fully meld into a cohesive, rich sauce.
7. Transfer and Prepare for Baking: Taste the mixture and adjust salt/pepper if needed. Pour the entire cooked cabbage and beef mixture into the prepared $9 \times 13$ inch casserole dish, spreading it evenly. Use the back of a spoon to ensure a compact, flat top.
Phase 3: Baking and Setting
8. Top with Cheese: Sprinkle the **shredded cheese** (cheddar or mozzarella) evenly and generously over the top of the cabbage mixture, covering the entire surface.
9. Bake: Bake in the preheated oven for **15–20 minutes**. The casserole is done when the mixture is bubbling hot throughout, and the cheese is melted, golden brown, and slightly crispy around the edges.
10. Rest and Serve (CRITICAL): Remove the casserole from the oven and let it **rest for 5–10 minutes** before attempting to slice or scoop. This brief rest is vital as it allows the liquids to be reabsorbed and the melted cheese and sauce to firm up, ensuring the casserole holds its shape and is not runny when served.
Serving and Storage: Maximizing Leftover Quality
The casserole should be served warm, immediately after its brief resting period. Because it is a complete, satisfying meal, no complex side dishes are strictly necessary, though a simple side salad adds freshness. It is particularly excellent with a dollop of sour cream or a sprinkle of fresh dill.
- **Serving:** The casserole is best sliced into squares after resting.
- **Storage:** Store cooled leftovers in an airtight container in the **refrigerator for up to 4 days**.
- **Reheating:** Individual portions reheat perfectly in the microwave. For a whole dish, cover with foil and reheat in an oven set to $350^\circ\text{F}$ ($175^\circ\text{C}$) until heated through (15–20 minutes).
- **Freezing:** This is an excellent dish for freezing. Cool the baked casserole completely, cut it into individual portions, wrap each piece tightly in plastic wrap, and then place them in a freezer-safe bag. It can be frozen for up to **3 months**. Thaw overnight in the refrigerator before reheating.
Tips: Essential Techniques for the Best Texture
Cabbage Shredding: For the most traditional and tender texture, slice the cabbage very thinly. Using a food processor’s shredding attachment or a mandoline works exceptionally well. If you chop it too thickly, the cabbage may remain crunchy even after simmering.
Beef Fat Content: While 80/20 beef adds flavor, leaner beef (90/10) reduces the need for excessive drainage. If using very lean beef, you might want to increase the initial cooking oil to 4 tablespoons to compensate for the lost richness.
Tomato Acidity Balance: Traditional stuffed cabbage often uses a touch of brown sugar to balance the tomato acidity. For a low-carb version, use **1 teaspoon of a sugar substitute** (like erythritol or monk fruit) stirred into the sauce (Step 5) to replicate that crucial sweet-sour balance without adding carbs.
Dutch Oven Advantage: Using a Dutch oven for the stovetop portion (Steps 2–6) is ideal. Its heavy bottom distributes heat evenly, preventing scorching during the simmer and making the entire process a one-pot affair before the final transfer to the baking dish.
Variations: Customizing the Low-Carb Profile
Adapt the casserole to different dietary needs and flavor preferences:
- **Keto Fat Boost:** Replace the ground beef with **ground pork** (higher fat content) or stir in **1/4 cup of heavy cream** into the tomato sauce mixture (Step 5) for a creamier, higher-fat filling.
- **Meat Swap:** Use **ground turkey** or a combination of **ground beef and ground lamb** for a richer, gamier flavor profile.
- **Spice Swap (Hungarian Style):** Double the amount of **paprika** (using Hungarian sweet paprika) and add 1/2 teaspoon of **caraway seeds** to the sauce mixture (Step 5) for a true Hungarian influence.
- **Vegetable Bulk:** Add 1 cup of drained, sautéed **mushrooms** or 1/2 cup of finely diced **celery** to the aromatic base (Step 2) to increase the vegetable content without adding significant carbs.
Tips: Further Steps for Flavor and Texture
Flavor Deepening: For an intensely smoky, deep flavor, stir in **1 teaspoon of beef base concentrate** or bouillon powder into the sauce mixture (Step 5). This amplifies the savory character of the beef and makes the casserole taste like it simmered all day.
Cheese Crust Optimization: For an extra-crispy, golden brown cheese top, switch the oven to **Broil** for the last 2 minutes of baking, watching carefully to prevent burning. Alternatively, mix the shredded cheese with 1 tablespoon of olive oil before topping for even browning.
Make-Ahead Stability: To ensure the best texture for a make-ahead version, assemble the casserole completely (through Step 7, without the cheese) and refrigerate. Before baking, let the dish sit at room temperature for 30 minutes. Add the cheese and bake, increasing the total bake time by 10–15 minutes to account for the cold start.
Serving Enhancements: A classic pairing for cabbage dishes is sour cream. Serve with a dollop of full-fat sour cream or crème fraîche, often sprinkled with fresh **dill or parsley**, to add a cool, creamy contrast to the rich, hot filling.
Conclusion: A Low-Carb Legacy
The Low Carb Unstuffed Cabbage Casserole successfully translates a time-honored recipe into a convenient, modern format. By meticulously managing moisture through proper draining and cabbage wilting, and building a rich tomato and spice base, we achieve a satisfying, deep flavor profile without the high-carb starch. This casserole is not just a healthy alternative; it is a delicious, comforting dish in its own right—a perfect centerpiece for any low-carb or weeknight dinner table.
Frequently Asked Questions (FAQ)
Q: Why did my casserole turn out watery?
A: This is usually due to insufficient moisture removal. Ensure two things: 1) all fat/grease is drained from the ground beef (Step 3), and 2) the cabbage mixture is simmered (Step 6) long enough to reduce the liquid from the tomatoes and the water released by the cabbage.
Q: Can I use pre-shredded cabbage (coleslaw mix)?
A: Yes, you can. However, coleslaw mix often contains hard carrot pieces. If using, you should simmer the mixture for the full 15 minutes (Step 6) to ensure the carrots fully soften.
Q: Is this dish freezer-friendly?
A: Absolutely. It freezes exceptionally well. I recommend freezing it after it has been fully baked and cooled. Thaw overnight in the refrigerator and reheat until bubbly.
Q: Can I replace the tomato sauce with crushed tomatoes?
A: Yes, but crushed tomatoes are thinner. If you use them, you may need to simmer the sauce mixture (Step 6) for 5–10 minutes longer, uncovered, to allow more moisture to evaporate and prevent the final casserole from being runny.
Q: How do I make this dairy-free?
A: Simply omit the cheese topping, or use a high-quality shredded dairy-free mozzarella alternative. The structure of the casserole will not be affected by the omission of the top cheese layer.