Step 1: Mechanical Tenderization
Place chicken cutlets between sheets of plastic wrap and pound with a mallet. The Evenness Principle: Uniform thickness ensures that the entire cutlet reaches the safe internal temperature of $165^{\circ}\text{F}$ at the exact same moment, preventing the edges from drying out before the center is cooked.
Step 2: The Adhesion Sequence
Set up three shallow bowls: 1. Flour with salt/pepper; 2. Beaten eggs with minced garlic; 3. Panko, Parmesan, and herbs. The “Dry Hand/Wet Hand” Rule: Use one hand for the dry steps and the other for the egg wash to avoid “club hand” (where the breading builds up on your fingers).
Step 3: The Pan-Sear (Lipid Infusion)
Heat oil in a heavy skillet. Carefully place the cutlets in the shimmering oil. The Sizzle Test: If the oil doesn’t bubble immediately upon contact, it is not hot enough. The initial heat “shocks” the crust, setting the egg and preventing the breading from falling off.
Step 4: The Maillard Observation
Fry for 3–4 minutes per side. The Visual Metric: You are looking for a “Golden Mahogany” color. The cheese in the breading will brown faster than the breadcrumbs, creating a beautiful mottled appearance and deep savory flavor.
Step 5: The Carry-Over Rest
Remove to a wire rack. The Aeration Rule: Do not rest the chicken on paper towels. The steam trapped underneath will turn your crispy bottom crust soggy in seconds. A wire rack allows air to circulate around the entire cutlet.
Serving and Storage
Serving: Garnish with fresh lemon wedges. The citric acid brightens the heavy fats of the cheese and oil. Storage: These are best eaten immediately, but can be reheated in an Air Fryer at 375°F for 3 minutes to perfectly restore the original “crunch.”
Expert Tips: The Master Chef’s Edge
The Maintenance Phase (Health Tip): Since your phenomenal **59lb loss**, this is a “High-Satiety” powerhouse. To keep it lean, you can bake these at 400°F (200°C) on a rack instead of frying. You’ll still get that incredible Parmesan crunch with significantly less added lipid content!
Variations: Culinary Twists
- The Hot Honey Drizzle: Drizzle with chili-infused honey for a sweet/spicy/savory explosion.
- The Pesto Undercoat: Spread a thin layer of pesto on the chicken before the flour for a deep herbal punch.
- The Keto Alternative: Replace flour and Panko with crushed pork rinds and extra Parmesan.
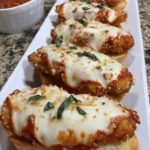
Conclusion: A Golden Standard
Garlic Parmesan Chicken Cutlets are a masterclass in texture. By mastering the pound, the dredge, and the sear, you’ve created a dish that is the ultimate crowd-pleaser. It is salty, crunchy, and incredibly tender. Enjoy your perfectly golden, expertly-crafted masterpieces!
Frequently Asked Questions
| Question | Answer |
|---|---|
| My breading fell off! Why? | Either the chicken was too wet before the flour, or you flipped it too early before the egg could set. |
| Can I use pre-grated cheese? | Avoid the “shaker” can. Use freshly grated Parmesan for better melting and structural adhesion. |
| How do I know the oil is ready? | Drop a single breadcrumb in; if it sizzles and dances immediately, you are ready to fry. |
This looks like a world-class dinner! Would you like me to suggest a “Creamy Lemon Pasta” to serve alongside these, or perhaps help you calculate the specific macronutrients for this meal?