ADVERTISEMENT
Phase 1: Preparing the Peanut Butter Core
- **Prepare Pretzels:** Break the **pretzels** (Ingredient I) into small, uneven pieces. Aim for pieces roughly $\frac{1}{2}\text{ inch}$ in size. Set aside.
- **Mix Base (BINDING MANDATE):** In a large bowl, combine the **creamy peanut butter, powdered sugar, and vanilla extract**. Mix with a spatula until a very thick, cohesive dough forms. The mixture should be stiff and not sticky.
- **Incorporate Pretzels:** Fold the **broken pretzels** into the peanut butter mixture until they are completely and evenly coated.
- **Chill Core:** Scoop out tablespoon-sized portions and form them into round or slightly irregular clusters. Place on a parchment-lined tray and refrigerate for **$30\text{ minutes}$** until firm.
Phase 2: Chocolate Coating and Stabilization
- **Melt Chocolate (SEALING PROTOCOL):** Place the **chocolate chips** (Ingredient III) and **coconut oil/butter** (if using) in a microwave-safe bowl. Microwave in $30\text{ second}$ intervals, stirring well between each, until completely smooth and glossy.
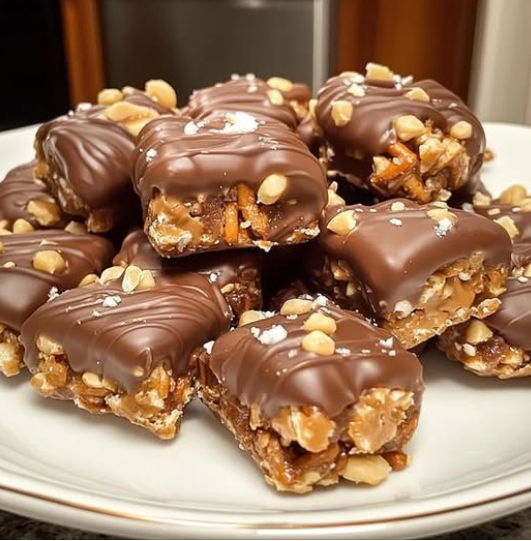
- **Coat Clusters:** Using two forks or a dipping tool, dip each chilled **peanut butter pretzel cluster** into the melted chocolate, turning to coat completely. Tap the cluster gently on the side of the bowl to allow excess chocolate to drip off.
- **Set Chocolate:** Return the coated clusters to the parchment-lined tray. If desired, sprinkle with flaky sea salt or crushed pretzels immediately before the chocolate sets.
- **Final Set:** Refrigerate for an additional **$15\text{–}20\text{ minutes}$** until the chocolate shell is completely hard and non-tacky.
Storage and Safety: Maintaining Crunch and Freshness
Optimal handling for extended shelf life:
- **Refrigeration:** Store in an airtight container in the fridge for up to **2 weeks**.
- **Freezing:** Can be frozen for up to **3 months**. Thaw at room temperature for $10\text{ minutes}$ before serving.
- **Crunch Preservation:** Always store in an airtight container to prevent moisture absorption, which causes the pretzels to lose their crispness (Textural Integrity Principle).
Tips: Essential Techniques for Smoothness and Stability
Peanut Butter Quality: Use a **commercial, non-separating creamy peanut butter** (like Jif or Skippy) (Ingredient II). Natural peanut butter, which separates oil, will result in a much looser, greasier mixture that may not set properly (Binding Mandate).
Powdered Sugar Sifting: **Sift the powdered sugar** before mixing (Instruction 2) to ensure there are no lumps, guaranteeing a smooth and uniform peanut butter dough.
Microwave Safety: When melting chocolate (Instruction 5), always use low heat settings and stir frequently. Chocolate burns easily, which makes it seize and unusable for coating.
Dipping Technique: Ensure the clusters are **fully chilled** before dipping (Instruction 6). Dipping warm clusters into the melted chocolate will cause the two layers to mix and prevent the chocolate from forming a firm shell.
Coconut Oil Alternative: If you don’t use coconut oil, add $\frac{1}{2}\text{ teaspoon}$ of **vegetable shortening** (like Crisco) to the chocolate. This achieves the same glossy, fluid consistency for a clean coat.
Variations: Customizing Flavor and Coating
Easily adapt the flavor profile and presentation:
- **White Chocolate Shell:** Substitute white chocolate chips for the milk/dark chocolate (Ingredient III) and drizzle with the opposite color for contrast.
- **Spiced Peanut Butter:** Add $\frac{1}{4}\text{ teaspoon}$ of **cinnamon** or **pumpkin pie spice** to the peanut butter dough (Instruction 2) for a warming flavor note.
- **Rice Krispies Boost:** Replace $\frac{1}{2}\text{ cup}$ of the **pretzels** with $\frac{1}{2}\text{ cup}$ of **Rice Krispies cereal** for an even lighter, crispier texture.
- **Flaky Sea Salt:** Sprinkle **flaky sea salt** over the chocolate immediately after dipping (Instruction 7). The large salt flakes provide an extra burst of salty contrast on the sweet shell.
**Hand Rolling vs. Scooping:** Use a **tablespoon cookie scoop** for consistent size (Instruction 4). If the clusters are uneven, the small ones will have too much chocolate, and the large ones may be harder to coat.
**Quick Set:** Place the tray in the **freezer for $5\text{ minutes}$** immediately after coating (Instruction 7) to set the chocolate quickly. This is essential for achieving the professional, glossy finish and preventing the chocolate from melting off.
**Troubleshooting Sticky Dough:** If your dough is too sticky after adding the pretzels (Instruction 3), add $\frac{1}{4}\text{ cup}$ more **powdered sugar** and mix vigorously. This will absorb the excess moisture and oils.
**Double Coating:** For a truly indulgent dessert, **double-dip** the clusters. Let the first coat set completely, then dip a second time. This creates a thick, satisfying shell.
Conclusion: A Perfectly Balanced Confection
The **No-Bake Peanut Butter Pretzel Cluster** is a triumphant study in simple confectionery technique. By strictly managing **The Binding and Set Mandate** to ensure a firm core and executing **The Tempering and Sealing Protocol** for a flawless chocolate shell, you create a perfectly balanced treat that delivers texture, sweetness, and saltiness in every stable bite.
Frequently Asked Questions (FAQ)
Q: Why is my peanut butter mixture too soft and falling apart?
A: Your mixture likely needs more **powdered sugar** (Instruction 2). The sugar provides the necessary bulk and firmness. Also, ensure you are using creamy, high-fat peanut butter, not a low-fat or natural variety (Binding Mandate).
Q: Why did my melted chocolate seize (turn thick and grainy)?
A: **Water contamination** (even a drop of water or condensation) or **overheating** is the cause (Instruction 5). If seized, try whisking in $1\text{ teaspoon}$ of hot coconut oil or shortening to save it, or start over.
Q: Can I skip the chilling step for the peanut butter core?
A: **No.** Skipping the $30\text{ minute}$ chill (Instruction 4) will make the clusters too soft to handle, and they will lose their shape and mix into the warm chocolate, creating a messy, unstable final product.
Q: My chocolate cracked after chilling. Why?
A: The **chocolate shell was too thick** or did not contain enough **coconut oil/butter** (Instruction 5). The high contrast in temperature between the warm coating and the cold cluster causes the shell to crack if it’s too brittle.
ADVERTISEMENT