ADVERTISEMENT
Phase 1: Preparing the Dough (The Shortbread Standard)
- **Preheat and Prep:** Preheat the oven to **$350^\circ\text{F}$ ($175^\circ\text{C}$)**. Line a baking sheet with parchment paper.
- **Creaming (THE CREAMING WINDOW):** In a stand mixer (paddle attachment) or large bowl with a hand mixer, cream the **¾ cup softened butter** and **½ cup sugar** on medium-high speed for **2 minutes** until light and fluffy. Add the **1 egg yolk**, and mix for another minute.
- **Add Flour:** Turn off the mixer, scrape the bowl. With the mixer on **low speed**, gradually incorporate the **1½ cups all-purpose flour**. Mix only until the flour is just combined and the dough comes together into a cohesive mass. **Do not overmix.**
- **Chill Dough (SPREAD PREVENTION):** **Optional, but recommended:** Wrap the dough tightly and chill for **1 hour**. This solidifies the butter, preventing the cookies from spreading excessively in the oven.
Phase 2: Forming and Filling (The Jam Stabilization Method)
- **Portion Dough:** Using a small cookie scoop or spoon, portion **$\frac{1}{2}$ tablespoon-sized** dough balls. Roll them lightly between your palms and arrange them about **2 inches apart** on the prepared baking sheet.
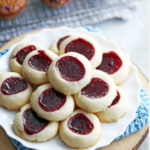
- **Make Indentations:** Make an indent in the center of the dough with your **thumb** OR grease the back of a **$\frac{1}{2}$ teaspoon measuring spoon** with cooking spray and use that to make your indents. The spoon method ensures a uniform well size and prevents cracks in the cookie edge.
- **Fill with Jam:** Fill each indent with the **$\frac{1}{2}$ cup raspberry jam**. **Pro Tip:** Seal the jam inside a zip-top plastic bag, cut a tiny hole in the corner, and use it to pipe the jam precisely into the indents, keeping the edges clean.
Phase 3: Baking and Cooling
- **Bake:** Bake the cookies in the preheated oven ($350^\circ\text{F}$) for **9–11 minutes**, or until the shortbread edges are light golden brown. The centers should still look pale.
- **Cooling Protocol:** Remove cookies from the oven and allow them to cool on the pan for **2 minutes** (this prevents them from breaking). Then, carefully transfer them to a wire rack to cool completely before serving.
Serving and Storage: Maintaining Freshness
Optimal handling for a crisp-tender cookie:
- **Serving:** Serve fully cooled. Optional: Dust with powdered sugar just before serving for a traditional holiday look.
- **Storage:** Store cooled cookies in an airtight container at room temperature for up to **5 days**. Separate layers with parchment paper to prevent sticking.
- **Freezing Dough:** The dough can be prepared (Steps 1–3), tightly wrapped, and frozen for up to **3 months**. Thaw overnight in the refrigerator before scooping and baking.
- **Freezing Baked Cookies:** Baked and cooled cookies (without powdered sugar) freeze well for up to **1 month**. Thaw at room temperature.
Tips: Essential Techniques for Shortbread Structure
Butter Temperature (Crucial): The **¾ cup butter** (Instruction 2) must be softened, but not melted. If the butter is too warm, the dough will be greasy and require more flour, leading to a tougher cookie.
Salted Butter: Using **salted butter** is often preferred in shortbread as the salt enhances the rich flavor and provides a good balance to the sweet jam. If you use unsalted butter, add $\frac{1}{4}$ teaspoon of fine salt to the flour.
Preventing Cracks: If the edges of your dough crack when creating the indent (Instruction 6), dip your finger or spoon back into the cooking spray, or dampen it with a tiny bit of water. Cracks can be gently pressed back together before filling.
Jam Consistency: If your **raspberry jam** (Instruction 7) seems too runny, gently warm it in a saucepan for 1 minute to thicken it slightly, or stir in a pinch of cornstarch before piping.
Baking Uniformity: Baking for the full **9–11 minutes** (Instruction 8) is important. The light golden edges signal doneness, ensuring the bottom of the cookie is set and preventing the cookie from having a raw, “doughy” taste.
Variations: Customizing Flavor and Filling
Easily adapt the flavor profile of this classic cookie:
- **Almond Shortbread:** Add **$\frac{1}{2}$ teaspoon of almond extract** (Instruction 2) along with the egg yolk. Use apricot or cherry jam for the filling.
- **Lemon Zest:** Add the zest of **one medium lemon** (Instruction 2) to the butter and sugar mixture for a bright citrus note. Fill with lemon curd instead of jam.
- **Chocolate Drizzle:** After the cookies are completely cooled (Instruction 9), melt **$\frac{1}{4}$ cup of dark chocolate chips** and drizzle over the finished cookies for extra richness.
- **Nutty Base:** Fold in **$\frac{1}{4}$ cup of very finely ground walnuts or pecans** with the flour (Instruction 3) for a deeper, nutty flavor in the shortbread base.
**Piping Consistency:** Even with the zip-top bag method (Instruction 7), use a smooth, even pressure when piping to achieve a consistent amount of jam in each indent. Too much jam will run out during baking.
**Alternative Indent:** If you don’t want to use your thumb or a spoon, you can use the **end of a round wooden spoon handle** to create the indent (Instruction 6).
**Sugar Substitute:** While granulated sugar is traditional (Instruction 2), substituting with **powdered sugar (confectioners’ sugar)** can result in an even more tender, slightly finer crumb structure.
**Pan Usage:** For best results, use a **light-colored aluminum baking sheet** (Instruction 1). Darker pans absorb more heat and can cause the bottoms of the cookies to brown too quickly or burn.
Conclusion: A Timeless Classic
The **Raspberry Shortbread Thumbprint Cookie** is a timeless recipe that rewards precision. By respecting **The Shortbread Standard** through minimal mixing and adequate chilling, and carefully executing **The Creaming Window** and **The Jam Stabilization Method**, you guarantee a cookie that is tender, buttery, and beautifully balanced with the sweet-tart flavor of raspberry. This recipe provides a delicate, melt-in-your-mouth experience perfect for holidays or everyday indulgence.
Frequently Asked Questions (FAQ)
Q: Why did my cookies spread too much and flatten?
A: The butter was likely **too soft or melted** during mixing (Instruction 2), or you **skipped the recommended chill time** (Instruction 4). Chilling is crucial to firm the fat and prevent spreading.
Q: Why did the raspberry jam run out of the indent?
A: The jam was either **too thin/runny** (low pectin content), or you **overfilled the indent** (Instruction 7). Ensure the jam is thick and do not fill past the indent’s edge.
Q: Can I use different fillings besides raspberry jam?
A: **Yes!** (Instruction 7). Any thick, high-quality jam, curd (like lemon or lime), or even melted chocolate can be used, provided they have enough viscosity to hold their shape during baking.
Q: Why is my cookie dough tough instead of crumbly?
A: The dough was **overmixed** after adding the flour (Instruction 3). This overdeveloped the gluten, resulting in a tough, chewy shortbread instead of the desired sandy, tender crumb.
ADVERTISEMENT