ADVERTISEMENT
Phase 1: Prep and Filling
- **Preheat & Prep:** Preheat your oven to **$375^\circ\text{F}$ ($190^\circ\text{C}$)**. Line a baking sheet with parchment paper. Prepare your dough (unroll crescent or unfold puff pastry), leaving it cold.
- **Make the Filling (ROOM-TEMPERATURE WHIPPING):** In a medium bowl, combine the **softened cream cheese**, **$\frac{1}{2}$ cup granulated sugar**, **1 large egg yolk**, **1 teaspoon vanilla extract**, and **pinch of salt**. Use an electric mixer or whisk to mix until the filling is **completely smooth and creamy** with no lumps.
Phase 2: Assembly and Shaping (COLD DOUGH RULE)
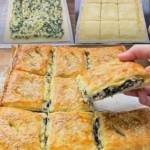
- **Assemble the Rolls:** Work quickly to keep the dough cold. Lay out the first sheet of dough. If using crescent roll dough, pinch seams together firmly. Spread half of the cream cheese filling evenly over the dough, leaving a small border. Carefully roll up the dough from one of the long sides, creating a tight log. Repeat with the second sheet and remaining filling.
- **Slice & Shape:** For the rolls, cut each log into **8 equal slices** (about 1-inch thick). Place the slices, **cut side up**, on your prepared baking sheet, leaving space between them. For the puff pastry square/folded method, simply arrange the individual danishes on the sheet.
Phase 3: Baking and Finish
- **Egg Wash and Sprinkle:** In a small bowl, whisk together **1 egg yolk and 1 tablespoon of milk**. Lightly brush the tops and sides of the danishes with this egg wash. Sprinkle a tiny bit of the reserved **granulated sugar** on top for extra crunch, if desired.
- **Bake (PUFF VS. CRESCENT STRATEGY):** Bake for **15–20 minutes** at $375^\circ\text{F}$ ($190^\circ\text{C}$). The danishes are done when they are **golden brown** and the filling looks **set** (no longer jiggly).
- **Cool & Serve:** Let the danishes cool slightly on the baking sheet for 5 minutes before moving them to a wire rack. Once fully cooled, dust generously with **powdered sugar**, if desired, before serving.
Serving and Storage: Maximizing Flake and Freshness
Optimal handling for this sweet treat:
- **Serving:** Best served warm or at room temperature. The flaky texture is most prominent soon after cooling.
- **Storage:** Store leftovers in an airtight container in the refrigerator for up to **3 days**. The pastry will lose some of its flakiness but remains delicious.
- **Reheating:** Reheat in a toaster oven or standard oven at $300^\circ\text{F}$ for 5–8 minutes until the pastry is warm and slightly crisp again.
Tips: Essential Techniques for a Bakery-Quality Result
The Cream Cheese Rule (CRITICAL): The **cream cheese** (Step 2) *must* be fully softened. If it’s cold, it will create lumps, which will never smooth out, regardless of how long you mix. Set it out for at least 1-2 hours prior to mixing.
Dough Temperature: Use the dough straight from the fridge (Step 3). If using **puff pastry**, minimize rolling or stretching to preserve the butter layers.
Pinch Crescent Seams: If using crescent rolls (Step 3), ensure you **firmly pinch all perforated seams** together before spreading the filling. This prevents leaks during rolling and baking.
Filling Consistency: The filling should be **thick** (Step 2). If you accidentally add too much milk to the egg wash, or if you use too much liquid, the filling might ooze out during baking. If the filling seems runny, add a teaspoon of flour or cornstarch.
Serving Polish: Dusting with **powdered sugar** (Step 7) is not just for looks; it adds a final layer of sweetness and gives the danish a professional, bakery-fresh appearance.
Variations: Customizing Flavor and Topping
Easily adapt the flavor profile of the danishes:
- **Lemon Zest Brightness:** Add the **zest of one small lemon** to the cream cheese filling (Step 2) for a vibrant, citrus tang.
- **Fruit Topping:** Before baking, place a spoonful of **jam (raspberry or apricot)** in the center of the slices/squares, right on top of the cream cheese filling (Step 3).
- **Almond Crunch:** Add **$\frac{1}{4}$ teaspoon of almond extract** to the filling (Step 2) and sprinkle the tops with **sliced almonds** before baking (Step 5).
- **Icing Glaze:** For an extra sweet finish, skip the powdered sugar and instead drizzle a thin glaze made from **$\frac{1}{2}$ cup powdered sugar and 1 tablespoon of milk** over the cooled danishes (Step 7).
**The Log Method:** The **rolled log method** (Step 3) is easiest and creates a beautiful swirl. If you want a more traditional-looking, open-faced square danish, use the puff pastry and place the filling in the center, leaving the corners to puff around it.
**Cutting the Logs:** Use a **sharp, non-serrated knife** (Step 4) to cut the log. A dull knife will squash the log, ruining the swirl pattern. If the log is soft, freeze it for 5-10 minutes before slicing.
**Parchment Paper:** Always use **parchment paper** (Step 1). The high sugar content in the filling and the dough can easily caramelize and stick to the baking sheet.
**Checking Doneness:** If the edges are golden (Step 6) but the filling still looks very wet and jiggly, the danishes need 2-3 more minutes. The filling should look mostly **set** before removing them from the oven.
Conclusion: Effortless Elegance for Breakfast
The **Easy Breakfast Cheese Danish** is a testament to the power of convenience and precise technique. By adhering to **The Room-Temperature Whipping Protocol** for a silky-smooth filling and respecting **The Cold Dough for Flakiness Rule**, you guarantee a perfect, professional-looking pastry every time. Whether for a quick treat or a special brunch, these flaky, creamy danishes are sure to be a hit and effortlessly start your day with a smile.
Frequently Asked Questions (FAQ)
Q: Why did my cream cheese filling turn out lumpy?
A: The **cream cheese was not fully softened** (Step 2). You must start with true room-temperature cream cheese to ensure a smooth, lump-free filling.
Q: My danishes came out flat and didn’t puff. Why?
A: The dough likely got **too warm** (Step 3) during assembly, causing the internal butter layers to melt before baking. Work quickly, and if needed, chill the assembled danishes for 10 minutes before baking.
Q: Can I use low-fat cream cheese?
A: **Yes**, but full-fat is recommended (Step 2). Low-fat may be slightly runnier and less rich, affecting the final set of the filling.
Q: How can I make the filling even sweeter?
A: You can increase the sugar by $\frac{1}{4}$ cup (Step 2). Alternatively, add a layer of **apricot or raspberry jam** over the filling before rolling/folding for added sweetness and complexity (Variation 7).
ADVERTISEMENT