Preheat your oven to 400°F (200°C). In a large bowl, whisk together the cornmeal, flour, sugar, baking powder, and salt.
Regulation: Ensure there are no clumps of baking powder, as this will lead to uneven rising in the mini-muffin tin.
In a separate vessel, whisk the milk, melted butter, honey, and egg until smooth. Slowly pour the wet ingredients into the dry. Fold gently until just combined.
Tip: Do not overmix! Over-agitation activates the gluten, making the poppers tough.
Gently fold in the corn kernels. These provide “bursts” of moisture and texture within the crumb.
Grease a mini-muffin tin generously with butter. Fill each cup about 3/4 full.
Bake for 10–12 minutes. The poppers are done when the edges are a deep golden brown and a toothpick comes out clean.
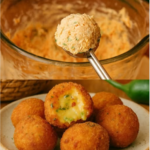
While the poppers are still hot, whisk together the softened butter and honey for the glaze. Brush generously over each popper. The heat will cause the glaze to sink into the pores of the bread.
Serving and Storage
These poppers are designed to be served warm, as the glaze is most effective when it is in its semi-liquid state.
| Method | Timeframe | Optimal Condition |
|---|---|---|
| Room Temp | 24 Hours | Keep in a vented container to avoid sogginess. |
| Refrigerator | 3–4 Days | Reheat in a toaster oven for 2 minutes to restore the “snap” of the edges. |
| Freezer | 2 Months | Wrap in foil and store in a heavy-duty freezer bag. |
Tips: Optimizing the Golden Ratio
- Butter Temperature: Ensure your melted butter isn’t boiling hot when you add the egg, or you risk “scrambling” the protein.
- The Honey Drip: Use local honey if possible; the floral notes are more pronounced and complement the cornmeal’s earthy profile better than processed syrups.
- Corn Choice: If using frozen corn, do not thaw it first. The extra moisture from thawing can make the batter too thin.
Variations: Spicy & Savory Twists
- The Jalapeño Kick: Add 1 tbsp of finely minced jalapeños to the batter for a sweet-heat contrast.
- The Cheddar Burst: Fold in 1/2 cup of shredded sharp cheddar cheese for a savory, salty depth.
- The Smokey Popper: Add 1/4 tsp of smoked paprika to the glaze for a BBQ-inspired finish.
Additional Tips: Troubleshooting
If your poppers are flat, your baking powder may be expired. If they are too dry, check your oven temperature; many home ovens run 25 degrees hot, which can over-bake small items like these in seconds.
Conclusion
The Southern-Style Honey Butter Cornbread Popper is a testament to the idea that small bites can carry massive flavor. By respecting the regulations of the wet-to-dry ratio and the importance of a hot-pan start, you ensure a professional result every time. These poppers are a joyful addition to any 2026 table, bridging the gap between a side dish and a snack. Enjoy the golden, buttery goodness!
Frequently Asked Questions
- Can I use buttermilk instead of regular milk?
- Yes! Buttermilk will add a lovely tang and make the poppers even more tender. If you do, add a pinch of baking soda to help with the rise.
- Can I make these gluten-free?
- Absolutely. Replace the all-purpose flour with a 1:1 gluten-free baking blend. Since cornmeal is naturally gluten-free, the texture remains very similar.
- How do I stop them from sticking to the pan?
- Grease with butter rather than oil. The solids in the butter create a better non-stick barrier for cornmeal-based batters.