ADVERTISEMENT
Phase 1: Gelatin Activation (BLOOM & TEMPER)
- **Bloom Gelatin:** Sprinkle the **gelatin** over the **cold water** in a small bowl. Stir immediately and let sit for **$1\text{–}2\text{ minutes}$** until the mixture thickens and resembles spongy foam.
- **Liquefy Gelatin:** Microwave the bloomed gelatin for **$5\text{–}10\text{ seconds}$** or until the mixture has fully liquefied. The goal is a liquid that is clear, not steaming. Set aside to cool to **lukewarm** (TEMPERING PROTOCOL).
Phase 2: Whipping and Stabilization
- **Whip Cream (EMULSIFICATION MANDATE):** In a large **chilled mixing bowl**, combine the **heavy cream, powdered sugar, and vanilla**. Mix on low speed using the whisk attachment until small bubbles cover the surface. Increase speed to medium and mix until the cream is visibly thicker and reaches **soft-peak stage**.
- **Add Gelatin:** While the mixer is still going on medium speed, **slowly stream the lukewarm liquid gelatin** into the thickening cream. Increase speed to high and mix until **medium–stiff peaks** form. The peaks should hold their shape but still have a slight curl at the tip.
- **Store or Serve:** Use immediately or transfer to an airtight container and store in the refrigerator.
Storage and Safety: Maintaining Stability
Optimal handling for extended shelf life:
- **Refrigeration:** Homemade stabilized whipped cream will keep in the refrigerator for **$3\text{–}4\text{ days}$** without weeping, thanks to the gelatin.
- **Freezing:** It can be frozen in a freezer-safe container for **up to $1\text{ month}$**. Thaw it overnight in the refrigerator; it should retain its volume better than un-stabilized cream.
- **Safety Note:** Do not leave this dairy product at room temperature for more than $2\text{ hours}$.
Tips: Essential Techniques for Max Volume
Do Not Over-Whip: Stop whipping (Instruction 4) the moment medium–stiff peaks are achieved. Over-whipping results in butter, which is dense and unusable for this application.
Chill Everything: Ensure the **heavy cream, mixing bowl, and whisk attachment** are chilled for at least $15\text{ minutes}$ before starting the whipping process (Emulsification Mandate).
Gelatin Temperature Check: Test the liquid gelatin (Instruction 2) with your finger—it should feel slightly warm or neutral, not hot. If it feels cool, quickly zap it again. If it is too cold, it will seize upon hitting the cream.
Cream Purity: Use **heavy whipping cream** (Ingredient I) with no substitutes. Products like half-and-half have a butterfat content below the $30\%$ threshold needed to form stable peaks.
Speed Control: Start the mixer on low to medium (Instruction 3) to build structure, then transition to high speed *only* after the gelatin is added (Instruction 4). This slow start prevents liquid splashing and rapid butter formation.
Recipe Variations: Customizing Flavor and Density
Easily adapt the flavor and richness of the whipped topping:
- Substitute **almond extract, lemon extract, mint extract, or orange extract** for vanilla (Ingredient I).
- Add **$2\text{ tablespoons}$ cocoa powder** (sifted) along with the powdered sugar to make Chocolate Cool Whip (Ingredient I).
- Add a spoonful of **peanut butter or Nutella** during the **Cream Cheese** stage (see Tip 8 below) for richness.
- For extra density, substitute $4\text{ oz}$ of the cream with **softened cream cheese**, beaten until smooth before adding the remaining cold cream.
- Add **strawberry or raspberry jam** (about $\frac{1}{4}\text{ cup}$) to the cream cheese base for color and fruit flavor.
- Gently **stir in fresh berries** (Instruction 5) for a delicious treat, but do so *just before serving*, as berries can weep liquid over time.
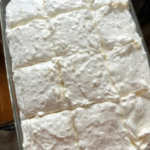
**Stiff Peak Appearance:** The final texture (Instruction 4) should be firm enough to pipe through a pastry bag. If the cream looks slightly grainy, you have gone too far and are near making butter. [Image demonstrating the difference between soft, medium, and stiff peaks in whipped cream]
**Powdered Sugar Role:** **Powdered sugar** (Ingredient I) is preferred over granulated sugar because it contains a small amount of cornstarch, which is itself a stabilizer and dissolves easily, preventing graininess in the final product.
**Adding Flavor Extracts:** Add **vanilla or other extracts** (Ingredient I) at the beginning of the process (Instruction 3). If added late, it can break down the structure of the already-formed peaks.
**Troubleshooting Soupy Cream:** If your cream becomes soupy upon adding the gelatin, it means the **gelatin was too hot**. Place the entire bowl in an ice bath for $5\text{ minutes}$ and re-whip. If it fails, the only recourse is to use it in a baked or frozen application.
Conclusion: A Stable, Versatile Topping
This **Homemade Cool Whip** recipe transforms a fragile dessert topping into a stable, versatile ingredient. By respecting **The Gelatin Bloom and Tempering Protocol** for structural support and executing **The Fat-Air Emulsification Mandate** for maximum volume, you create a perfect whipped topping that will hold its shape and freshness for days.
Frequently Asked Questions (FAQ)
Q: Why did my cream split into butter?
A: The cream was **over-whipped** (Tip 6). This happens when the fat globules are beaten so aggressively that they clump together, squeezing out the buttermilk and air.
Q: I have little rubbery chunks in my whipped cream. What are they?
A: That is the **gelatin seizing** (Tip 6). The liquid gelatin (Instruction 2) was too cold when it was added to the cold cream, causing it to harden instantly rather than incorporating smoothly (Tempering Protocol).
Q: Can I use this recipe to frost a cake?
A: **Yes**, this stabilized whipped cream is excellent for frosting cakes and pies because it holds its piped shape much longer than standard whipped cream.
Q: Why do I need powdered sugar instead of granulated sugar?
A: **Powdered sugar** dissolves instantly and contains cornstarch (a stabilizer), whereas large crystals of **granulated sugar** may not fully dissolve in the cold cream, resulting in a gritty texture (Tip 8).
ADVERTISEMENT