Advertisement
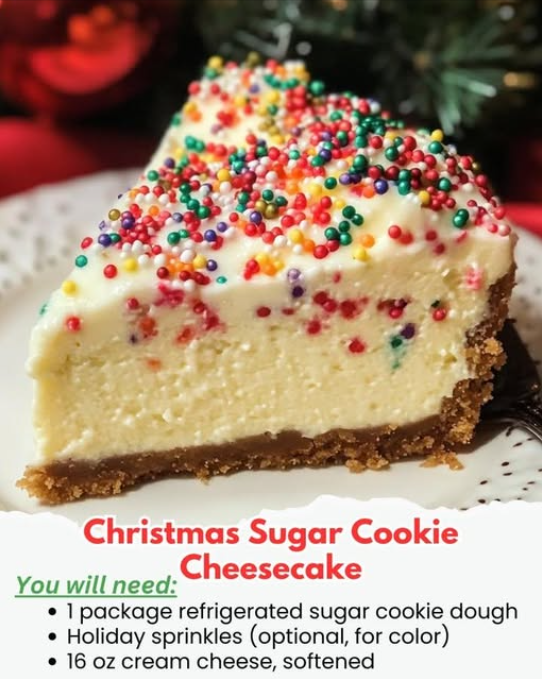
Phase 1: Preparing the Stabilized Sugar Cookie Crust
- **Preheat and Prep:** Preheat your oven to **$350^\circ\text{F}$ ($175^\circ\text{C}$)**. Prepare a **9-inch springform pan** by lining the bottom with parchment paper and lightly greasing the sides.
- **Create the Dough Base:** In a bowl, combine the **refrigerated sugar cookie dough** with **2 tablespoons of all-purpose flour** and the **holiday sprinkles** (if using). The extra flour helps stabilize the dough and prevents excessive spreading during the bake.
- **Press and Chill:** Press the dough evenly across the bottom and about **1 inch up the sides** of the prepared springform pan. Prick the dough base several times with a fork. Place the pan in the freezer for **15 minutes**. This chilling step is vital to prevent the crust from shrinking excessively when baked.
- **Pre-Bake the Crust:** Bake the chilled crust for **10–12 minutes**, or until the edges are just set and slightly golden. Remove from the oven and reduce the oven temperature to **$325^\circ\text{F}$ ($160^\circ\text{C}$)**.
Phase 2: Mixing the Silky Cheesecake Filling
- **Soften and Cream Cheese (CRITICAL):** Ensure the **cream cheese** is completely at room temperature. Beat the softened cream cheese in a stand mixer (with the paddle attachment) or a large bowl with a hand mixer on medium speed until it is **perfectly smooth and lump-free**. Scrape down the sides often.
- **Add Dry Ingredients:** Gradually add the **granulated sugar and 1/4 cup of flour** to the cream cheese, mixing until just combined. The flour helps stabilize the filling and prevents cracking.
- **Introduce Flavor and Cream:** Beat in the **vanilla extract, almond extract, sour cream (or heavy cream), and pinch of salt** until smooth.
- **Integrate Eggs (Slowly):** Add the **room temperature eggs, one at a time**, beating only until the egg yolk disappears into the mixture. **Do not overmix** once the eggs are added; excess air incorporated at this stage is the primary cause of cheesecake cracking.
Phase 3: Baking and Cooling for Stability
- **Fill and Prepare Water Bath (Recommended):** Pour the cheesecake filling evenly over the pre-baked sugar cookie crust. Wrap the outside of the springform pan tightly in several layers of aluminum foil to prevent water seepage. Place the wrapped pan inside a large roasting pan. Fill the roasting pan with hot water to come about halfway up the sides of the springform pan. This water bath (bain-marie) ensures even, gentle heat and prevents cracking.
- **Bake Slowly:** Carefully transfer the roasting pan (with the water bath) to the $325^\circ\text{F}$ oven. Bake for **60–75 minutes**. The cheesecake is done when the edges are set and puffy, but a **small 2-inch circle in the center still looks slightly jiggly** when the pan is gently nudged.
- **Cool Gradually (CRITICAL):** Turn off the oven, but **leave the cheesecake inside** the oven with the door propped open (using a wooden spoon) for **1 hour**. This gradual cooling prevents the sudden temperature shock that causes large cracks.
- **Chill:** Remove the cheesecake from the oven and water bath. Run a thin knife around the edge of the pan to loosen the sides. Cool to room temperature on a wire rack (1-2 hours), then cover and **refrigerate for at least 6 hours, or preferably overnight**, before removing the springform ring.
Critical Techniques: Managing Crust, Cream, and Cracks
A. Preventing Crust Shrinkage (Step 3)
Refrigerated cookie dough has a high fat and sugar content, making it prone to spreading and shrinking when baked. The key defenses are two-fold: adding a small amount of **extra flour** to the dough mixture (Step 2) for structure, and implementing the **15-minute freeze** (Step 3). The cold fat sets quickly in the oven’s heat, reducing the tendency to slump down the sides of the pan.
B. The Science of the Water Bath (Step 9)
Cheesecake cracks primarily because of uneven temperature distribution and rapid temperature changes. The water bath (bain-marie) works by providing a buffer of steam and moisture, preventing the edges of the cake from baking too quickly and pulling away from the center. This gentle, consistent heat from all sides allows the filling to rise and set uniformly, significantly reducing the stress that leads to fissures.
C. The Two-Stage Egg Integration (Step 8)
The single most important factor for a creamy texture and crack-free surface is how the eggs are added. Over-beating the eggs incorporates too much air. This air expands rapidly during baking, causing the center to puff up high. When the cake is removed from the oven, the air contracts quickly, and the center collapses, creating a large, unsightly crack. Adding the eggs **one at a time, and only mixing until the yolk disappears**, minimizes air incorporation, ensuring a dense, stable crumb.
Water Bath Protection Tip:
To guarantee your springform pan doesn’t leak water into your crust, first wrap the bottom of the pan with a layer of heavy-duty foil, then place the entire pan inside an oven bag or a second, slightly larger baking pan before placing it in the water bath.
Serving and Storage: The Perfect Holiday Presentation
Cheesecake flavor improves significantly after a full night of chilling. For serving, remove the cake from the refrigerator 30 minutes before slicing to allow the filling to soften slightly, enhancing its creamy texture.
- **Serving:** For the cleanest slices, use a thin, sharp knife dipped in hot water and wiped dry between each cut. Top individual slices with whipped cream and sprinkles just before serving.
- **Storage:** Store leftover cheesecake tightly covered in the **refrigerator for up to 5 days**. The plastic wrap or airtight dome should not touch the surface of the cake.
- **Freezing:** Cheesecake freezes beautifully. After chilling and removing the ring, place the cake (still on the base) in the freezer until firm. Wrap the entire cake tightly in plastic wrap, then a layer of foil. Freeze for up to **3 months**. Thaw overnight in the refrigerator before serving.
Tips: Ensuring a Golden Crust and Smooth FillinG
Checking Oven Accuracy: Cheesecake is sensitive to temperature. If your crust edges burn or the top cracks consistently, check your oven temperature with an external thermometer. An inaccurate oven is a major cause of failure in baking.
Room Temperature Rules: All dairy products (cream cheese, eggs, sour cream) must be at room temperature. This allows them to emulsify properly, creating a smooth, velvety filling without lumps. Cold cream cheese will inevitably lead to a lumpy batter.
Slicing for Clean Lines: If the cheesecake is going to be photographed or presented formally, chilling the cake for 15 minutes in the freezer just before slicing will make the cold filling firmer and allow for surgical precision in cutting.
The Flour Advantage: The small amount of all-purpose flour added to the filling (Step 6) acts as a safety net. It absorbs moisture and provides structure, making the cake slightly more forgiving if you accidentally overbeat the eggs.
Variations: Customizing the Holiday Spirit
Adapt the flavor profile to match your favorite holiday treats:
- **Peppermint Twist:** Omit the almond extract. Stir in 1 teaspoon of **peppermint extract** and 1/2 cup of **crushed candy canes** to the filling before baking. Garnish with more crushed candy canes.
- **Gingerbread Base:** Swap the sugar cookie dough for **refrigerated gingerbread cookie dough**. Do not pre-bake; bake the full cake slightly longer (approx. 75–85 minutes) until the center is set.
- **Eggnog Flavor:** Replace the sour cream with 1/4 cup of **thickened eggnog**. Add a dash of **nutmeg** to the filling for a true seasonal aroma.
- **Cranberry Swirl:** Swirl 1/2 cup of cooled **cranberry sauce** (tart or sweetened) through the cheesecake filling before baking. Use a knife to create a festive pattern.
Tips: Decoration and Presentation
The Spatula Glide: Before baking, use an offset spatula to smooth the top of the batter after pouring it into the pan. This helps ensure a flat surface for decoration.
Stencil Design: For an easy, professional look, place a paper stencil (e.g., a star or snowflake shape) on the chilled, unadorned cheesecake. Dust the exposed area with powdered sugar, then carefully lift the stencil to reveal the design.
Edible Glitter: Sprinkle the top of the cheesecake with fine **edible glitter** just before serving for a magical, icy look that catches the light beautifully under holiday lighting.
Preventing Dough Collapse: If the sugar cookie dough on the sides of the springform pan slumps before or during the pre-bake, use the back of a spoon to gently push the dough back up while it’s still warm and pliable. Recenter it before adding the filling.
Conclusion: A New Holiday Tradition
The Christmas Sugar Cookie Cheesecake is the epitome of holiday baking, successfully merging two beloved seasonal treats into one stunning dessert. By adhering to the critical techniques—stabilizing the sugar cookie crust, controlling air in the batter, and ensuring a gentle, crack-free bake via the water bath—you create a dessert that is not only delicious but visually flawless. It’s an elevated classic, destined to become the defining centerpiece of your holiday tradition.
Frequently Asked Questions (FAQ)
Q: I don’t have a springform pan. Can I use a regular cake pan?
A: Yes, use a 9-inch round cake pan. Line the bottom and sides with parchment paper, leaving two long pieces hanging over the sides to act as “slings” for lifting the chilled cake out after baking.
Q: My cheesecake cracked anyway! What can I do to hide it?
A: Don’t panic! Cracks can be easily disguised. Cover the entire top with whipped cream, melted white chocolate, or a thick layer of frosting or ganache before serving. The holiday sprinkles and toppings will hide any imperfections.
Q: Why do the eggs need to be room temperature?
A: Room temperature eggs emulsify better with the room temperature cream cheese and other fats. Cold eggs will tighten the cream cheese batter, potentially leading to lumps and requiring extra mixing time, which incorporates too much air.
Q: Can I skip the water bath?
A: You can, but you significantly increase the risk of cracking and uneven texture. If you must skip it, reduce the oven temperature by $25^\circ\text{F}$ ($15^\circ\text{C}$) and increase the baking time slightly to compensate for the lower, gentler heat.