Step 1: Preparing the Base
- **Combine Dry:** In a mixing bowl, combine the **graham cracker crumbs, shredded coconut, cocoa powder, and a pinch of salt**. Mix thoroughly.
- **Bind:** Pour in the **sweetened condensed milk**. Mix until fully combined. The mixture will be very thick, sticky, and uniform.
- **Press:** Line an 8×8 inch or 9×9 inch baking dish with parchment paper (allowing excess paper to hang over the sides for easy removal). Press the mixture **firmly** into an even layer in the bottom of the pan. Use the bottom of a glass or a spatula to ensure it is compacted.
Step 2: Creating the Chocolate Topping
- **Melt:** In a small saucepan, melt the **$\frac{1}{2}$ cup butter** and **$\frac{1}{2}$ cup chocolate chips** over **low heat**. Stir continuously to prevent scorching.
- **Smooth:** Continue stirring until the mixture is completely smooth and glossy. Remove from heat immediately.
- **Coat:** Pour or drizzle the melted chocolate over the pressed base and spread evenly with a spatula.
Step 3: Caramel Drizzle and Chill
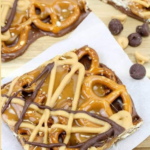
- **Drizzle:** Drizzle the **$\frac{1}{4}$ cup of caramel sauce** over the chocolate layer while it is still wet. For a decorative swirl, use a toothpick or skewer to gently swirl the caramel through the chocolate.
- **Refrigerate:** Refrigerate the entire baking dish for at least **2–4 hours**, or until the chocolate topping is completely set and hard, and the base is firm. The chilling time is mandatory for clean, easy slicing.
Step 4: Cutting and Serving
- **Cut:** Use the parchment paper overhang to lift the entire bar out of the pan. Place it on a cutting board.
- **Slice:** Use a long, sharp knife to cut the slab into squares or bars.
- **Serve:** Serve chilled and enjoy every gooey, chocolate-caramel bite!
Serving and Storage: Maximizing Chewy Texture
Serving Presentation
These bars look fantastic cut into small squares and placed in mini paper cupcake liners. For a sophisticated look, sprinkle the caramel layer with **flaky sea salt** just before chilling.
Storage and Longevity
- **Refrigeration:** Store the cut bars in an **airtight container** in the **refrigerator** for up to **1 week**. The refrigeration maintains the firmness of the chocolate and the chewy texture of the condensed milk base.
- **Freezing:** These bars freeze exceptionally well. Place the cut bars in a freezer-safe container, separating layers with parchment paper, and freeze for up to 3 months. Thaw in the refrigerator overnight before serving.
- **Room Temp:** They can sit at cool room temperature for a couple of hours for parties, but should be refrigerated for longer storage.
Tips: Troubleshooting and Achieving Chewy Density
Tip 1: Compacting the Base
The base must be **extremely compact**. If it’s loose, the bars will crumble when you cut them. Use a spatula, measuring cup, or the bottom of a glass to press the base layer down with significant force before adding the topping.
Tip 2: The Easiest Crumb
While you can buy pre-made graham cracker crumbs, crushing your own is easy and often tastes better. Place graham crackers in a sturdy zip-top bag and crush them using a **rolling pin** until you reach a fine crumb consistency.
Tip 3: Creating a Smooth Chocolate Topping
The low heat and the inclusion of **butter** are key to the smooth topping. The butter adds richness and prevents the chocolate from seizing or becoming stiff. If your melted chocolate seems too thick to drizzle or spread, stir in 1 teaspoon of vegetable shortening or coconut oil for a smoother consistency.
Variations: Customizing the Crunch and Flavor
1. Nutty Crunch
Add **$\frac{1}{2}$ cup of chopped toasted pecans or walnuts** to the graham cracker base mixture (Step 1). The nuts enhance the crunch and provide a wonderful contrast to the chewy coconut.
2. Dark Chocolate Decadence
Use **dark chocolate chips** (60% or higher cocoa content) for the topping and increase the sweetness slightly by adding **1 tablespoon of brown sugar** to the graham cracker base. This provides a rich, less sweet bar.
3. Peppermint Swirl (Holiday)
Add **$\frac{1}{2}$ teaspoon of peppermint extract** to the melted chocolate (Step 2). After drizzling the caramel, sprinkle the top with **crushed candy canes** for a festive, minty flavor profile.
Advanced Tips: Preparation and Efficiency
Tip 4: Clean Cuts
For the neatest, cleanest cuts, ensure the bars are **fully chilled and hard** before slicing. Use a **long, sharp knife** dipped in **hot water** and wiped dry between each slice. This technique melts the chocolate just enough to prevent cracking or dragging.
Tip 5: Quick-Set Caramel
If your caramel sauce is very thin, it may bleed too much into the chocolate. You can slightly **thicken the caramel** by heating it gently on the stove with $\frac{1}{2}$ teaspoon of cornstarch mixed with 1 tablespoon of milk, or by using a store-bought caramel topping designed for ice cream.
Tip 6: Using the Microwave
The chocolate and butter topping (Step 2) can also be melted in the microwave. Combine them in a microwave-safe bowl and heat in **30-second intervals**, stirring well after each one, until smooth. Be careful not to overheat the chocolate, as it can burn easily.
Conclusion: The Ultimate No-Fuss Chocolate Fix
The No-Bake Caramel Coconut Chocolate Cookies are a guaranteed favorite, delivering an intense level of flavor with minimal effort. The combination of chewy base, snappy chocolate, and gooey caramel makes these bars irresistible. They are the perfect solution for anyone craving a truly decadent treat without turning on the oven.
Get ready to enjoy these simple, delicious, and highly addictive no-bake bars!
Frequently Asked Questions: Troubleshooting and Prep
Q: My base mixture is too dry and crumbly. What did I miss?
A: Your **sweetened condensed milk** measurement may be slightly off, or your graham cracker crumbs may be too finely packed. If the mixture is too dry, knead in an additional **1–2 teaspoons of sweetened condensed milk** until the dough holds its shape when pressed.
Q: My coconut won’t mix in evenly. Should I toast it?
A: Toasted coconut is an excellent variation! Lightly toasting the coconut in a dry skillet adds flavor and texture, and it often incorporates more easily into the mixture. Just ensure the coconut is completely cool before adding it to the base.
Q: Can I use oil instead of butter in the topping?
A: Yes. You can substitute the $\frac{1}{2}$ cup of butter with $\frac{1}{2}$ cup of **coconut oil or vegetable shortening** (solid or melted). Using oil may create a slightly harder set on the chocolate topping.
Q: Can I substitute other cookies for graham crackers?
A: Yes, digestive biscuits, vanilla wafers, or shortbread cookies all make excellent substitutes. They should all be crushed into fine crumbs and measured to 1 cup.