- Activate the Yeast: In a small bowl, mix **warm milk, sugar, and yeast**. Let it sit for **5–10 minutes** until it becomes foamy.
- Make the Dough: In a large mixing bowl, combine **flour and salt**. Add the **egg, melted butter, and yeast mixture**. Stir until a rough dough forms.
- Knead: Transfer the dough to a lightly floured surface and knead for about **8–10 minutes** until smooth and elastic. You can also use a stand mixer with a dough hook for 5 minutes.
- First Rise: Place the dough in a greased bowl, cover with a damp towel, and let it rise in a warm place for **60–90 minutes** or until doubled in size.

Critical Techniques for Dough Perfection
A. The Importance of Yeast Activation Temperature
The success of any yeast dough begins at Step 1. The milk temperature of **$110^\circ\text{F}$ ($45^\circ\text{C}$)** is specifically chosen because it is the optimal warmth for active dry yeast.
- **Too Cold:** If the milk is below $100^\circ\text{F}$, the yeast will activate slowly or not at all, resulting in a dense, heavy dough.
- **Too Hot:** If the milk exceeds $120^\circ\text{F}$, the heat will begin to kill the yeast organisms, preventing the dough from rising. Always use a thermometer if possible, or test by ensuring the liquid feels warm, but not hot, to the touch.
- **The Foam Check:** The appearance of foam (or a “yeast head”) after 5–10 minutes is your visual guarantee that the yeast is alive and active.
B. Mastering the Kneading Process
Kneading (Step 3) is where the magic of **gluten development** happens, providing the dough’s structure.
- **The Windowpane Test:** To check if the dough is sufficiently kneaded, tear off a small piece of dough and gently stretch it between your fingers. If you can stretch it thin enough to see light pass through without tearing (the “windowpane”), the gluten is properly developed.
- **Manual Kneading:** Knead by folding the dough over itself, pressing down and away with the heel of your hand, turning slightly, and repeating. This action aligns the gluten strands.
- **Stand Mixer:** If using a machine, be sure to stop after 5 minutes, as the motor generates heat which can overwork and warm the dough faster than hand kneading.
[Image illustrating the dough passing the windowpane test]
Application Guide: Perfect Results Every Time
The final texture of the dough changes based on how it is handled and baked after the first rise.
1. Pizza Dough: Achieving a Crisp Crust ($475^\circ\text{F}$)
- **High Heat:** The high baking temperature ($475^\circ\text{F}$) is necessary for the dough to set quickly, resulting in a crisp exterior and a slightly chewy interior.
- **Don’t Over-Roll:** Roll the dough thin, but avoid stretching or handling it excessively to keep some of the gas bubbles trapped for a light texture.
- **Pre-Bake (Optional):** For a very crisp crust, pre-bake the dough for 5 minutes before adding toppings.
- **Bake Time:** 12–15 minutes, or until the cheese is bubbly and the crust is golden brown.
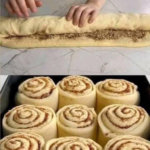
2. Cinnamon Rolls: Ensuring Soft, Fluffy Results ($350^\circ\text{F}$)
- **Second Rise is Mandatory:** After rolling and slicing the rolls, they **must** have a second rise (or proofing) for 30–45 minutes until they look visibly puffy. This is what yields a soft, airy final texture.
- **Perfect Slice:** Use unflavored dental floss or thread to slice the rolled dough instead of a knife. This prevents the rolls from squishing and keeps their perfect circular shape.
- **Bake Time:** 20–25 minutes at a moderate temperature ($350^\circ\text{F}$) to ensure the center cooks thoroughly without burning the butter/cinnamon filling.
3. Dinner Rolls: Golden and Buttery ($375^\circ\text{F}$)
- **Consistent Shaping:** Shape the dough into uniform balls and use a scale for consistency (each ball should be about 50–60g). Uniformity ensures even baking.
- **Baking Strategy:** The slightly higher temperature ($375^\circ\text{F}$) creates a lovely golden-brown exterior. Baking for 15–18 minutes should yield a soft center.
- **The Finish:** Brushing the hot rolls with extra melted butter immediately after they come out of the oven melts into the crust, giving a rich, restaurant-quality flavor and shine.
Troubleshooting and Storage
Common Questions:
- **Dough Not Rising:** Check the milk temperature (too cold or too hot). Also, ensure your yeast is fresh. If your yeast doesn’t foam, discard the mixture and start with fresh yeast.
- **Dough is Too Sticky:** If, after 5 minutes of kneading, the dough is excessively sticky, add flour **1 tablespoon at a time** until it pulls cleanly away from the surface. Avoid adding too much flour, as this results in a dry, dense product.
- **Make-Ahead Dough:** The dough can be stored after the first rise (Step 4) in an airtight, greased container in the refrigerator for up to 3 days. When ready to use, let it sit at room temperature for 30–60 minutes to warm up and loosen before shaping.
Conclusion: Bake Anything, Any Time
The Crazy Dough recipe is the ultimate kitchen hack for home bakers. Its balanced composition ensures a reliable, delicious foundation for almost any baked good—from the fluffiest cinnamon roll to the crispiest pizza crust. By mastering the fundamental steps of yeast activation and kneading, you will have a versatile, delicious batch of dough ready to be transformed into your favorite baked treat!