ADVERTISEMENT
Phase 1: Baking the Cake
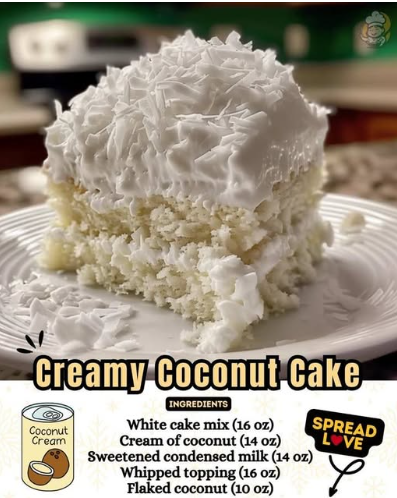
- **Prepare Cake Base:** Preheat oven to the temperature specified on the cake mix package (usually $175^\circ\text{C}$ or $350^\circ\text{F}$). Grease and flour a $13\text{x}9\text{ inch}$ pan. Prepare the **white cake mix** according to the package directions, typically by combining the mix with the **eggs, oil, and water**. Pour the batter into the prepared pan.
- **Bake:** Bake for the time specified on the package (usually 28–32 minutes) or until a toothpick inserted into the center comes out clean.
Phase 2: Soaking and Cooling
- **Mix Soak (TRIPLE THREAT):** While the cake is cooling, mix together the entire **can of cream of coconut** and the entire **can of sweetened condensed milk** in a bowl.
- **Poke and Soak (COOL AND POKE METHOD):** Let the cake cool for **10 minutes** in the pan on a wire rack. While still warm, **poke the entire surface** of the cake deeply and evenly with a skewer or fork (about $20$ to $30$ times). Slowly pour the milk mixture evenly over the top of the warm, poked cake, ensuring the liquid soaks into the holes.
- **Refrigerate:** Let the cake cool completely to room temperature, then cover and place in the refrigerator for at least **3 hours** (or until fully chilled).
Phase 3: Frosting and Serving
- **Frost and Decorate (STABILIZATION CHILL):** Spread the **thawed whipped topping** evenly over the chilled cake. Sprinkle the entire surface liberally with the **flaked coconut**.
- **Final Set:** Return the frosted cake to the refrigerator for at least **1 hour** before slicing and serving.
Serving and Storage: The Cold Requirement
Optimal handling for this highly moist, chilled dessert:
- **Serving:** Must be served cold (Instruction 7). The texture is best when the cake is well-chilled, as the fat in the cream of coconut solidifies, resulting in a rich, non-soggy crumb.
- **Storage:** Store leftovers, covered, in the refrigerator for up to **5 days**.
- **Freezing:** This cake freezes well! Freeze the cake *after* the soak (Step 4) but *before* the whipped topping and flaked coconut (Step 6). Thaw in the refrigerator and then proceed with the frosting.
Tips: Essential Techniques for Moisture and Flavor
Cream of Coconut vs. Coconut Milk: Use **cream of coconut** (Ingredient II). It is thick, sweet, and highly concentrated, containing stabilizers essential for the cake’s ultimate richness. Regular, thin coconut milk will not provide the same density or flavor.
The Warm Soak: The cake must be **warm, not hot** (Step 4), when the milk soak is applied. If it’s too hot, the top may turn mushy. If it’s too cool, it won’t absorb the liquid effectively.
Toasted Coconut: For a deeper, nuttier flavor, lightly toast the **flaked coconut** (Ingredient III) in a dry skillet until golden-brown before using it for the garnish. Cool completely before sprinkling.
Whip Topping Stability: Ensure the **whipped topping** (Ingredient III) is fully thawed but still cold. This helps it hold its volume and prevents it from weeping or dissolving the coconut soak layer.
Check Cake Doneness: Do not overbake the cake (Step 2). Since it’s going to be soaked, a slightly under-baked cake is better than an over-baked one, as it will absorb the liquid more readily.
Variations: Customizing Fruit and Flavor
Easily adapt the flavor profile of the cake:
- **Pina Colada:** Substitute the **white cake mix** with a **yellow or pineapple-flavored mix**. Layer the cake with drained, crushed pineapple before the final coconut topping (Step 6).
- **Citrus Boost:** Add **1 tablespoon of lime or lemon zest** to the cake batter before baking (Step 1) for a bright, tropical contrast.
- **Nutty Base:** Add **$\frac{1}{2}$ cup of finely chopped pecans or walnuts** to the cake batter (Step 1).
- **Glaze Alternative:** Instead of whipped topping, use a **cream cheese frosting** made with $\frac{1}{2}$ package (4 oz) cream cheese, $\frac{1}{4}$ cup butter, $2$ cups powdered sugar, and $1\text{ tsp}$ vanilla.
**Poking Tool:** Use a thin wooden skewer or the handle of a wooden spoon for poking (Step 4). A fork creates smaller holes, which may not allow the thick cream of coconut to soak in easily.
**Cake Mix Flexibility:** You can substitute the **white cake mix** with a **yellow cake mix** for a slightly richer, buttery flavor (Step 1), but the color will be off-white.
**Coconut Fat:** Do not worry if the cream of coconut has a layer of thick, solid fat at the top of the can. This is natural; mix it into the condensed milk and pour it all over the cake (Step 3/4).
**Serving Slices:** The cake is extremely moist. For clean slices, use a large, sharp knife dipped in hot water and wiped clean between each cut (Tip 5). This prevents the sticky filling from dragging.
Conclusion: Deep Moisture and Rich Flavor
The **Creamy Coconut Cake** is a masterclass in enhancing convenience ingredients through smart technique. By utilizing **The Coconut Soaking Triple Threat** for deep saturation, applying **The Cool and Poke Method** for even moisture, and adhering to **The Stabilization Chill** for structural integrity, you create a dessert that is far moister and richer than its simple ingredients suggest. It is the perfect tropical, no-fuss centerpiece for any gathering.
Frequently Asked Questions (FAQ)
Q: Why is my cake soggy or mushy?
A: The most likely cause is that the cake was **too hot** when the soak was applied (Step 4), causing the starch structure to dissolve. It should be warm, not hot.
Q: Can I use regular heavy cream instead of cream of coconut?
A: **No** (Ingredient II). Cream of coconut contains high sugar content and stabilizers that are crucial for the flavor and consistency of the soak. Regular heavy cream is unsweetened and will not provide the same result.
Q: Should I use sweetened or unsweetened flaked coconut?
A: Either works (Ingredient III). Sweetened is traditional, but unsweetened will cut the overall sweetness, which can be desirable given the sugary soak.
Q: Can I skip the chilling time?
A: **No** (Step 5). The chilling time is essential for the soak to set the cake into a firm, moist, sliceable texture. Serving it warm or at room temperature will result in a messy slice.
ADVERTISEMENT