Executing this cake requires a rhythmic approach to assembly. By following these steps, you eliminate the “chaos” of uneven baking and ensure a vibrant, professional result.
- The Thermal Foundation: Preheat your oven to exactly 350°F (175°C). Position your oven rack in the center. Prepare a 9×13-inch pan or a 10-cup Bundt pan by applying a thin layer of butter followed by a dusting of flour. Tap out the excess; this creates the “barrier” for a clean release.
- The Liquid Emulsion: In a large, deep mixing bowl, combine the granulated sugar, room-temperature eggs, vegetable oil, and vanilla extract. Whisk vigorously for 2–3 minutes. You are looking for a mixture that is pale, slightly thickened, and velvet-smooth.
- The Fruit Infusion: Pour the pineapple juice into the egg mixture. Stir gently. You will notice the mixture become vibrant and aromatic. This is the stage where the flavors begin to “marry.”
- The Dry Sift: In a separate bowl, whisk together the flour and baking soda. Gradually incorporate the dry ingredients into the wet batter in three stages. The Regulation: Use a large spatula and a “folding” motion. Stop the moment the last white streak of flour disappears. Over-mixing at this stage will activate the gluten and lead to a tough, bread-like texture.
- The Bake: Pour the golden batter into your prepared pan. Smooth the top with a spatula to ensure an even “bloom.”
- Standard 9×13 Pan: 35–40 minutes.
- Traditional Bundt Pan: 45–52 minutes.
The cake is officially “set” when the edges begin to pull away slightly from the pan and a wooden skewer inserted into the center emerges clean or with a few dry crumbs.
- The Cooling Set: Remove the pan from the oven and place it on a wire rack. Allow it to sit undisturbed for 15–20 minutes. This allows the internal steam to redistribute, ensuring the cake remains moist and structural when sliced.
Service and Storage Tips
Presentation is the final step in the transition from a simple bake to a premium masterpiece. Storage, meanwhile, is about preserving the “velvet” integrity of the crumb.
- Service: For an honest, rustic look, serve warm with a simple dusting of powdered sugar. For a gourmet presentation, pair a thick slice with a dollop of unsweetened mascarpone cream or a scatter of fresh mint leaves to contrast the golden hue.
- The 24-Hour Rule: This cake is unique in that its flavor profile intensifies over time. If possible, bake it the day before service. The pineapple sugars will “settle,” creating a deeper, more nuanced sweetness.
- Room Temperature Storage: Keep the cake in an airtight glass dome or container at room temperature for up to 4 days. The oil-based structure will keep it moist without refrigeration.
- Refrigeration: While not necessary, if you prefer a cold dessert, the cake will last up to a week in the fridge. Note that the sugars may become slightly denser when chilled.
- Freezing: This cake is a “storage champion.” Wrap individual slices tightly in parchment paper and then foil. They will retain their premium quality for up to 3 months. Thaw at room temperature for an hour before enjoying.
The Flavor Pivot: Variants
The core structure of this cake is a “blank canvas” for tropical exploration. Use these variations to adapt the recipe to your specific aesthetic or occasion.
- The Island Crunch: Fold in 1/2 cup of toasted shredded coconut and 1/2 cup of chopped macadamia nuts into the final batter. This adds a “shatter-crisp” textural contrast to the soft sponge.
- The Zesty Orchard: Add the freshly grated zest of two limes and replace 2 tablespoons of the pineapple juice with lime juice. This creates a “Margarita” inspired profile that is exceptionally vibrant.
- The Caramelized Crown: Melt 1/2 cup of butter in the bottom of your baking pan, sprinkle with 1 cup of brown sugar, and arrange pineapple rings before pouring the batter over the top. This transforms the recipe into a sophisticated Pineapple Upside-Down Sponge.
- The Ginger Spike: Add 1 teaspoon of ground ginger and 1/2 teaspoon of cardamom to the flour. The heat of the spices provides a grounding, earthy balance to the high-sugar fruit juice.
Chef’s Tips: Mastering the Golden Ratio
Small adjustments in technique can be the difference between a “good” cake and a grounding, premium experience.
- The Bubbling Soda Check: Always ensure your baking soda is fresh. Drop a pinch into a tablespoon of pineapple juice; if it doesn’t fizz aggressively, your cake will not rise.
- The Fat-to-Acid Balance: If you find the cake too sweet, add a pinch of flaky sea salt to the top before baking. The salt cuts through the pineapple sugar, highlighting the fruit’s natural acidity.
- The Glaze Secret: While the cake is still slightly warm, prick the surface with a fork and pour over 1/4 cup of additional pineapple juice. This creates “syrup channels” that make the cake unbelievably moist.
- Pan Material: Darker pans absorb more heat and will create a darker, thicker crust. If using a light aluminum pan, you may need to extend the bake time by 3–5 minutes to achieve that shatter-crisp edge.
Conclusion: An Honest, Vibrant Legacy
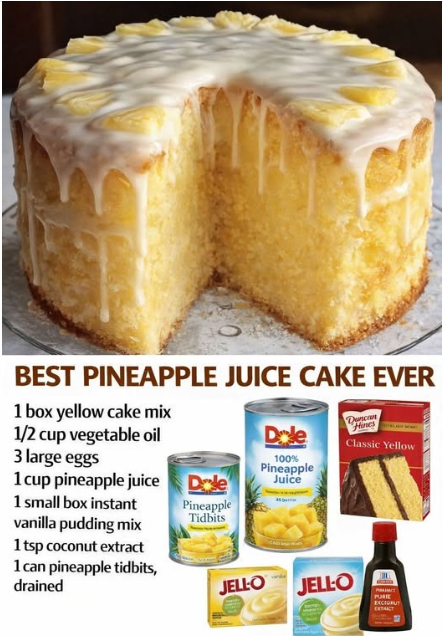
The Pineapple Juice Cake is more than the sum of its seven ingredients. It is a testament to the fact that premium baking does not require a multitude of steps—it requires a respect for the “regulation” of flavor and heat. By choosing high-quality juice, ensuring a proper emulsion of fats and sugars, and allowing the cake the time it needs to “cure” after baking, you create an honest masterpiece that transcends the trends of modern pastry.
This cake is grounding, comforting, and undeniably vibrant. It brings the warmth of the tropical orchard into the home hearth, providing a velvet-smooth reward that is as satisfying to bake as it is to eat. Whether shared at a festive table or enjoyed quietly with a morning coffee, it is a recipe that promises success every time. This is the golden standard. Enjoy the perfection of every tropical bite.
Frequently Asked Questions
- Can I use canned crushed pineapple instead of juice?
- Absolutely. You can substitute the 1 cup of juice with 1 cup of undrained crushed pineapple. This will introduce small, jammy pockets of fruit throughout the cake, though the crumb will be slightly denser.
- Why did my cake sink in the center?
- This is often caused by a “thermal shock.” If the oven door is opened too early (before the structure has set), the carbon dioxide bubbles collapse. It can also be caused by using expired baking soda.
- Is this cake suitable for a layered wedding cake?
- Because of the high oil content and moist crumb, this cake is quite tender. If you intend to stack multiple layers, we recommend chilling the cakes thoroughly before assembly to ensure they have the structural integrity to hold the weight.
- Can I substitute the vegetable oil with butter?
- You can use 1 cup of melted butter, but be aware that the texture will change. Butter contains water and solids that will make the cake firmer when cold. The “velvet” longevity of the cake is best achieved with oil.
- What is the best juice to use?
- 100% unsweetened pineapple juice is the gold standard. Avoid “pineapple drink” or “cocktail blends” as they contain high amounts of corn syrup which can cause the cake to become overly sticky and burn on the edges.