ADVERTISEMENT
Phase 1: Preparation and Wet Mixing
- **Prep Lemon and Ricotta:** Follow the provided Prep Instructions for zesting and juicing both lemons. **Optional:** For a thicker dough, drain the **2 cups ricotta cheese** in a sieve lined with cheesecloth for 30–60 minutes.
- **Cream Butter, Sugar, and Zest:** In a large mixing bowl or stand mixer, cream the **$\frac{1}{2}$ cup softened butter** and **1 cup sugar** until light and fluffy. Beat in the **zest of the first lemon** (Zest Maximization Technique).
- **Add Wet Ingredients:** Beat in the **2 room temperature eggs**, one at a time, mixing well after each addition. Next, mix in the **2 cups ricotta cheese** and the **3 tablespoons lemon juice** until just combined. The mixture will be very wet.
Phase 2: Dry Mixing and Dough Stabilization
- **Combine Dry Ingredients:** In a separate medium bowl, whisk together the **$2 \frac{1}{2}$ cups all purpose flour**, **2 tsp baking soda**, **2 tsp baking powder**, and **$\frac{1}{2}$ tsp salt**.
- **Integrate Dry and Wet:** Gradually add the flour mixture to the wet mixture, mixing on **low speed** only until the flour is *just* incorporated. **Do not overmix**; overmixing will result in a tough, chewy cookie. The dough will remain soft and sticky.
- **Chill Dough (COLD-TO-HOT PROTOCOL):** Cover the bowl with plastic wrap and chill the dough in the refrigerator for at least **30 minutes to 1 hour**. This is mandatory for stabilizing the dough and preventing spread.
Phase 3: Baking and Icing
- **Preheat and Prep:** Preheat the oven to **$350^\circ\text{F}$ ($175^\circ\text{C}$)**. Line baking sheets with parchment paper.
- **Scoop:** Use a **small cookie scoop (about 1.5 tablespoons)** to drop rounded balls of dough onto the prepared baking sheets. Do not flatten the dough; they will spread slightly on their own. Space them about 2 inches apart.
- **Bake:** Bake for **10–12 minutes**, or until the edges are very lightly golden and the centers look set and puffed. Remove from the oven and allow to cool on the baking sheet for **5 minutes** before transferring to a wire rack to cool completely.
- **Prepare Icing:** While the cookies cool, whisk together the **$1 \frac{1}{2}$ cups powdered sugar**, **3 tablespoons lemon juice**, and the **zest of the second lemon** until smooth. Add milk or more powdered sugar as needed to achieve a thick, pourable consistency.
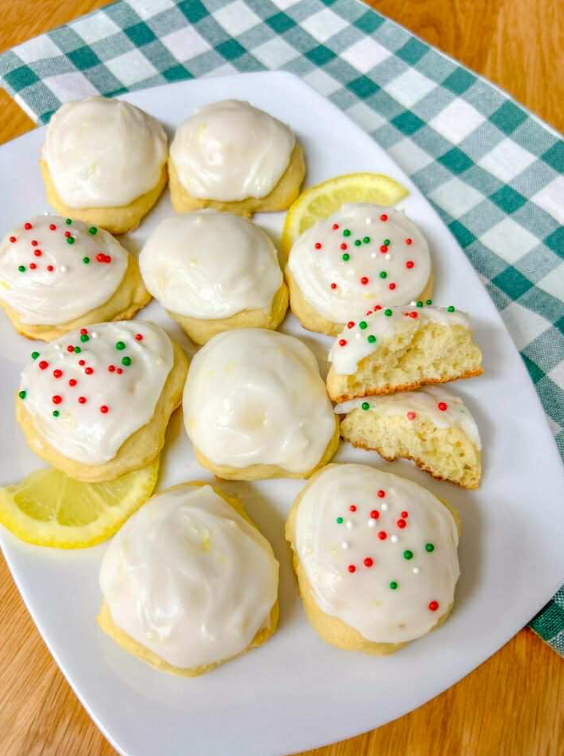
- **Ice and Finish:** Once the cookies are **completely cool**, drizzle the icing over the top of each cookie. Allow the icing to set for 15–20 minutes before serving.
Serving and Storage: The Icing Set
Optimal handling for these tender cookies:
- **Serving:** Serve once the icing has fully set (Step 11). The icing adds structure and a burst of flavor.
- **Storage:** Store iced cookies in an airtight container at **room temperature** for up to **5 days**. The high moisture content keeps them fresh longer than standard cookies.
- **Freezing:** The unbaked dough (Step 6) can be frozen. Baked, un-iced cookies also freeze well; thaw completely, then apply icing.
Tips: Essential Techniques for Cakey Texture
Ricotta Drainage (High Priority): Draining the **2 cups ricotta cheese** (Step 1) is the best way to prevent flat cookies. Use the finest sieve you have or cheesecloth to remove excess whey. This step directly influences the dough’s stability.
Zest Infusion: Always rub the **lemon zest** (Step 2) into the sugar with your fingers before adding the butter. This helps release the essential oils for maximum flavor.
Room Temperature Eggs: Ensure the **2 eggs** are at room temperature (Step 3). This helps them emulsify better with the softened butter, creating a smoother batter and a more even crumb.
Leavening Power: The recipe uses **both baking powder and baking soda** (2 tsp each) (Step 4). The soda reacts with the lemon juice (acid), and the powder provides lift during baking, resulting in the signature high, cakey dome.
Icing Consistency: For a professional drizzle (Step 10), the icing should be thick enough to coat the back of a spoon but still thin enough to drip slowly. Adjust with small amounts of milk or more powdered sugar.
Variations: Customizing Citrus and Flavor
Adapt the flavor profile of this tender cookie:
- **Orange Ricotta:** Substitute both the lemon zest and juice with **orange zest and juice** for a sweeter, warmer flavor profile. Add a pinch of nutmeg to the dough.
- **Almond Ricotta:** Add **$\frac{1}{2}$ teaspoon of almond extract** (Step 3) to the wet ingredients for a subtle, complex flavor.
- **Poppy Seed:** Fold in **1 tablespoon of poppy seeds** (Step 5) with the dry ingredients for a subtle crunch and classic lemon-poppy pairing.
- **Baked Texture:** For a slightly crispier edge, skip the chilling step (Step 6) and increase the baking time by 2–3 minutes (though this is not traditional).
**Flour Measurement:** Use the **spoon and level** method for the $2 \frac{1}{2}$ cups all-purpose flour (Step 4) to ensure accuracy. Too much flour will result in a denser, less cake-like cookie.
**Microwave Lemon:** The instruction to **microwave the lemon for 5–8 seconds** (Prep) is a great way to release more juice by softening the fruit’s fibers, ensuring you get the full **3 tablespoons of lemon juice** needed for the dough and the full amount for the icing.
**Dough Handling:** Use a cookie scoop (Step 8) for uniform shape and size. The dough is too soft to roll, so scooping is essential.
**Cooling Completely:** Ensure the cookies are **completely cool** (Step 10) before applying the icing. Applying icing to warm cookies will cause it to melt and run off, resulting in a thin, translucent layer.
Conclusion: Lemon Perfection Achieved
The **Lemon Ricotta Cookie** is a celebration of texture and bright flavor. By mastering **The Ricotta Factor** through proper draining and adhering to **The Cold-to-Hot Protocol** for stabilization, you guarantee a cookie that is soft, moist, and perfectly puffed. The vivid zest, maximized by **The Zest Maximization Technique**, ensures a punch of citrus in every bite and a beautiful finish under the tangy glaze. These cookies are guaranteed to be a hit due to their unique, cake-like tenderness.
Frequently Asked Questions (FAQ)
Q: Why did my cookies spread and flatten?
A: The dough was **not chilled long enough** (Step 6), or the **ricotta was not drained** (Step 1 Prep), resulting in a dough with too much moisture and soft fat.
Q: Why are my cookies tough?
A: The dough was **overmixed** after the flour was added (Step 5). The moisture from the ricotta makes the flour eager to form gluten; stop mixing immediately once the dry ingredients are combined.
Q: Can I use low-fat ricotta?
A: **It is not recommended.** (Step 3). Low-fat ricotta contains more whey/water, significantly increasing the risk of flat, overly spread cookies. Use full-fat for the best results.
Q: Can I skip the chilling time?
A: **No.** (Step 6). Skipping the chill time for this soft, high-moisture dough will result in flat, thin, misshapen cookies that are closer to crackers than soft cakes.
ADVERTISEMENT