ADVERTISEMENT
Phase 1: Preparation and Initial Chill
- **Drain Pineapple (MOISTURE MANAGEMENT MANDATE):** Place the **crushed pineapple** in a fine-mesh sieve lined with cheesecloth and press or squeeze out as much liquid as possible. The drier the pineapple, the firmer the final balls.
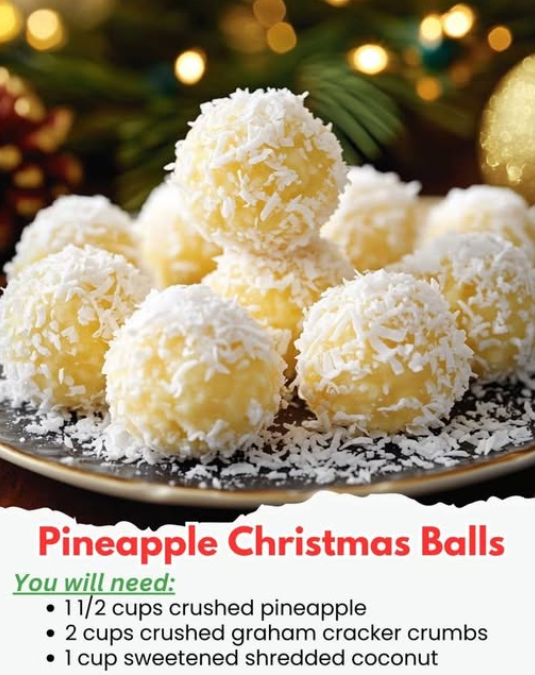
- **Mix Ingredients:** In a large bowl, combine the **well-drained pineapple, graham cracker crumbs, 1 cup of coconut, softened butter, sifted powdered sugar, and vanilla extract**. Mix thoroughly until the mixture is uniform and comes together like a stiff dough.
- **Initial Chill (CHILL AND ROLL PROTOCOL, Part 1):** Cover the bowl and refrigerate the mixture for a minimum of **1 hour**. This allows the dry ingredients to fully absorb the moisture and makes the dough much easier to handle.
Phase 2: Shaping, Coating, and Setting
- **Roll Balls:** Remove the chilled mixture. Scoop $1\text{-tablespoon}$ portions and quickly roll them between your palms into firm, smooth balls (about $1\text{-inch}$ diameter). Work quickly to prevent the warmth of your hands from softening the mixture.
- **Coat Balls:** Place the **extra coconut** (Ingredient III) in a shallow dish. Roll each shaped ball immediately in the coconut, pressing lightly to ensure the coating adheres completely.
- **Final Chill (CHILL AND ROLL PROTOCOL, Part 2):** Place the coated balls on a wax paper-lined baking sheet. Cover loosely and refrigerate for a minimum of **4 hours** or until fully firm. This is essential for the balls to hold their shape during storage and serving.
- **Serve:** Serve the chilled **Pineapple Christmas Balls** straight from the refrigerator.
Serving and Storage: Post-Roll Integrity
Optimal handling for this no-bake treat:
- **Serving:** Serve cold. If left at room temperature for too long, the balls will soften significantly.
- **Storage:** Store in an airtight container in the refrigerator for up to **1 week**.
- **Freezing:** **Pineapple Christmas Balls freeze exceptionally well.** Freeze in a single layer until solid, then transfer to a freezer-safe bag for up to **3 months**. Thaw overnight in the refrigerator before serving.
Draining the Pineapple: The success of the recipe depends on getting the pineapple **extremely dry** (Instruction 1). If you suspect your mixture is too sticky after mixing, add an extra tablespoon of **graham cracker crumbs** or **powdered sugar** until the desired firm, non-sticky consistency is reached.
Coconut Fineness: If using thick, long shreds of coconut, pulse the **1 cup of coconut** (Ingredient I) in a food processor briefly to create smaller, finer pieces. This helps it blend better into the dough and improves the ball’s texture.
Gloves for Rolling: If the dough is still sticky, use **disposable vinyl or latex gloves** when rolling the balls (Instruction 4). This prevents the mixture from sticking to your hands and keeps the balls uniform.
Gluten-Free Option: Easily make this recipe gluten-free by substituting the **graham cracker crumbs** with **crushed vanilla wafers or gluten-free shortbread cookies**.
Testing the Dough: After the initial $1\text{-hour}$ chill (Instruction 3), squeeze a small amount of dough between your fingers. If it holds its shape and doesn’t leave excessive residue, it’s ready to roll. If it crumbles, add a touch of melted butter or condensed milk. If it’s too sticky, add more crumbs/powdered sugar.
Variations: Customizing Spices and Fillings
Easily adapt the flavor profile of this festive treat:
- **Spice Note:** Add $\frac{1}{2}\text{ teaspoon}$ of **ground nutmeg or allspice** to the graham cracker crumbs for a warmer, traditional Christmas flavor profile.
- **Citrus Boost:** Add $\frac{1}{2}\text{ teaspoon}$ of **fresh lemon zest** to the mixture before the initial chill to brighten the pineapple’s natural acidity.
- **White Chocolate Dip:** Instead of rolling entirely in coconut, dip the chilled balls halfway into melted **white chocolate** after the final chill, then allow the chocolate to set on wax paper.
- **Nuts for Crunch:** Stir in $\frac{1}{2}\text{ cup}$ of **finely chopped pecans or walnuts** along with the graham cracker crumbs for a subtle crunchy texture element.
**Compressing the Balls:** When rolling (Instruction 4), **squeeze the mixture firmly** together before rolling into a sphere. This initial compression forces out any trapped air pockets and helps create a denser, more structurally sound ball that won’t crumble.
**Rolling Surface:** Use a **non-stick silicone mat** or a sheet of wax paper dusted lightly with **powdered sugar** for the rolling stage to minimize sticking.
**Uniform Sizing:** Use a **small cookie scoop or measuring spoon** (like a $1\text{-tablespoon}$ measure) to portion the mixture. This ensures all the balls are a uniform size for professional presentation and even cooling/setting.
**Coloring the Coconut:** For a festive presentation, toss the **extra coconut coating** (Ingredient III) with a drop of **green or red food coloring** mixed with $\frac{1}{2}\text{ teaspoon}$ of water before rolling the balls.
Conclusion: A Firm and Festive Result
The **Pineapple Christmas Ball** recipe is a technical masterclass in non-heat-set confections. By strictly following **The Moisture Management Mandate** to control liquid content and executing **The Chill and Roll Protocol** for optimal shaping and firmness, you achieve a beautifully textured, intensely flavored, and structurally sound holiday treat.
Frequently Asked Questions (FAQ)
Q: Why is my mixture too sticky to roll?
A: The **pineapple was not drained thoroughly** (failure of **The Moisture Management Mandate**, Instruction 1). Gradually add extra **graham cracker crumbs or powdered sugar** until the mixture stiffens.
Q: Why are my balls crumbling?
A: The mixture may be too dry or was not chilled long enough. Add a tablespoon of **melted butter or condensed milk** to the mixture to rehydrate and improve binding, then chill again.
Q: Can I use fresh pineapple?
A: **Yes**, but it is **not recommended** for a consistent result. Fresh pineapple has a higher water content and contains enzymes that can sometimes break down the milk proteins in the recipe, making the mixture unstable and often too sticky.
Q: How can I speed up the chilling process?
A: Instead of the refrigerator, chill the mixture in the **freezer** for **20-30 minutes** after mixing (Instruction 3) to rapidly firm the dough.
ADVERTISEMENT