The Holiday Lifesaver: Homemade Sweetened Condensed Milk
Introduction: The Secret Weapon of the Holiday Pantry
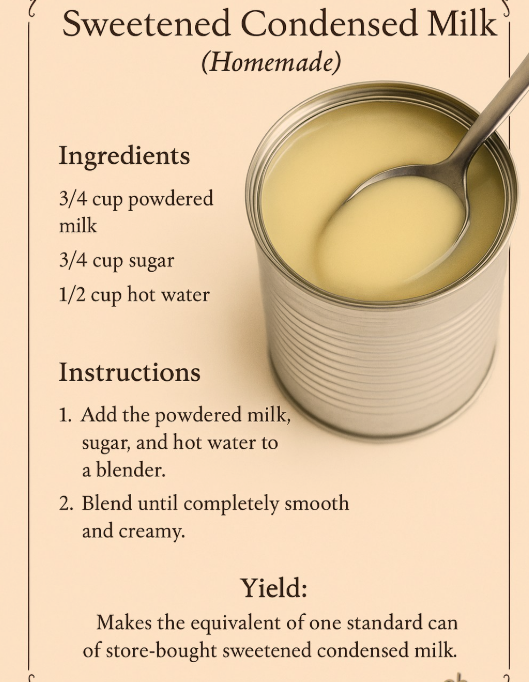
As we enter the season of fudge, pumpkin pies, and decadent “magic” cookie bars, one ingredient stands out as the ultimate binder and sweetener: Sweetened Condensed Milk. Most of us are used to the iconic, heavy-set cans tucked away in the baking aisle, but being caught without one in the middle of a midnight baking session is a common holiday frustration.
Fortunately, the homemade version is not only an easy substitute but a culinary upgrade. By slowly reducing milk and sugar, you create a thick, ivory-colored syrup that is rich in milk solids and deep in caramel-like flavor. Unlike the store-bought version, which is processed at high temperatures for shelf stability, homemade condensed milk retains a fresh, creamy profile. This recipe is the ultimate “pantry hack” that ensures your holiday treats remain on schedule, even when the grocery store shelves are empty.
Ingredients: A Simplicity in Two Parts
The magic of this recipe is that it relies on ingredients you likely already have in your refrigerator and cupboard. The goal is to evaporate the water content of the milk while dissolving and slightly caramelizing the sugar.
- 2 cups Whole Milk: Higher fat content is better here. Whole milk provides the creamy mouthfeel and thickness required for traditional recipes.
- 2/3 cup Granulated Sugar: This provides the sweetness and acts as a preservative. It also helps the milk thicken into a syrup through the process of reduction.
- 1/4 tsp Vanilla Extract (Optional): A splash of vanilla adds a gourmet touch, making it perfect for coffee or fruit-based desserts.
- Pinch of Salt: A tiny bit of salt balances the intense sweetness and enhances the dairy notes.
Instructions: The Low-and-Slow Reduction
Step 1: The Initial Simmer
In a heavy-bottomed saucepan, combine the milk and sugar. Place over medium-low heat. Stir constantly until the sugar is completely dissolved. It is important not to let the milk reach a rolling boil too quickly, as this can cause the proteins to scorch on the bottom of the pan.
Step 2: The Reduction Phase
Once the sugar is dissolved, lower the heat to its lowest setting. You want to see a very gentle simmer—just a few small bubbles breaking the surface. Stop stirring. Stirring during the reduction phase can actually encourage crystallization, leading to a grainy final product.
Step 3: Watching the Volume
Allow the milk to simmer uncovered for 35 to 45 minutes. You are looking for the volume to reduce by approximately half. The color will transform from a bright white to a creamy, pale yellow, and the consistency will become noticeably syrupy.
Step 4: The Finishing Touches
Once reduced and thickened, remove the pan from the heat. Stir in the vanilla extract and the pinch of salt. Don’t worry if it looks a bit thinner than the canned stuff while hot; the milk will thicken significantly as it cools.
Step 5: Straining (The Pro Move)
For the smoothest possible result, pour the milk through a fine-mesh sieve into a glass jar. This removes any small “milk skin” fragments or sugar crystals that may have formed during the simmering process.
Serving and Storage
Serving: Use this exactly as you would use a 14-ounce can from the store. It is the perfect base for No-Churn Ice Cream, Vietnamese Iced Coffee, or holiday Tres Leches cake.
Storage: Pour the cooled milk into a clean glass jar and seal tightly. It will keep in the refrigerator for up to 2 weeks. Because it is fresh dairy, it does not have the multi-year shelf life of the canned version, so be sure to label your jar with the date!
Tips: Preventing the Scorch
- Use a Heavy Pan: A thin saucepan will create hot spots, which leads to burnt milk bits at the bottom. A heavy-duty stainless steel or enameled cast iron pot is ideal.
- The “Skin” Solution: If a skin forms on top while simmering, simply skim it off with a spoon or whisk it back in before straining.
- Don’t Rush the Heat: If you try to boil the milk to speed up the process, you risk curdling the dairy. Patience is the key ingredient here.
Variations: Special Dietary Tweaks
- Dairy-Free Version: Replace the whole milk with a can of full-fat coconut milk. Use the same amount of sugar and simmer until reduced. This makes an incredible vegan sweetened condensed milk.
- Honey-Condensed Milk: Swap the granulated sugar for 1/2 cup of honey for a floral, unrefined sweetness that pairs beautifully with tea.
- Brown Sugar (Dulce de Leche Style): Use brown sugar instead of white to create a deeper, more caramel-like flavor similar to a light Dulce de Leche.
Tips: Knowing When It’s Done
- The Spoon Test: Dip a metal spoon into the mixture. If it coats the back of the spoon and doesn’t run off immediately, it is ready.
- The Scale Method: For precision, weigh your empty saucepan before you start. The final product should weigh roughly half of the starting weight of the milk and sugar combined.
- If It’s Too Thick: If you over-reduce the milk and it becomes too thick to pour, simply whisk in a tablespoon of hot water to thin it back to the desired consistency.
Conclusion: Empowerment in the Kitchen
Mastering basic components like Homemade Sweetened Condensed Milk is what separates a cook from a baker. It removes the reliance on processed, store-bought cans and gives you total control over the ingredients entering your family’s holiday treats. This simple reduction of milk and sugar is a reminder that the best flavors often come from the most basic transformations. The next time you find yourself staring at an empty pantry shelf, don’t panic—just grab the milk and sugar, turn on the stove, and let the slow simmer save your holiday season.
Frequently Asked Questions
- Is this the same as Evaporated Milk?
- No. Evaporated milk is milk that has been reduced but has no added sugar. Sweetened condensed milk is much thicker and significantly sweeter.
- Can I use 2% or Skim milk?
- You can, but the final result will be less creamy and will take longer to reduce. You may also need to add a tablespoon of butter at the end to achieve the right richness.
- My milk turned out grainy, why?
- This usually happens if the sugar didn’t fully dissolve before the simmering started, or if the milk was stirred too much during the reduction phase, causing crystals to splash onto the sides of the pot and fall back in.
Would you like me to suggest a “No-Bake Peanut Butter Pie” recipe that uses this condensed milk, or perhaps a guide on how to turn this into Dulce de Leche?