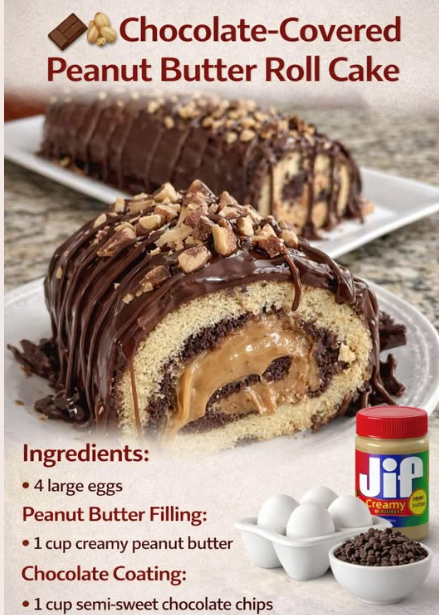
Step 1: The Aeration Phase (The Batter)
Beat the eggs (usually with sugar and flour) until the volume triples. The “Surface Tension” Science: You are creating a stable foam. If you over-mix after adding dry ingredients, you will break the Air Voids, resulting in a dense, brittle cake that will crack when rolled.
Step 2: The Thermal Set (Baking)
Bake on a flat sheet pan. The “Flash Hydration” Secret: You want a quick bake at a higher temperature to set the structure while the center remains moist. A dry cake is a non-elastic cake.
Step 3: The Pre-Roll (Fiber Training)
Immediately turn the hot cake onto a towel and roll it up. The “Memory Effect” Physics: By rolling the cake while the protein bonds are still warm and flexible, you prevent the cake from cracking later. As it cools in the roll, the fibers “set” into the curved shape.
Step 4: Integration of the Lipid Center
Unroll, spread the peanut butter, and re-roll. The “Shear Stress” Rule: The peanut butter should be slightly warm to reduce its Dynamic Viscosity, allowing it to glide over the sponge without snagging the surface.
Step 5: The Final Encapsulation
Pour the melted chocolate over the roll. The “Crystallization” Phase: As the chocolate cools, it forms a Continuous Protective Layer that seals in the moisture of the cake and provides the signature “crack” when sliced.
Service and Storage Tips
Service: Slice with a hot, thin-bladed knife. The “Thermal Cutting” Rule: The heat of the blade melts through the chocolate shell without shattering it, ensuring a clean spiral presentation.
Storage: Store in the refrigerator. The “Lipid Solidification” Factor: Cold temperatures keep the peanut butter firm and the chocolate shell crisp, preventing the cake from becoming “weepy” or losing its shape.
Variants: Structural Iterations
| Variation | The Adjustment | The Result |
|---|---|---|
| Dark Velvet Roll | Add cocoa powder to the cake batter. | Higher bitter-sweet profile and deeper color contrast. |
| Crunchy Center | Use “Extra Crunchy” peanut butter. | Increased Mechanical Texture and fracture force within the roll. |
| Ganache Finish | Mix chocolate with 1/4 cup heavy cream. | A softer, truffle-like exterior rather than a hard shell. |
Tips: Pro-Level “Roll” Nuances
- Egg Temperature: Always use room-temperature eggs (approx. 21°C). Cold eggs have higher Surface Tension and will not trap as much air, leading to a smaller, less flexible cake.
- The “Dusting” Barrier: Dust the towel with powdered sugar before the pre-roll. This acts as a Dry Lubricant, preventing the cake from adhering to the towel fibers.
- Chocolate Tempering: For a professional shine, melt your chocolate slowly. If it gets too hot, the cocoa butter will separate, resulting in “bloom” (white streaks) on the surface of your cake.
Conclusion: A Triumph of Structural Engineering
The Chocolate-Covered Peanut Butter Roll Cake is a masterpiece of Thermodynamic Balancing and Mechanical Design. By controlling the elasticity of a protein foam and stabilizing it with a rich lipid center, you create a complex, multi-textured dessert. On this Saturday, December 27, 2025, enjoy the perfectly executed results of cooling-phase engineering. Happy rolling!
Frequently Asked Questions
- Why did my cake crack?
- This is a Flexibility Failure. It happens if the cake was over-baked (too dry) or if you waited too long to do the “pre-roll” after it came out of the oven.
- Can I use a different nut butter?
- Yes, but ensure it has a similar Viscosity Profile. Almond butter is often thinner and may require chilling before you roll the cake to prevent leakage.
- How do I get the chocolate to look smooth?
- Use a Spreading Agent like 1 tablespoon of coconut oil or shortening mixed into the melted chocolate. This increases the “flow” of the chocolate for an even coating.
Would you like me to suggest a “Peanut Butter Drizzle” recipe to top this off, or perhaps show you how to turn this into a “Vertical Layer Cake”?