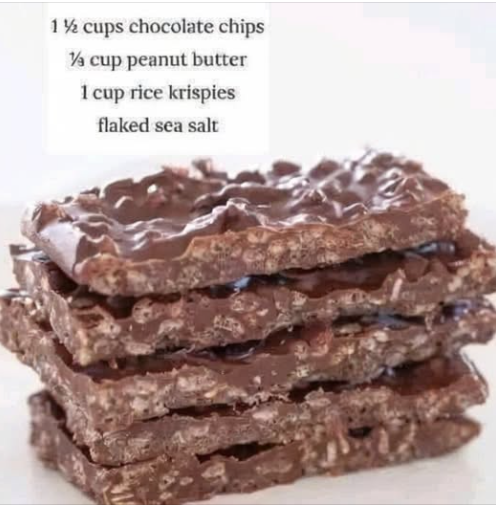
The three ingredients are carefully chosen to maximize flavor contrast and structural function.
| Component | Quantity | Functional Role and Technical Insight |
|---|---|---|
| **The Crunch** | ||
| **Crispy Rice Cereal** | 2 cups | **Textural Agent:** Provides low-density volume; its porous structure is easily permeated by the binder. |
| **The Binder (Structure and Flavor)** | ||
| **Peanut Butter** | 1 cup | **Primary Binder:** High oil/fat content ensures firm set upon cooling; provides rich flavor. |
| **Chocolate Chips** | 1 cup | **Secondary Binder/Coating:** Melts easily; cocoa butter solidifies quickly to lock the structure. |
Instructions: Temperature and Setting Protocol
The instructions focus on the rapid melting of the binders and the efficient pressing before the mixture sets.
- **Prepare the Pan:** Line an $\mathbf{8 \times 8 \text{-inch baking pan}}$ with $\mathbf{\text{parchment paper}}$, leaving an overhang for easy removal. This ensures a clean, non-stick surface for the fat-based bar.
- **Melt the Binders:** Combine the $\mathbf{1 \text{ cup of peanut butter}}$ and $\mathbf{1 \text{ cup of chocolate chips}}$ in a $\mathbf{\text{microwave-safe mixing bowl}}$. Microwave in $\mathbf{30 \text{-second increments}}$, stirring well after each one, until the mixture is fully smooth and melted. Be careful not to scorch the chocolate.
- **Combine and Mix:** Add the $\mathbf{2 \text{ cups of crispy rice cereal}}$ to the melted peanut butter-chocolate mixture. Using a spatula, quickly fold and stir until the cereal is **uniformly coated** with the binder. Work quickly, as the mixture will begin to cool and thicken immediately.
- **Press and Chill:** Transfer the mixture into the prepared $\mathbf{8 \times 8 \text{-inch pan}}$. Use the spatula or the bottom of a measuring cup to **firmly and evenly press** the mixture into the pan. This step is crucial for density and cohesion.
- **Set Structure:** Place the pan in the $\mathbf{\text{refrigerator}}$ for a minimum of $\mathbf{2 \text{ hours}}$, or until the bars are completely firm. The cooling process solidifies the fat, setting the structure.
- **Slice and Serve:** Use the parchment paper overhang to lift the entire slab out of the pan. Slice the bar into uniform squares or rectangles using a $\mathbf{\text{sharp, warm knife}}$.
Serving and Storage: Maintaining the Snap
Optimal Serving and Handling
These bars are best served chilled or slightly cool to maintain their firm structure and crisp snap.
- **Clean Slicing:** To achieve neat, non-crumbled cuts (Step 6), use a knife that has been briefly warmed under hot water and wiped dry. The heat melts the chocolate coating slightly, allowing for a clean pass.
- **Portion Control:** Slice the $\mathbf{8 \times 8 \text{-inch bar}}$ into $\mathbf{16 \text{ squares}}$ for a generous serving size.
Storage and Longevity
The fat-based structure grants these bars excellent shelf stability, particularly when chilled.
- **Refrigeration (Best):** Store in an $\mathbf{\text{airtight container}}$ in the refrigerator for up to $\mathbf{7 \text{ days}}$. This maintains the firmness and crispness.
- **Room Temperature:** The bars can be stored in an airtight container at room temperature for up to $\mathbf{4 \text{ days}}$, but they may soften, especially if the room is warm ($\mathbf{>75^{\circ}\text{F}}$).
- **Freezing:** Freezing is **recommended** for long-term storage (up to $\mathbf{3 \text{ months}}$). Wrap individual bars tightly in plastic wrap before placing them in an airtight container. Thaw at room temperature for $\mathbf{15 \text{ minutes}}$ before serving.
Tips: Maximizing Crispness and Binding
Tip: The Cereal Refresh
If your $\mathbf{2 \text{ cups of crispy rice cereal}}$ has been open for a while and feels soft, you can refresh its crispness. Spread the cereal on a baking sheet and bake it in a low oven ($\mathbf{300^{\circ}\text{F}}$) for $\mathbf{5 \text{ minutes}}$. Let it cool completely before mixing. This removes absorbed moisture (humidity) and maximizes the final crunch.
Technical Pointers
- **Natural vs. Creamy Peanut Butter:** If using **natural peanut butter** (oil separation), ensure you stir it thoroughly before measuring the $\mathbf{1 \text{ cup}}$ to incorporate the oils and fat. Using unmixed natural peanut butter can make the bars too oily and crumbly.
- **Don’t Overheat:** When melting the binders (Step 2), stop heating when a few small lumps of chocolate remain. Continuous stirring will allow the latent heat to melt the remaining chocolate. Overheating can cause the chocolate to **”seize”** or separate, ruining the smooth texture.
- **Firm Pressing:** The **firm pressing** in Step 4 is crucial. It minimizes air pockets and forces the binder to make maximum contact with the cereal, guaranteeing a dense, non-crumbly bar.
- **Temperature Tolerance:** If using a high ratio of milk chocolate (which has more milk solids and sugar than semi-sweet), the final bars may be slightly softer at room temperature due to the lower melting point of milk chocolate fat.
Variations: Adjusting the Fat and Flavor Profile
The simplicity of the base allows for endless modifications through substitutions and additions.
Binder Swaps
- **Nut-Free Alternative:** Replace the $\mathbf{1 \text{ cup of peanut butter}}$ with $\mathbf{1 \text{ cup of sunflower seed butter}}$ or $\mathbf{\text{tahini}}$ (for an earthier, less sweet flavor). Note that the texture may vary slightly.
- **White Chocolate Base:** Substitute the $\mathbf{1 \text{ cup of chocolate chips}}$ with $\mathbf{1 \text{ cup of white chocolate chips}}$. Add $\mathbf{\frac{1}{2} \text{ tsp of vanilla extract}}$ to boost the flavor, as white chocolate is milder.
- **Caramel Inclusion:** Fold $\mathbf{\frac{1}{4} \text{ cup of finely chopped soft caramel candies}}$ into the mixture before pressing into the pan.
Textural Mix-ins
- **Nutty Crunch:** Add $\mathbf{\frac{1}{2} \text{ cup of chopped roasted peanuts or pecans}}$ to the $\mathbf{2 \text{ cups of crispy rice cereal}}$ for a more complex, layered crunch.
- **Marshmallow Fluff:** Stir $\mathbf{1 \text{ tablespoon of marshmallow fluff}}$ into the melted chocolate/peanut butter mixture (Step 2) before adding the cereal. This adds a slight chewiness and extra binding power.
- **Sea Salt Finish:** Sprinkle a pinch of $\mathbf{\text{flaky sea salt}}$ over the top of the mixture immediately after pressing it into the pan (Step 4) for a salty-sweet contrast.
Tips: Advanced Melting and Binding Techniques
Tip: The Double Boiler Method
If you prefer not to use a microwave, melt the $\mathbf{1 \text{ cup of chocolate chips}}$ and $\mathbf{1 \text{ cup of peanut butter}}$ in a heatproof bowl set over a saucepan of simmering water (a $\mathbf{\text{double boiler}}$). This provides gentle, indirect heat, eliminating the risk of scorching the chocolate.
Baking Science Deep Dive
- **Emulsification:** The chocolate and peanut butter mixture forms a crude, yet functional, **emulsion**. The emulsifying agents (lecithin in the chocolate and protein/fat in the peanut butter) keep the mixture smooth, preventing the cocoa butter from separating during melting.
- **Controlling Stickiness:** If your mixture is too sticky to press firmly (Step 4), wet your hands slightly or lightly grease the bottom of the measuring cup used for pressing. This reduces the surface tension between the mixture and the press tool.
- **Ratio Adjustments:** If the bars crumble easily upon cutting, the binding ratio may be off. This often means the $\mathbf{1 \text{ cup of peanut butter}}$ was not a full cup, or that the $\mathbf{2 \text{ cups of cereal}}$ were packed too tightly. For increased stability, consider adding $\mathbf{1 \text{ tablespoon of coconut oil}}$ to the melted mixture.
- **Cooling Rate:** Cooling in the **refrigerator** (Step 5) is essential for this recipe. Rapid cooling forces the fat components (cocoa butter and peanut oils) to crystallize quickly, resulting in a **firmer, snappier** final bar compared to slow cooling at room temperature.
Conclusion: A Decadent Lesson in Fat Crystallization
The **3-Ingredient Homemade Crunch Bar** is a brilliant demonstration of no-bake confectionery, where structure is achieved purely through the **thermal properties of fat**. The process is defined by the rapid melting and subsequent quick cooling of the $\mathbf{1 \text{ cup of chocolate chips}}$ and $\mathbf{1 \text{ cup of peanut butter}}$, which act together as a high-viscosity binder. This solidification process locks the $\mathbf{2 \text{ cups of crispy rice cereal}}$ into a dense, non-crumbly matrix. It is a prime example of culinary simplicity yielding a texture that is both satisfyingly crunchy and reliably stable, making it a truly foolproof, three-step dessert.
Frequently Asked Questions:
Q: My bars are crumbly and fall apart when I cut them. What went wrong?
A: The mixture likely **lacked sufficient binder**. This happens if the $\mathbf{1 \text{ cup of peanut butter}}$ or $\mathbf{1 \text{ cup of chocolate chips}}$ was mis-measured, or if the $\mathbf{2 \text{ cups of rice cereal}}$ were packed too densely. Also, ensure you pressed the mixture **very firmly** (Step 4) into the pan before chilling.
Q: Do I have to use the microwave?
A: **No.** You can use the $\mathbf{\text{double boiler method}}$ (see Tip Box) to gently melt the $\mathbf{\text{chocolate chips and peanut butter}}$ together on the stovetop. The key is gentle, indirect heat to avoid scorching the chocolate.
Q: Why did my melted chocolate turn thick and grainy (seize)?
A: **Seizing** occurs if the chocolate gets a small amount of water or is severely overheated. Since the peanut butter itself is a fat, it shouldn’t cause seizing. The most common cause here is **overheating** the chocolate, which causes the cocoa solids to burn and clump.
Q: How can I make these bars less sticky?
A: The stickiness is usually due to the exposed melted sugar content in the chocolate. To reduce stickiness, ensure the bars are **fully chilled** (Step 5) before cutting. For a dry surface, dust the tops lightly with a small amount of $\mathbf{\text{powdered sugar}}$ before slicing.