Step 1: The Critical Blending Phase
The texture of this recipe hinges entirely on achieving a perfectly homogenous mixture. Combine the Greek yogurt, cottage cheese, sweetener, vanilla, lemon juice, and salt in a high-speed blender or food processor. Blend continuously for a full **2 to 3 minutes**. This duration is necessary to fully emulsify the ingredients and break down every single curd of the cottage cheese. The mixture must achieve a consistency akin to thick pudding or traditional cream cheese batter. If any graininess remains, the finished product will lack the required creamy mouthfeel.
Step 2: Flavor Testing and Adjustment
Immediately stop and taste the mixture. Because sweetness is highly subjective, and the cold temperature of the filling can mute flavors, this is the time to adjust. Add sweetener a half-teaspoon at a time until the desired level is reached. If the tang is too mild, add a teaspoon of lemon juice. This step is critical before chilling, as adjustments are difficult once the mixture has set.
Step 3: The Jars and Crust Layering
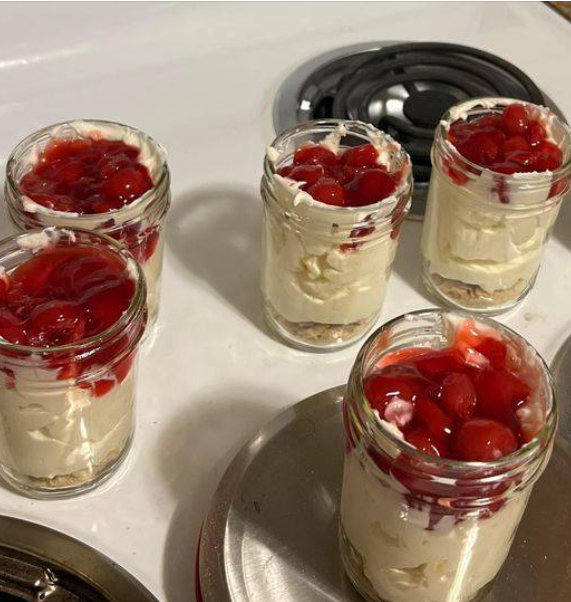
Divide the mixture into two to four serving jars (depending on desired portion size, typically 8-10 oz jars). If using a crust (such as simple graham cracker crumbs or crushed nuts), place approximately one tablespoon of the prepared crust mixture into the bottom of each jar. Press it down firmly. Gently spoon the cheesecake mixture over the crust. For a more elegant presentation, you can use a piping bag to fill the jars smoothly.
Step 4: The Chilling and Setting Process
Cover the jars tightly (using the lids or plastic wrap) and refrigerate. A minimum of **30 minutes** is required for the temperature to drop and the ingredients to integrate, but the optimal chilling time is **2 to 4 hours**. During this period, the casein proteins in the yogurt and cottage cheese fully hydrate and cross-link, transforming the liquid mixture into a firm, sliceable (if you were making a whole cake) or spoonable, dense ‘cheesecake’ texture. This cold set is the entire premise of the “No-Bake” method.
Serving and Storage: Maintaining Peak Freshness
The portable nature and excellent shelf stability of these jars make them ideal for meal prep and controlled snacking.
Optimal Serving
The jars should be served directly from the refrigerator, ensuring the filling is dense and cold. For an aesthetic touch, always add fresh fruit or a swirl of light whipped cream (or non-fat Greek yogurt mixed with sweetener) **immediately before serving**. Adding toppings too early can introduce excess moisture, leading to a watery film on the cheesecake layer.
Storage Longevity
These High Protein Cheesecake Jars are excellent for planning meals or snacks for the entire week. When stored in sealed, airtight containers in the main compartment of the refrigerator, the filling remains fresh and delicious for up to **5 days**. If using an oat or cracker crust, they may begin to soften slightly after day three, but the integrity of the cheesecake itself remains intact. Avoid freezing, as this can crystalize the water content and lead to an unfavorable, grainy texture upon thawing.
Tips: Enhancing Technique and Macro Balance
Tip 1: The Protein Powder Boost
To maximize the protein content without sacrificing texture, substitute half a scoop of your favorite vanilla protein powder for half a tablespoon of the sweetener. Use an **Isolate** powder, as these tend to be finer and mix more smoothly than concentrates. If the batter becomes too stiff, add milk or water, one teaspoon at a time, until the smooth consistency is restored.
Tip 2: Eliminating Grittiness
If you lack a high-speed blender, press the cottage cheese through a fine-mesh sieve or strainer **before** adding it to the mixture. This physical separation of the curds ensures an exceptionally smooth, creamy result, even with a standard mixer. This small pre-step is a professional technique for achieving a flawless texture.
Tip 3: The Tangy Probiotic Kick
If you desire an even more complex, probiotic-rich tang, consider replacing a quarter cup of the Greek yogurt with **Kefir**. Kefir has a thinner consistency, so you may need to compensate by chilling for a longer period (up to 6 hours) or adding a pinch of a natural thickener like xanthan gum (start with $1/8$ teaspoon).
Variations: Flavor Profiles and Dietary Adaptations
1. The Chocolate Peanut Butter Dream
Add 1 tablespoon of unsweetened cocoa powder and 1-2 tablespoons of powdered peanut butter (or a small amount of melted natural peanut butter) to the filling mixture before blending. Use a crushed Oreo-style cookie or a crushed peanut base for the crust. This transforms the macro dessert into a deep, decadent chocolate flavor profile while keeping the protein high.
2. The Tropical Coconut Delight
Substitute the lemon juice with **lime juice** and add $1/2$ teaspoon of coconut extract. Use a crust made of finely shredded, unsweetened coconut toasted with a small amount of erythritol. Top with fresh mango or pineapple. This is particularly refreshing during warmer months and provides a vibrant, contrasting acidity.
3. Vegan/Dairy-Free Adaptation
While challenging due to the reliance on dairy protein, a suitable alternative exists. Use a high-protein, firm, **unsweetened cashew yogurt** or **coconut yogurt** as the base. Replace the cottage cheese with **firm silken tofu** blended with a small amount of plant-based protein powder. The texture will be slightly different, but the density and protein content can be maintained, though additional thickeners (like chia seeds soaked in almond milk) may be necessary.
Advanced Tips: Scaling, Garnish, and Portioning
Tip 4: Scaling for Batch Cooking
This recipe scales perfectly. For large-batch meal prep (e.g., eight jars), simply multiply all ingredients by four. When scaling, ensure the blending time is extended by at least 1-2 minutes to ensure the larger volume achieves the same smooth consistency. Always blend in a food processor, as a standard blender may not handle the volume evenly.
Tip 5: Garnish and Presentation
Elevate the appearance with a simple, contrasting garnish. A sprinkle of **cinnamon**, a few thin slices of **lemon zest**, or a light dusting of cocoa powder using a fine sieve adds professional visual appeal. For a textural contrast, press 2-3 toasted slivered almonds into the top layer just before serving.
Tip 6: Calorie and Macro Control
To maintain strict control over macronutrients, use a kitchen scale to measure the total prepared filling and divide it precisely by the number of servings. For example, if the total filling weighs 400 grams and you want four servings, weigh out exactly 100 grams of filling per jar. This ensures every serving has identical nutritional value, which is vital for competitive athletes or precise weight loss protocols.
Conclusion: A Sustainable, Satisfying Dessert Solution
The High Protein Cheesecake Jar is more than just a recipe; it is a nutritional strategy disguised as a decadent dessert. By leveraging the natural emulsifying and setting properties of Greek yogurt and skillfully processed cottage cheese, we have successfully replicated the sensory experience of classic cheesecake—the creamy density, the rich mouthfeel, and the signature tang—without the pitfalls of traditional baking, high sugar, or excessive fat. The no-bake preparation simplifies the process, making it accessible to even novice cooks, while the portable jar format ensures easy integration into a busy, health-conscious lifestyle.
We have explored the crucial role of blending for texture, the chemical function of acidity and salt for flavor, and the myriad of variations that keep the dish exciting and adaptable to various dietary needs (from keto to high-volume/low-calorie plans). This dessert is a powerful tool for managing cravings, ensuring satiety due to its high protein content, and sustaining long-term adherence to a fitness-oriented diet. Embrace the blend, master the chill, and enjoy this guilt-free triumph of macro-friendly culinary innovation.
Frequently Asked Questions: Troubleshooting and Customization
Q: Why is my cheesecake filling still gritty after blending?
A: The grit is caused by undissolved cottage cheese curds. This is usually due to insufficient blending time or a less powerful blender. **Solution:** Blend for a full 3 minutes, or if necessary, process the cottage cheese alone first until completely smooth, then add the other ingredients and blend again. Alternatively, use the sieve technique mentioned in the advanced tips.
Q: Can I replace Greek yogurt with regular yogurt?
A: It is strongly discouraged. Regular yogurt has a much higher water content and lower protein density than Greek yogurt, which is strained. Using regular yogurt will result in a much thinner, watery filling that will not set properly, even with extended chilling. If you must use it, you will likely need to add a thickening agent like a small amount of dissolved gelatin or extra protein powder to achieve the necessary density.
Q: What is the best keto-friendly crust option?
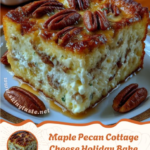
A: The best keto crust is a mixture of finely crushed **almonds or pecans** combined with a small amount of melted butter or coconut oil and a pinch of powdered erythritol. Toasting the nuts lightly before crushing enhances their flavor significantly. This provides a satisfying crunch and healthy fats without the carbs of traditional graham crackers.
Q: My filling tastes too sour/too sweet. How can I fix this after it’s chilled?
A: Once chilled, the structure is set, so mixing adjustments are difficult. **Solution:** For too sour/tangy filling, top the jar with a thicker, sweeter element, such as a layer of sweetened whipped cream or a thin spread of sugar-free white chocolate ganache to balance the acidity. For too sweet filling, top it with a very tart topping, such as fresh raspberries or a sugar-free lemon curd.
Q: How can I make this taste more like actual cream cheese?
A: To mimic the cream cheese flavor, which is traditionally higher in fat and tangier, ensure you use the **full-fat** Greek yogurt option. Also, consider adding a few drops of **cream cheese extract** (if available) or slightly increasing the lemon juice content to enhance the specific fermentation flavor notes characteristic of cream cheese.