The directions emphasize temperature and timing for a professional finish.
- **Preheat & Bake:** Preheat oven to $\mathbf{350^{\circ}\text{F}}$ ($\mathbf{175^{\circ}\text{C}}$). Bake the cake in a $\mathbf{9 \times 13 \text{-inch pan}}$ for $\mathbf{25\text{–}30 \text{ minutes}}$ (Step 3). Cool completely to ensure all moisture has escaped and the cake is structurally rigid.
- **Crumble & Bind:** Crumble the cooled cake (Step 4). Mix in the $\mathbf{16 \text{ oz vanilla frosting}}$ (Step 5) until the mixture is uniform and $\mathbf{\text{easily squeezes together}}$ without cracking.
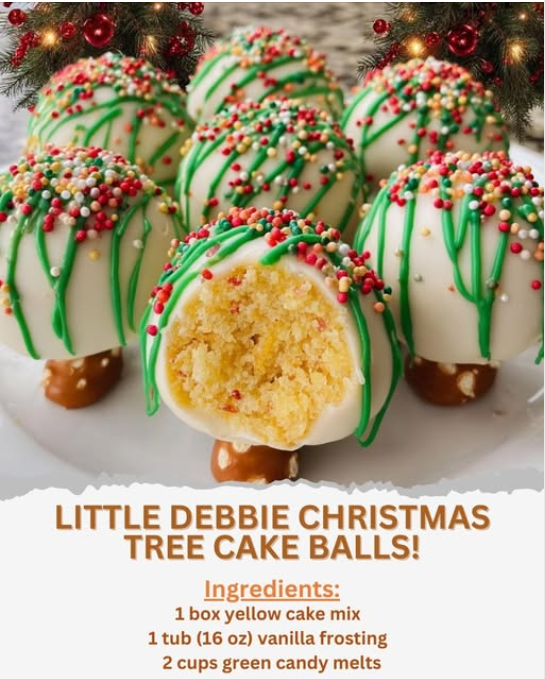
- **Shape & Chill:** Shape the mixture into small, firm **cone-shaped cake balls** (Step 6). Place on parchment paper and chill for $\mathbf{\text{at least } 1 \text{ hour}}$ (Step 7). **Crucial:** The longer the chill, the easier the dipping.
- **Melt & Prep:** Melt the $\mathbf{2 \text{ cups of green candy melts}}$ according to package directions (Step 8)—usually on low heat or in a microwave in $\mathbf{30 \text{-second increments}}$. Insert a pretzel stick into the base of each chilled cone (Step 9).
- **Dip & Decorate (Speed is Key):** Dip each cake ball into the melted coating (Step 10). Allow excess to drip off completely. Immediately **decorate** with sprinkles and edible decorations (Step 11) **before the coating sets**.
- **Set & Serve:** Let the cake balls set completely on parchment paper until the coating hardens (Step 12). Serve chilled or at room temperature (Step 13).
Serving and Storage: Protecting the Shell
Optimal Presentation and Handling
The integrity of the coating is essential for long-term enjoyment and handling.
- **Handling:** Always handle the finished cake balls by the pretzel stick or the base to avoid leaving fingerprints or compromising the glossy coating.
- **Drying Time:** Ensure the candy melts are fully hardened before moving or storing the cake balls to avoid smudging the color or the decorations.
Storage and Longevity
The candy coating acts as a moisture seal, extending the life of the cake inside.
- **Room Temperature:** Store in an $\mathbf{\text{airtight container}}$ at cool room temperature ($\mathbf{65^{\circ}\text{F}}$ to $\mathbf{70^{\circ}\text{F}}$) for up to $\mathbf{1 \text{ week}}$. The hard candy shell prevents the inner cake from drying out.
- **Refrigeration:** The cake balls can be refrigerated for up to $\mathbf{2 \text{ weeks}}$. If chilled, allow them to sit at room temperature for $\mathbf{10 \text{ minutes}}$ before serving for optimal flavor and softer inner texture.
- **Freezing:** Cake balls freeze well! Store in an airtight container for up to $\mathbf{2 \text{ months}}$. Thaw in the refrigerator overnight before serving.
Tips: Advanced Coating Techniques
Tip: Thinning the Coating
If your $\mathbf{2 \text{ cups of green candy melts}}$ feel too thick for dipping, stir in $\mathbf{1 \text{ teaspoon of coconut oil or shortening}}$ into the melted coating. This lowers the viscosity of the melted fat, making the coating thinner, smoother, and easier to work with, which results in a thinner, cleaner shell.
Technical Pointers
- **Proper Crumbling:** Ensure the cake is $\mathbf{\text{finely and uniformly crumbled}}$ (Step 4). Large lumps of cake will make the dough uneven and prone to cracking when shaped.
- **Frosting Ratio:** The ratio of $\mathbf{\text{frosting to cake}}$ is critical for the “dough” consistency (Step 5). If the cake mix is very moist, use slightly less than the full $\mathbf{16 \text{ oz tub}}$. The goal is a firm, non-sticky mass.
- **Toothpick Technique (Tip 1):** Use a $\mathbf{\text{toothpick}}$ (or a fork) inserted at the base of the cone for dipping. Once coated, gently tap the side of the bowl to remove excess. Use a second toothpick to slide the cake ball onto the parchment paper.
- **Microwave Caution:** When melting the candy melts (Step 8), never overheat them. Overheating can cause the vegetable fats to **seize** (thicken and clump) or **scorch** (burn the sugar), rendering the coating unusable. Use low power and stop when small lumps remain, stirring until smooth.
Variations: Altering the Core and Coating
The simple structure is highly adaptable to different holiday flavors and appearances.
Flavor Swaps
- **Chocolate Peppermint:** Substitute $\mathbf{\text{yellow cake mix}}$ with $\mathbf{\text{chocolate cake mix}}$ and $\mathbf{\text{vanilla frosting}}$ with $\mathbf{\text{peppermint frosting}}$. Use $\mathbf{\text{red or white candy melts}}$.
- **Gingerbread:** Use a $\mathbf{\text{spice cake mix}}$ and add $\mathbf{1 \text{ tsp of ground ginger}}$ to the frosting. Use $\mathbf{\text{tan or white candy melts}}$.
- **Citrus Zing:** Add the $\mathbf{\text{zest of one orange}}$ to the $\mathbf{\text{cake batter}}$ before baking for a bright, aromatic lift.
Coating and Garnish Enhancements
- **Snowy Finish:** Dip the cake balls in $\mathbf{\text{white candy melts}}$ and sprinkle with $\mathbf{\text{sparkling sugar}}$ or $\mathbf{\text{finely ground coconut}}$ for a snowy effect.
- **Stripes:** Use a piping bag or a fork to drizzle a contrasting color (like red or white) over the $\mathbf{\text{green coating}}$ after it has set but before it has fully hardened.
Conclusion: A Decadent Lesson in Thermal Stability
The **Little Debbie Christmas Tree Cake Ball** is an excellent example of using **food science for convenience**. The recipe relies on the $\mathbf{\text{high-fat binder}}$ of the frosting to create a dense, stable core, and the **rapid-setting property** of the $\mathbf{\text{compound candy melts}}$ to form a durable, moisture-sealing exterior. The $\mathbf{\text{chilling step}}$ is the key to managing the temperature differential, ensuring a smooth, crack-free coating and a festive, delicious holiday treat.
Frequently Asked Questions:
Q: Why did my cake balls crack after the candy melt hardened?
A: Cracking occurs due to $\mathbf{\text{temperature differential}}$. If the cake balls were $\mathbf{\text{too cold}}$ (frozen solid) or the $\mathbf{\text{candy melts were too hot}}$, the rapid expansion/contraction creates stress on the coating. Ensure the cake balls are only $\mathbf{\text{chilled (not frozen)}}$ and the candy melts are only $\mathbf{\text{just melted and thinned}}$ (see Tip Box).
Q: My coating is dull and sticky, not shiny. What happened?
A: This is usually caused by **overheating** the candy melts (Step 8). Overheating denatures the stabilizers and separates the fat from the sugar, resulting in a dull, thick, or grainy coating. The coating should be melted gently and kept in a warm (but not hot) state during dipping.
Q: Can I use homemade buttercream instead of the tub frosting?
A: $\mathbf{\text{Yes, but be cautious}}$. Homemade buttercream has a much higher liquid content and is less stable than commercial tub frosting. You may need to use $\mathbf{\text{significantly less}}$ homemade frosting (start with $\mathbf{10 \text{ oz}}$) to achieve the correct, firm dough consistency for shaping.
Q: How can I make my tree shapes more uniform?
A: Use a $\mathbf{\text{small cookie scoop}}$ to portion out the cake mixture before shaping (Step 6). This ensures a uniform volume. After scooping, use your palm and fingers to roll it into a ball first, and then gently taper one end to form the cone/tree shape.