Step 1: Making the Candy Dough
- **Combine Wet Ingredients:** In a medium bowl, combine the **sweetened condensed milk, $\frac{1}{2}$ teaspoon of peppermint extract**, and the optional **softened butter** and **salt**. Stir until smooth.
- **Add Sugar:** Gradually add the **powdered sugar**, mixing with a wooden spoon or stand mixer (using the dough hook) until a stiff, cohesive dough forms. The dough will look crumbly at first but will come together.
- **Knead:** Turn the mixture out onto a clean, lightly dusted work surface. **Knead briefly** (1–2 minutes) until the dough is smooth and uniform, soft like clay, and no longer sticky. If the dough is too sticky, add powdered sugar 1 tablespoon at a time. If too dry, add milk 1 teaspoon at a time.
Step 2: Coloring the Dough
- **Divide:** Divide the smooth white dough into three equal parts. Leave one part white.
- **Color Red:** Take the second part and place a small drop of **red gel food coloring** onto the dough. Knead thoroughly until the color is evenly distributed. Add more coloring as needed to reach the desired shade.
- **Color Green:** Repeat the process with the third part of the dough, using the **green gel food coloring**.
Step 3: Shaping the Mints
- **Option A: Rolling/Cutting:** Roll each colored dough piece to about **$\frac{1}{4}$ to $\frac{3}{8}$ inch thickness**. Use small, festive cookie cutters (stars, trees, circles) to cut out shapes. You can also use a sharp knife to cut simple squares or rectangles.
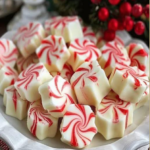
- **Option B: Rolling/Pinching:** Roll small portions of dough into $\frac{1}{2}$-inch balls. Place them on a piece of parchment paper and gently press the top center with a fork to create a classic **butter mint press design**.
- **Option C: Molds:** Press small amounts of dough into **silicone candy molds** (often used for chocolate or clay). Pop them out immediately and lay them on parchment paper.
Step 4: Drying and Serving
- **Dry:** Lay the finished peppermints on a parchment-lined tray. Leave them **uncovered at room temperature for 12–24 hours**. This step is crucial, as it allows the surface of the mints to dry out slightly, forming a light “crust” while keeping the interior soft.
- **Store:** Once the surface is dry, store them in an airtight container.
- **Serve:** Serve the soft peppermints chilled or at room temperature.
Serving and Storage: Maximizing Softness
Serving Presentation
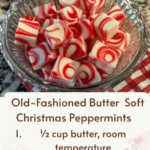
Arrange the mints on a holiday platter alongside other cookies and candies. The vibrant red, green, and white colors make them a beautiful centerpiece. They are often served after dinner with coffee or hot cocoa.
Storage and Longevity
- **Airtight Container:** Once dried for 12–24 hours, store the finished mints in an **airtight container** at **room temperature** for up to **2–3 weeks**.
- **Freezing:** The finished peppermints can be frozen. Place them in a single layer on a tray until solid, then transfer to a freezer-safe bag for up to 2 months. **Thaw completely overnight in the refrigerator** before bringing them to room temperature.
- **Avoiding Humidity:** Because the main ingredient is powdered sugar, humidity is the enemy. Store them in a cool, dry place to prevent them from becoming sticky or weeping.
Tips: Troubleshooting and Achieving the Signature Texture
Tip 1: The Magic of Gel Coloring
Always use **gel food coloring** (or paste coloring). Liquid food coloring contains water, and even a small amount can drastically change the consistency of the dough, making it too sticky and requiring much more powdered sugar, which can result in a grainy, hard final product. Gel coloring delivers vibrant color without the extra moisture.
Tip 2: Perfecting the Dough Consistency
The dough is ready when it is soft, pliable, and **feels like soft playdough**. If it crumbles and breaks apart when kneading, it is too dry—add a few drops of milk or condensed milk. If it sticks to your hands, it is too wet—dust with more powdered sugar. The dough should not require excessive effort to shape.
Tip 3: Why Dry the Mints?
The 12–24 hour drying process is essential. It allows the moisture on the surface to evaporate, forming a **thin, protective crust**. This layer keeps the mints from sticking together in the container and preserves the soft, creamy interior. Do not cover them during this initial drying period.
Variations: Customizing the Flavor and Presentation
1. Classic Butter Mints
For a traditional, non-Christmas variation, use only **white** dough and swap the peppermint extract for **vanilla extract**. This creates a classic, buttery wedding or party mint.
2. Chocolate Peppermints
Before adding the powdered sugar, stir **1–2 tablespoons of unsweetened cocoa powder** into the wet ingredients. This creates a chocolate peppermint dough that can be shaped and striped with the white mint dough.
3. Layered Candy Canes
For a beautiful candy cane look, roll a thin rope of white dough and a thin rope of red dough. Twist them gently together, then roll the twisted piece until it is smooth and elongated. Curl the end into the shape of a cane before drying.
Advanced Tips: Preparation and Efficiency
Tip 4: Clean Color Change
When switching between colors (especially from white to red/green), always **wipe down your work surface and clean your hands or the dough hook** thoroughly. Even a tiny bit of red will tint the entire green batch pink.
Tip 5: Quick Shaping Method
For high-volume production, roll a small portion of dough into a thin log (about $\frac{1}{2}$ inch thick). Use a **pizza cutter** or sharp knife to slice the log into small $\frac{1}{2}$-inch pieces. Then, simply press a fork into the top of each piece (as in Option B) for a quick, uniform shape.
Tip 6: Achieving Uniform Size
If aiming for uniform size for a professional look, use a **kitchen scale** to weigh the small balls before shaping, or use a **$\frac{1}{2}$-teaspoon measuring spoon** to scoop out the dough, ensuring every mint is the same size.
Conclusion: The Essential Soft Candy for the Holidays
These Soft Soft Christmas Peppermints are the quintessential holiday candy—easy to make, customizable, and guaranteed to delight anyone who enjoys a refreshing, creamy confection. The simplicity of the ingredients belies the wonderful, melt-in-your-mouth texture.
Enjoy these festive, flavorful mints all season long!
Frequently Asked Questions: Troubleshooting and Prep
Q: Why are my peppermints grainy or hard?
A: The ratio of powdered sugar to condensed milk was likely too high. This often happens if **too much powdered sugar was added** when kneading, or if you **used too much liquid food coloring**. The excess sugar makes the final mint hard and grainy rather than soft and creamy.
Q: My mints are sticky even after drying. What do I do?
A: This is usually a sign of high humidity or insufficient drying time. Try placing them back on the parchment paper for another 12 hours. If they are already sticky, gently toss them in a small amount of **extra powdered sugar** to coat the surface before storing.
Q: Can I use milk instead of sweetened condensed milk?
A: No. Sweetened condensed milk is necessary because of its **high fat and sugar content** and thick consistency, which binds the powdered sugar into a dough. Regular milk is too thin and will not create the required dough structure.
Q: What if I don’t have peppermint extract?
A: You can substitute with **spearmint extract** for a softer mint flavor, or you can use **vanilla extract** for a classic “butter mint” flavor. You can also mix **$\frac{1}{2}$ teaspoon of almond extract and $\frac{1}{4}$ teaspoon of peppermint extract** for a cherry-mint flavor profile.